With this series, I hope to share ideas on developing React components that are safer from bugs and easier to maintain.
To explain and exemplify the principles involved, we'll be building a Multilevel-list. We'll go from requirements to a fully functional React component. Along the way, we'll touch on the topics of:
- Using TypeScript to:
- Prevent bugs
- Make code safer to change
- Designing data structures to reduce possible bugs
- Structuring components for testability
- What tests to write and at what level
Requirements
Our Multilevel-list component has the following requirements:
- Show items content
- Collapse sub-lists of items
- Expand sub-lists of items
- Accessible to key-board users
Before we go on, it's important to keep in mind the role and limitations of requirements.
Requirements exist to form an understanding between clients and developers on what we want to build. We know both parties are aligned enough to start development if they can come up with acceptance tests to verify the requirements.
In this context, an acceptance test doesn't imply an automated test. It can be a simple sentence about the system that we can say it's true or false. For example, an acceptance test to verify the requirement "Accessible to keyboard users" could be "We can collapse or expand any sub-list using only the keyboard".
Requirements won't fully specify the software behavior, meaning there will be a margin for interpretation. For example, for "Accessible to keyboard users" we could implement navigation with keyboard arrows or tabs. We make these decisions by using our experience and talking with the client if it impacts the business.
Defining the views
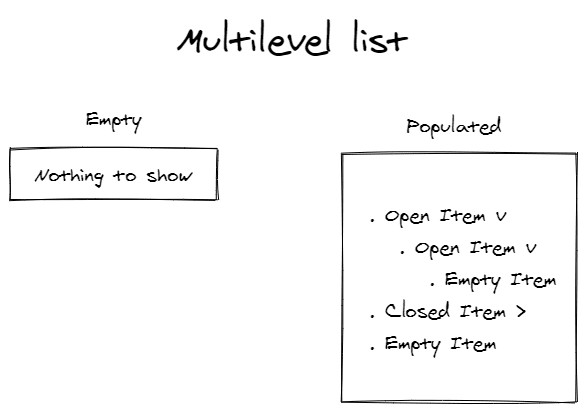
After looking at the requirements, we come up with some sketches of the component.
Through the sketches, we can start to decompose the component into views.
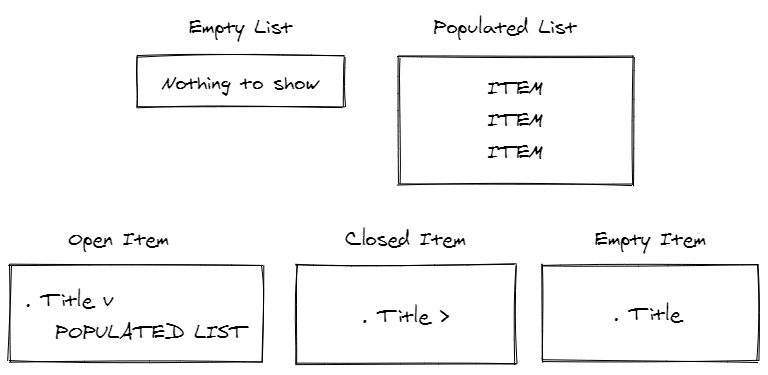
I suggest we model the Multilevel-list around two entities: lists and items. A list can either be empty or populated with items. An item can either be open, closed, or empty. Open items show populated lists.
In all, we decomposed the component into the below five views:
Designing the data structure
Now that we've defined the views and know the requirements, we can work on a data structure to support the component.
There are multiple concerns when designing a data structure besides fulfilling behavioral requirements. Required memory, ease of manipulation, and operations performance are some of them. In this article, we'll focus on reducing the space of invalid representations and having a 1 to 1 mapping between types and views. These concerns will minimize the chances for bugs and make the code easier to maintain.
As we've seen earlier, a list can either be empty or populated. An empty list has no items associated, and a populated list has at least one.
We can represent those invariants as follows:
type MultiLevelList = EmptyList | PopulatedList
type EmptyList = []
type PopulatedList = NonEmptyArray<Item>
type NonEmptyArray<T> = [T, ...T[]]
An item is either empty, opened, or closed. All items have content that's text. Empty items don't have a populated list of items, while closed and open items do.
type Item = OpenItem | ClosedItem | EmptyItem
type OpenItem = {
  id: string
  content: string
  state: "OPEN"
  children: PopulatedList
}
type ClosedItem = {
  id: string
  content: string
  state: "CLOSED"
  children: PopulatedList
}
type EmptyItem = {
  id: string
  content: string
  state: "EMPTY"
}
// Note: Although not influencing any view,
//  we'll need the id's to render the items using React.
Invalid states
Notice how there's very little room to represent an invalid state of a Multilevel-list. Compare it with the type below that we could also use to represent an Item:
type Item = {
  id: string
  content: string
  isOpen: boolean
  isClosed: boolean
  isEmpty: boolean
  children?: PopulatedList
}
This structure of Item gives much more margin to represent invalid states. It allows some invariants of Item to be violated, which previously couldn't. For example, it's now possible to describe an item that's simultaneously open and closed. Another example would be an open item that doesn't have an associated list.
Invalid states are a huge source of bugs. If we can structure our data to make those states impossible and rely on a type checker to enforce them, we will:
- Reduce possible bugs
- Make code easier to understand
- Save lines of code spent on code to deal with inconsistent states
Overall, we'll bring down the development and maintenance costs.
1 Type to 1 View
Currently, we have a 1 view to 1 type relation. This allows, when rendering, to code branch over types instead of conditions. This approach's advantage is that now we can rely on TypeScript's exhaustive checking to tell us if we handled all possible views at compile-time.
Following this approach and given the current types, the rendering code will follow the pattern below:
if (isEmptyList(list)) {
    return <div>/*render empty list*/</div>;
  }
if (isPopulatedList(list)) {
    return <div>/*render populated list*/</div>;
}
assertNever(list);
// isEmptyList() and isPopulatedList() are type guards

...

switch (item.state) {
  case "OPEN":
    return <div>/*render open item*/</div>
  case "CLOSED":
    return <div>/*render closed item*/</div>
  case "EMPTY":
    return <div>/*render empty item*/</div>
  default:
    return assertNever(item)
}

function assertNever(x: never): never {
  throw new Error("Unexpected object: " + x)
}
Exhaustive checking might not seem a big deal when we've just written the code. However, as time goes by and code changes, we'll introduce new types. Forgetting, or not knowing, that there's code we need to update to handle the new type is likely. With exhaustive checking that's not a problem, the compiler will tell us where we have to make changes.
If you want to know more about exhaustive checking and how the compile error happens, you can check the documentation.
Still room for invalid states?
You may have noticed that it's still possible to represent some invalid states with the current data structure. In specific, a Multilevel-list can contain the same item twice. This shouldn't happen as it will cause bugs. However, there's no way to enforce this restriction at compile-time. In these situations, it's important to find other options to make the restriction explicit. Documentation is one way to do it.
Taking all into consideration, we end up with the following:
/*
 * Invariants:
 *  There shouldn't be repeated Items
 */
type MultiLevelList = EmptyList | PopulatedList
type EmptyList = []
type PopulatedList = NonEmptyArray<Item>
type NonEmptyArray<T> = [T, ...T[]]

type Item = OpenItem | ClosedItem | EmptyItem
type OpenItem = {
  id: string
  content: string
  state: "OPEN"
  children: PopulatedList
}
type ClosedItem = {
  id: string
  content: string
  state: "CLOSED"
  children: PopulatedList
}
type EmptyItem = {
  id: string
  content: string
  state: "EMPTY"
}

// Type guards. Necessary to distinguish between types.
function isPopulatedList(list: MultiLevelList): list is PopulatedList {
  return list.length > 0
}
function isEmptyList(list: MultiLevelList): list is EmptyList {
  return list.length === 0
}
Next Steps
In the next article, we'll look at how to structure our multilevel-list component to be easy to test and what tests to write.
Enjoyed this article? Then follow me on Twitter. I tweet about what I believe it's essential to be a great software developer.


Top comments (0)