In this tutorial, you learn about the following topics
- Introduction to Fauna and Fauna Add-on For Netlify
- Introduction to FaaS with Fauna and Netlify.
- Build a Notes application with Netlify functions ( Clone the application from GitHub).
- Explain the code and processes involved in setting up Fauna Add-on for the Netlify application built in this tutorial.
- Test our application.
Feel free to navigate through the different sections of the article using the content list provided.
Fauna add-on for Netlify
Serverless computing are services that offer developers an increasingly higher levels of abstraction in the form of serverless offerings. These services are exposed to the developers as APIs that are consumed in applications to reduce or remove the hassle of handling the operational complexity within these applications. Fauna provides a flexible, developer-friendly, transactional database delivered as a serverless, secure and scalable cloud APIs. This means that our database is provided as a “client-serverless” application through serverless APIs. These “client-serverless” applications are written as rich, browser-native clients.
Fauna Add-on Netlify as an integration makes it easy to use Fauna as the apt database for your Netlify sites and functions. Netlify is a serverless computing company that offers hosting services, and serverless backend services for web applications and static websites. Now with Fauna Add-on Netlify, we can configure and implement a Netlify-specific database, and whilst creating this database, an access token is created and stored in a secured environment variable. Through this means the Fauna Add-on Netlify tool provides us with the basic resources needed to start building Netlify serverless functions that connects to the FaunaDB solely.
Introduction to FaaS with Fauna and Netlify
The term FaaS, also know as “Functions as a Service”, is a category of the clouding computing that allows developers to develop, run and manage application functionalities (microservices) without the hassle of maintaining this infrastructure. The underlying concept is the event-driven computing paradigm wherein application code, or containers, only run in response to events or requests. This means your application executes serverless code in response to events happening within your application.
Fauna is a serverless cloud database that offers fast and reliable global access to database via modern APIs, like GraphQL, without sacrificing data consistency. Fauna database can be accessed via HTTPS and there is no cross-database data contamination. Netlify as a serverless platform hosts our serverless applications that communicates with these databases.
Build a notes application with Netlify functions
Now let’s set up the Notes application using npm and netlify-cli, and as well configure some default settings on the project. With Netlify CLI, we can set up continuous deployment for our project through the terminal, even run development server or deploy our project.
Before we continue any further, let’s clone the below repository on GitHub into a Add-on-netlify folder. This folder would be automatically created while running the git clone command. Then we’ll setup CI/CD on this folder using the Netlify CLI tool.
git clone https://github.com/IkehAkinyemi/fauna-add-on-netlify Add-on-netlify
Now we’ve created a folder named Add-on-netlify, let’s change directory into it:
cd Add-on-netlify
And inside it we’ll install dependencies that would be used in building our project:
npm i netlify-cli -g
npm install faunadb
This above command would install the Netlify CLI globally on our local system, and installs JavaScript Driver for FaunaDB. We’ll use the JavaScript Driver to make HTTPS requests to our database to perform the CRUD operations on it. Netlify CLI would help us setup our Netlify application without using the Netlify UI. All the configuring and hosting would be done through the terminal.
Setting up Fauna add-on for the Netlify application
Let’s setup and configure Netlify for our project by running the below commands, while providing the right response to the questions needed by netlify-cli to configure our project:
netlify init

What would you like to do? Create & configure a new site
? Team: Ikeh_Chukwuka_Favour's team
Choose a unique site name (e.g. the-great-IkehAkinyemi-site.netlify.app) or leave it blank for a random name. You can update the site name later.
? Site name (optional): faunadb-add-on-netlify

Site Created

Site ID:   3d3b27bd-3f93-4968-acae-81ff45c69980
? Your build command (hugo build/yarn run build/etc): yarn run build
? Directory to deploy (blank for current dir): dist
? Netlify functions folder: netlify
Adding deploy key to repository...
Deploy key added!

Creating Netlify GitHub Notification Hooks...
Netlify Notification Hooks configured!

Success! Netlify CI/CD Configured!

This site is now configured to automatically deploy from github branches & pull requests
With the above success message, we have successfully linked this project to the Netlify. And at the same time setup CI/CD on the repository, https://github.com/IkehAkinyemi/fauna-add-on-netlify. This means that any update we push to this repository reflects on the deployed application on Netlify.
Next, let create and add “fauna” to our deployed application as a add-on.
netlify addons:create fauna
# Add-on "fauna" created for faunadb-add-on-netlify
Now let’s authenticate the Add-on, this way we’re actually setting up the database using the Fauna website that the command will open on our browser.
netlify addons:auth fauna
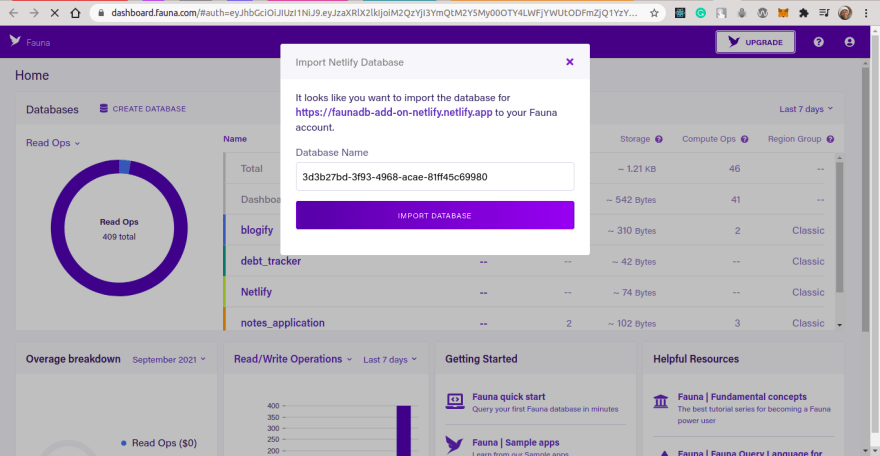
The above command would either open a sign up page on the Fauna website, or login page if you already have an account or the page to rename the default name given to your database if already logged in. Here, we’ll use the default name, 3d3b27bd-3f93-4968-acae-81ff45c69980, and import it into our account. After this, we now have full access to interact with this database.
Once imported, click on the database and navigate to the Security page through the sidebar to see the set of keys automatically generated for us. These keys are hidden and not accessible to anyone. The keys are stored in a private environment variables and the Netlify UI never displays them.
Configuring Fauna
We going to test our application to make sure everything is properly working. Before we continue, let’s navigate to the Collection page and create a Collection named notes. Click on the NEW COLLECTION button to create a collection as below:

After we have successfully created our new collection, we can now go back to our project and run a local development server using the netlify-cli tool.
netlify dev
◈ Netlify Dev ◈
◈ Injected addon env var: FAUNADB_ADMIN_SECRET
◈ Injected addon env var: FAUNADB_SERVER_SECRET
◈ Injected addon env var: FAUNADB_CLIENT_SECRET
◈ Ignored general context env var: LANG (defined in process)
◈ Ignored general context env var: LANGUAGE (defined in process)
◈ No app server detected. Using simple static server
◈ Running static server from "Notes backend/dist"
◈ Loaded function create.
◈ Loaded function delete.
◈ Loaded function jokes.
◈ Loaded function read.
◈ Loaded function update.
◈ Functions server is listening on 36151

◈ Static server listening to 34503

   ┌──────────────────────────────────────────────────┐
   │                                                  │
   │   ◈ Server now ready on http://localhost:42375   │
   │                                                  │
   └──────────────────────────────────────────────────┘
From the above output, we can see that the FAUNADB_ADMIN_SECRET, FAUNADB_SERVER_SECRET and the FAUNADB_CLIENT_SECRET as Injected addon env var. This means that Netlify is managing and providing us with this environment variables from a hidden source within our application. This provides security against hacks or security breaches within our applications. Also, from the output above, we have four serverless CRUD operations defined within our project. These serverless functions can be found in the /serverless directory.
Testing our Application
Now let open the url, http://localhost:42375/ in the browser. This is the local development port where the frontend of our project is hosted at:

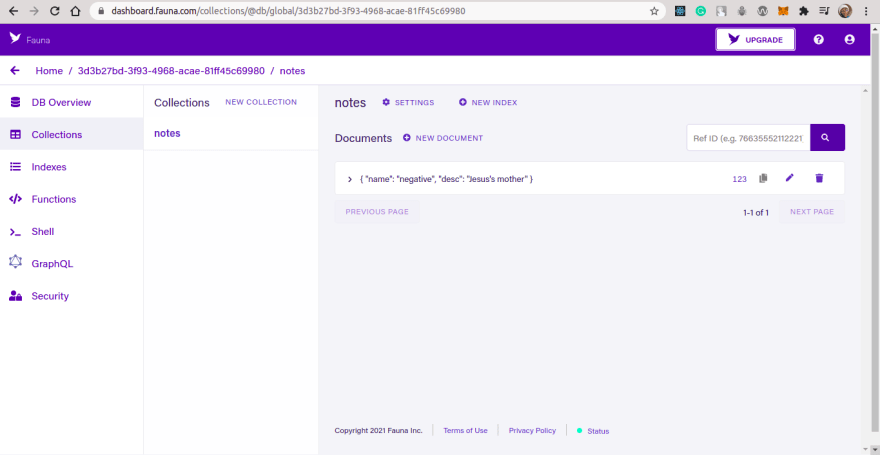
Next let’s click on the Create Note button which makes a fetch request to the serverless function, create, to create a Document on the database. Navigate back to the Fauna database page to confirm this action as below:

The data provided to this fetch request to create the Document can be found within the /dist/js/main.js file.
Next action is to create a new index. Navigate to the Indexes page to create an index. Searching documents in Fauna can be done by using indexes, specifically by matching inputs against an index’s terms field. Click on the NEW INDEX button to create an index. Once in create index screen, fill out the form: selecting the collection we’ve created previously, then giving a name to our index. In this tutorial, we will name ours all_notes. We can now save our index.

Next, click on the Read All Notes button to get the Documents created on the database. Check the terminal for the response as we used the console.log function to output the response there.
Request from ::1: GET /.netlify/functions/read
[
  {
    ref: Ref(Collection("notes"), "123"),
    ts: 1632442835420000,
    data: { name: 'Todo-list', desc: "Patrick's mother" }
  }
]
Response with status 200 in 864 ms.
Next, we insert a new document. You can find this document in github repo. Let’s click on the Update Note button and navigate back to the Fauna database page to confirm this action as below:
Now let’s perform the last CRUD action which is the delete action on our database. Click on the Delete Note button and navigate back to the Fauna database page to confirm this action as below:

Now we don’t have Document in our collection as the deleteOne function had made a fetch request to the serverless action, delete, on our database.
Conclusion
I’m glad you followed the tutorial to this point, hope you’ve learned how to use Fauna Add-on Netlify tool to integrate Fauna into a Netlify site or functions. The combination of Fauna with Netlify concepts provides you the capacity to build great web application, from e-commerce application to Notes keeping application, or any web application without exposing your secret keys which would be stored and retrieved through the Add-on tool on the application. Here’s the GitHub link to code sample we used within our tutorial.

Top comments (1)
Thank you so much
The first Netlify/Fauna tutorial I found that is clear, straightforward and not full of bloat - love it