
If you’re into the day trading or interested in investing in the stock market, Twilio SMS API is one of the most useful tools you can use for your benefit. Today we’re going to build a Node.js app to get daily stock price updates of any specified stock by you using Twilio SMS API.
In this tutorial you’ll learn how to use Twilio SMS API with Node.js and Third-party Stock API, You’ll also learn how to create API endpoints using Node.js and how to use PostgreSQL with Node.js as well.
Prerequisites:
- Node.js and npm installation on your local machine
- PostgreSQL installation on your local machine
- A free Twilio account
- An active Twilio phone number
- Basic knowledge of JavaScript and Node.js
- Basic Knowledge of SQL (optional)
If you haven't already installed Node.js on your local machine you can do so from nodejs.org and from there you can download node.js for your operating system, make sure you download the LTS version, that’s recommended for most use cases including ours.
Twilio account setup:
If you haven't already set up your Twilio account, you can sign up for a free Twilio account from here.
After setting up the account, get a Twilio phone number to get SMS updates from the Node.js app we’re going to build. If you’re on a Trial account the cost of the phone number will be applied from there.
Node.js project setup:
Create a folder called stock-daily-app, open Terminal and navigate inside the folder using
`cd stock-daily-app`. To initialize the project type, npm init. Go through the options by clicking enter, give the repository name stock-daily-app.
Now we’ll install all the required packages via npm, we’ll install express as the backend framework to create APIs, twilio npm package to access Twilio SMS API, pg to connect to our local PostgreSQL database, node-schedule to schedule daily updates, and finnhub to get current stock price data.
To install all these, type on the terminal;
npm install express twilio pg node-schedule finnhub
and press Enter.
We need some other packages also as dev dependencies. On the terminal type,
npm install dotenv nodemon –save-dev
and then press Enter.
We’ll use dotenv to store all the API secret keys as environment variables and nodemon will help us to automatically restart our node app whenever any file changes will occur without the need for any manual restart.
Now that we’ve installed all of the required packages for our Node.js app, one last thing remaining is to change the start script in package.json and write nodemon index.js instead, now whenever we’ll start the app we’ll type just npm start
After installing all the dependencies your package.json file will look something like this.
{
  "name": "stock-daily-app",
  "version": "1.0.0",
  "description": "Node.js App for Daily Stock Price Update",
  "main": "index.js",
  "scripts": {
    "start": "nodemon index.js"
  },
  "author": "Kausik Das",
  "license": "ISC",
  "dependencies": {
    "express": "^4.17.3",
    "finnhub": "^1.2.11",
    "node-schedule": "^2.1.0",
    "pg": "^8.7.3",
    "twilio": "^3.75.0"
  },
  "devDependencies": {
    "dotenv": "^16.0.0",
    "nodemon": "^2.0.15"
  }
}
PostgreSQL database setup:
If you haven't already installed PostgreSQL on your local machine, go to postgresql.org and click on the download button and then choose your Operating System (OS), and then you’ll see the Download the installer option, click on that and it’ll redirect you to another website then choose the latest version of PostgreSQL and click on the download button for your OS.

After downloading the installer, run it and follow along with the instruction to install PostgreSQL on your machine. If you have any issues setting up PostgreSQL or want to learn it, you can check this resource for that, and also you can visit the official docs from here.
After completing the setup search for the psql shell on your machine and opening it up, it’ll look something like this.
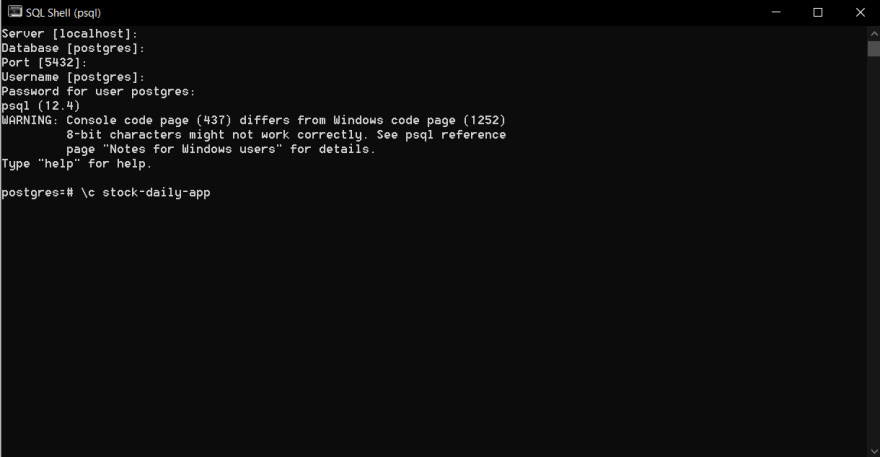
Go through the option using Enter and then put the password that you set up while installing PostgreSQL. Now type \l to see all the existing databases. We’ll create a database as well. Type CREATE DATABASE “stock-daily-app” Enter and our database is created, navigate inside the database using \c stock-daily-app
Now we’re all ready to start writing actual code for our Stock Daily Node.js App.
Setup environment variables:
Open the project folder on your code editor, here I’m using my favorite Visual Studio Code (VSCode), you can use your own choice of code editor. Navigate inside the stock-daily-app folder and create a file called *.env*, here we’re going to store all our API secret keys and all the sensitive info of our app.
Now go to your Twilio console and there you’ll find *AccountSID, AuthToken*, and the Twilio Phone Number you’ve got before under the Account Info section, all phone numbers should be E.164 format with a + and country code. Copy these three pieces of info and paste them on the .env file as environment variables, it’ll look something like this.
TWILIO_ACCOUNT_SID=paste-twilio-account-sid-here
TWILIO_AUTH_TOKEN=paste-twilio-auth-token-here
TWILIO_PHONE_NUMBER=paste-twilio-phone-number-here
Database config:
Now create a file called *db.js*, here we’ll write all the config code to connect to our local PostgreSQL database that we’ve just created. Here we’re using the ***pg*** npm package to connect to our database. Here is the code for that.
const { Pool } = require("pg");

// dev server config
const pool = new Pool({
  user: "postgres",
  password: "paste-your-postgresql-password-here",
  host: "localhost",
  port: 5432,
  database: "stock-daily-app",
});

//...
Now we're going to create a table called *users* with four fields(columns) of *name, phone, symbol*, and *status*. Here is the code for that, paste below the config code.
//...previous code

// Users Table
const createUsersTable = async () => {
  try {
    await pool.query(
      "CREATE TABLE users(id SERIAL PRIMARY KEY, name VARCHAR(255) NOT NULL, phone VARCHAR(255) NOT NULL UNIQUE, symbol VARCHAR(255) NOT NULL, status VARCHAR(255) NOT NULL)"
    );
  } catch (err) {
    console.error(err.message);
  }
};
createUsersTable();

module.exports = pool;
Send SMS using Twilio:
Create a file called *send_sms.js*, here we’ll put the code to get SMS updates. In the *accountSid* variable, we’ve used the environment variable we added before, the same way we’ve accessed *authToken* also. In the sendMsg function we’ve used two parameters called phoneNumber and dailyUpdate, we’ll access these two in the index.js file which we’ll create in some time. Here is the code below for *send_sms.js*, paste it there.
require("dotenv").config();

const accountSid = process.env.TWILIO_ACCOUNT_SID;
const authToken = process.env.TWILIO_AUTH_TOKEN;

const client = require("twilio")(accountSid, authToken);

const sendMsg = async (phoneNumber, dailyUpdate) => {
  const msg = await client.messages
    .create({
      from: process.env.TWILIO_PHONE_NUMBER,
      body: dailyUpdate,
      to: phoneNumber,
    })
    .then((message) => console.log(message.sid));

  return msg;
};

module.exports = sendMsg;
Setup finnhub for stock price:
We’ll use finnhub to collect the current stock price. Open finnhub.io and signup there. Then go to your finnhub dashboard and you’ll find the API key and a Sandbox API Key, for now, we'll use the Sandbox API Key for testing purposes, later if you decide to deploy it for public use, you can use the actual API Key for production.
Now go to the *.env* file and paste the Sandbox API Key there and the .env file will look something like this below.
TWILIO_ACCOUNT_SID=paste-twilio-account-sid-here
TWILIO_AUTH_TOKEN=paste-twilio-auth-token-here
TWILIO_PHONE_NUMBER=paste-twilio-phone-number-here
FINNHUB_API_ACCESS_KEY=paste-finnhub-sandbox-api-key-here
Create API endpoints:
Create a file called *index.js*. We’ll be using *express* to create the APIs, first require that on top of the file, then require *finnhub* and *node-schedule* for scheduling the daily SMS updates. Also, require the dotenv to access our environment variables. We’ve installed all these at the start of this tutorial.
We’ve to import the two files already created *send_sms.js* and *db.js*, we don’t have to put .js when requiring them, you can see below.
const express = require("express");
const finnhub = require("finnhub");
const schedule = require("node-schedule");
require("dotenv").config();

const sendMsg = require("./send_sms");
const database = require("./db");

const api_key = finnhub.ApiClient.instance.authentications["api_key"];
api_key.apiKey = process.env.FINNHUB_API_ACCESS_KEY;
const finnhubClient = new finnhub.DefaultApi();

const app = express();
const PORT = 3000;

app.use(express.json());
Now we’ll create a route */stock* for a POST request, here the users will submit their *name, phone*, and *symbol* for the stock they want to get daily SMS updates. You can see we’ve created the route and created those variables in *req.body*.
( If you don’t know what API routes and endpoints are, routes are the URL to get access to the API, in our case it’s http://localhost:3000/stock and the endpoints are the actions we’ll perform on the route like POST, GET, PUT and DELETE. One route can have multiple endpoints. )
//...previous code

// for new users
app.post("/stock", async (req, res) => {
  try {
    const { name, phone, symbol } = req.body;
    const user = {
      name,
      phone,
      symbol,
    };

//...
Now we’ll insert the new user to our PostgreSQL database, if you’re familiar with SQL queries you’ll get it quickly, otherwise, we’ve added the code below, we’ll insert all the user data into the *users* table which we’ve written the code for in the *db.js* file.
//...previous code

// for new users
app.post("/stock", async (req, res) => {
  try {
    const { name, phone, symbol } = req.body;
    const user = {
      name,
      phone,
      symbol,
    };

    // new user created
    const newUser = await database.query(
      "INSERT INTO users(name, phone, symbol, status) VALUES($1, $2, $3, $4) RETURNING *",
      [user.name, user.phone, user.symbol, "start"]
    );

//...
Now call the *finnhubClient* to get the *currentPrice* of the user-specified stock, you can see the code below. Here *user.symbol* is the user-specified stock symbol that the user will submit when calling the API endpoint. The *data.c* is the current price of the specified stock. We’ve used JavaScript Template Literals to add those variables in the string. You’ll get this text as an SMS when you call this endpoint.
Now inside the *finnhubClient*, we’ll call the schedule function to schedule the alert at 11:00 AM every day, you can choose your own time or modify it as needed. If you’re familiar with cron jobs, it'll be similar to that. If you want to learn about it you can do so from here.
Now inside the schedule function call the sendMsg function and here we’ll add those two variables user.phone and stockPriceUpdate as arguments which we’ve added in the send_sms.js file. You can see the code below.
//...previous code

// for new user
app.post("/stock", async (req, res) => {
  try {
    const { name, phone, symbol } = req.body;
    const user = {
      name,
      phone,
      symbol,
    };

    // new user created
    const newUser = await database.query(
      "INSERT INTO users(name, phone, symbol, status) VALUES($1, $2, $3, $4) RETURNING *",
      [user.name, user.phone, user.symbol, "start"]
    );

    finnhubClient.quote(user.symbol, (error, data, response) => {
      const currentPrice = data.c;
      const stockPriceUpdate = `Hi ${user.name}. Today ${user.symbol} stock price is $${currentPrice} USD`;

      schedule.scheduleJob("* 11 * * *", () => {
        sendMsg(user.phone, stockPriceUpdate);
      });
    });

    res.status(200).send({
      message: `Thank you ${user.name}, we received your request. you'll receive ${user.symbol} price update shortly via SMS`,
      data: newUser.rows[0],
    });
  } catch (err) {
    console.error(err.message);
  }
});

//...
Now we’re fully ready to call the endpoint we’ve just created. For testing purposes change the 11:00 AM time to 5 minutes later than your current time to get the SMS 5 minutes later.
To call the API endpoint, first open the project folder in the integrated terminal and run the server using the command *npm start,* it’ll look something like this.

Now, open Postman, it's an amazing tool to test APIs, you can do more things on it but I used it mostly to test APIs, if you don't have it already, get it from here. In Postman paste this URL http://localhost:3000/stock and set it as POST and then go to the body tab and put your **name, *phone,* and *symbol* for the stock you want to get the price for, all data should be inside quotes.
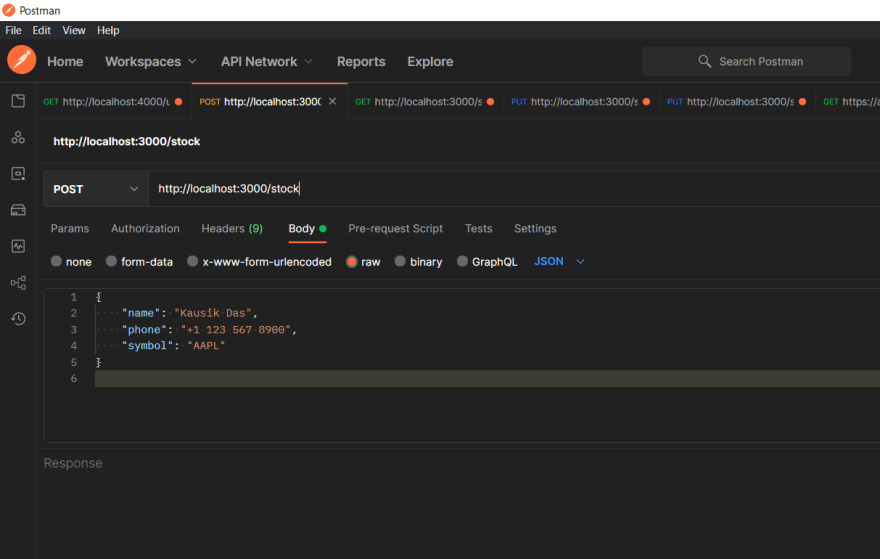
Now click send, if all things are right as described above you’ll see a message something like this on Postman, and a stock price alert will come to the phone number you've given. Here you can see a screenshot below.

Now that we’ve successfully created our first endpoint, let’s quickly build the rest. So the second endpoint will be for existing users, now that you’ve already added your credentials in the database, next time you start the server you don’t have to post everything again, you just have to put your phone number to match our existing details, that’s why we’ll make it a GET request. You can see the code below. Here we’ve queried the symbol and the name from our database using the phone number to use it for the alert and the rest is almost the same as the previous endpoint.
//...previous code

// restart alert for existing user
app.get("/stock", async (req, res) => {
  try {
    const { phone } = req.body;
    const user = {
      phone,
    };

    const getSymbol = await database.query(
      "SELECT symbol FROM users WHERE phone=$1",
      [user.phone]
    );

    const getName = await database.query(
      "SELECT name FROM users WHERE phone=$1",
      [user.phone]
    );

    finnhubClient.quote(getSymbol.rows[0].symbol, (error, data, response) => {
      const currentPrice = data.c;
      const stockPriceUpdate = `Hi ${getName.rows[0].name}. Today ${getSymbol.rows[0].symbol} stock price is $${currentPrice} USD`;

      schedule.scheduleJob("* 11 * * *", () => {
        sendMsg(user.phone, stockPriceUpdate);
      });
    });
    res.status(200).send({
      message: `Thank you ${getName.rows[0].name}, we received your request. you'll receive ${getSymbol.rows[0].symbol} price update shortly via SMS`,
    });
  } catch (err) {
    console.error(err.message);
  }
});

//...
We’re almost done now with just one last endpoint to change the stock symbol. If you want to get price alerts for any other stock instead of the current stock, then first stop the server with ctrl+c on your terminal and then call this endpoint to change the symbol with the new stock symbol. Here we’re doing a PUT request to update the symbol using the phone in our database. You can see the code below.
//...previous code

// change stock symbol
app.put("/stock", async (req, res) => {
  try {
    const { phone, symbol } = req.body;
    const user = {
      phone,
      symbol,
    };

    // update symbol
    const updateSymbol = await database.query(
      "UPDATE users SET symbol=$1 WHERE phone=$2 RETURNING *",
      [user.symbol, user.phone]
    );

    res.json(updateSymbol.rows[0]);
  } catch (err) {
    console.error(err.message);
  }
});

app.listen(PORT, () => {
  console.log(`Twilio Node.js Server is running at port ${PORT}`);
});
Hurray! Well done. You’ve just completed your own Node.js App to get daily stock price updates. Feel free to experiment with it, you can add more functionality and endpoints to modify existing users or delete a user or get more info of the stock or multiple stock prices at the same time, sky is the limit.
Happy Coding! 😄
My Twitter @ikausik_


Top comments (0)