
Without downloading any installation media
Sometimes you might need to quickly spin up a VM for some testing or safe experiments. The typical way to do this is to download the installation media (usually some ISO image), attach it to the VM instance and start the installation process. However, there is a much simpler solution to bootstrap Debian/Ubuntu installation in QEMU over the network without downloading a single ISO.
Debian/Ubuntu installation media types
When it comes to installation media Debian (and its derivative distribution Ubuntu) provides various installation media types for different needs:
- full installation CD and DVD images
- CD images for network install
- even smaller CD images for network install (also known as
mini.iso)
Full CDs/DVDs
Debian generally offers two flavours of these: a CD image, which is around 650 MB (actually, for amd64 the current stable "Buster" image is 694 MB) and a bunch of DVD images up to 4.4 GB in size. For a simple standard installation we should be fine with a CD image. Even if we require extra packages and need to use the DVD, Debian recommends downloading only the first DVD image (1 of 3 at the time of this writing) and download the rest, if required by the installer.
Ubuntu images are categorised a bit differently: the project offers a "Desktop" image, which is around 2.6 GB for the current 20.04.1 LTS "Focal Fossa" release and a "Server" image, which is around 914 MB! Desktop images are... well if we want to install Ubuntu on a desktop and server images, as you may have guessed already, are for server installations. The main difference is desktop images will install a graphical user interface by default, while server images will not (although we can install one later). It is also worth mentioning that Ubuntu installation images are live CDs: we can run Ubuntu directly from the CD without needing to install it. Finally, Ubuntu also offers variations of a "desktop" image with alternative graphical user interfaces: Kubuntu with a KDE based desktop, Xubuntu with a Xfce based desktop etc. The default desktop for Ubuntu is GNOME by the way.
Network install images
Using a full CD/DVD is usually useful only in specific scenarios, for example:
- we want to provision many machines at once (so we download the software once and use it multiple times).
- installing Linux on a machine not connected to the Internet (very unlikely use case in today's connected world - probably, only useful for some security critical setup).
For a simple one-off single setup in almost all other cases we may be better off with the installation over the network. There are two major reasons for this:
- with network install we only download packages we actually need: for example, if we want to run a simple HTTP server, we don't need to download the GNOME desktop (which would be included in the full installation CD).
- software updates: modern Linux distributions regularly publish software updates (usually much more often than they produce installation CDs), so right after the installation from the CD is complete we would likely need to check for updates and download new versions of some packages. With network install we get the latest and greatest from the start and don't download packages just to immediately overwrite them with a newer version.
So if the network install is much better, why do we have "network install CDs"? Well, an empty machine (or a VM) can't just do complex OS installation on its own, because it is empty (has no software). We need the installer software to solve the chicken and egg problem of installing software. These "network install CDs" provide just that: a minimal live operating system (Linux as well) to launch the installer, which will download and install the full operating system for us (often allowing us to customise and personalise the installation in the process).
If we search for Debian network install, most likely we'll find this page offering us to download a "minimal bootable CD" for Debian installation over the network. Debian claims these CDs should be between 150 MB and 300 MB in size depending on the architecture, but the current "Buster" image for amd64 is 336 MB (still a lot, but more than half the size of the full CD).
The mini.iso
If you're wondering why do we need a 336 MB CD image just to bootstrap a simple installer, which downloads packages from the Internet, you're not alone. However, both Debian and Ubuntu provide another variant of the installation media, known as mini.iso (you can get the Debian Buster one here). These are indeed much smaller (only 48 MB for Debian Buster installation on amd64), but do the job of network installation equally well. They are a bit tricky to find though as there are not many links from the official documentation pointing to those images. Nevertheless, if you need to install Debian/Ubuntu and you have to use an ISO, I recommend the mini.iso as it provides a truly minimal installer bootstrap.
Installing Debian/Ubuntu in QEMU without any installation media
48 MB is good, but what is better? 0 MB, of course! In addition to downloading less we get the benefit of not having these leftover garbage ISO files lying around after the installation is complete. This is not always possible though, but for a specific use case of "bootstrapping a Debian/Ubuntu VM in QEMU" is quite doable.
Let's create a QEMU disk image, which will host our installation (we're creating a 16 GB image below, but you may adjust the capacity for your needs):
$ qemu-img create -f qcow2 test.img 16G
Now if we start a QEMU VM with this disk image, we would see something like below:
$ qemu-system-x86_64 -nographic -m 4G -hda test.img
SeaBIOS (version 1.12.0-1)


iPXE (http://ipxe.org) 00:03.0 C980 PCI2.10 PnP PMM+BFF900F0+BFED00F0 C980


Booting from Hard Disk...
Boot failed: not a bootable disk

Booting from Floppy...
Boot failed: could not read the boot disk

Booting from DVD/CD...
Boot failed: Could not read from CDROM (code 0003)
Booting from ROM...
iPXE (PCI 00:03.0) starting execution...ok
iPXE initialising devices...ok


iPXE 1.0.0+git-20190125.36a4c85-1 -- Open Source Network Boot Firmware -- http:/
/ipxe.org
Features: DNS HTTP iSCSI NFS TFTP AoE ELF MBOOT PXE bzImage Menu PXEXT

net0: 52:54:00:12:34:56 using 82540em on 0000:00:03.0 (open)
  [Link:up, TX:0 TXE:0 RX:0 RXE:0]
Configuring (net0 52:54:00:12:34:56)...... ok
net0: 10.0.2.15/255.255.255.0 gw 10.0.2.2
net0: fec0::5054:ff:fe12:3456/64 gw fe80::2
net0: fe80::5054:ff:fe12:3456/64
Nothing to boot: No such file or directory (http://ipxe.org/2d03e13b)
No more network devices

No bootable device.
Our QEMU VM tried to boot from the disk first, but obviously failed, because the disk is new and empty. Next, it tried to boot from a... floppy 💾! Although, there is even an emoji for it, I will not cover anything about floppies here (and if someone doesn't know what a floppy is, just click here). Next, it tried to boot from a CD/DVD, but we did not attach any ISO images to this VM, so failed again. Finally, it tried to PXE-boot - a standardised form of machine network boot, but it requires supporting infrastructure on the local network: properly configured DHCP and TFTP servers. QEMU can actually emulate those for us with tftp= and bootfile= options (for details, see QEMU networking documentation), but we still need to provide the actual bootfiles, so in the end this option is not better than just attaching a mini.iso to our VM.
We may notice though, that the PXE-boot option in QEMU is implemented via iPXE - a popular open source bootloader and network card firmware. The nice thing about iPXE is that it is much "smarter" than the traditional network card firmware and can communicate over more common HTTP protocol rather than the very old PXE-boot protocols, suitable only for the local network. And that means we can just use iPXE to boot our VM straight from the Internet over HTTP!
We'll use just that to bootstrap our Debian/Ubuntu installation. But where do we get the installer from? The same online folder, which hosts the mini.iso also has a folder named debian-installer, which has an architecture specific folder inside (currently amd64 only). There we will find a bunch of files, but we need only two: linux - the installation environment Linux kernel image, and initrd.gz - the userspace portion of the installation environment (the installer itself). Now let's try to get these into QEMU directly with iPXE.
Start the QEMU (we're using the -nographic command line option to leave the console output in the terminal instead of the default QEMU-emulated monitor - this is useful to be able to copy-paste long debian installer HTTP links later):
$ qemu-system-x86_64 -nographic -m 4G -hda test.img
When it gets to the PXE-boot stage we will briefly see:
Press Ctrl-B for the iPXE command line...
We need to quickly press Ctrl+B here to interrupt the PXE-boot stage and get into the iPXE shell (if you missed the opportunity, just reboot the VM and retry):
iPXE>
Now we can direct iPXE to download the Debian installer from the Internet and launch it. But first, we need to configure the network card in iPXE. If you're using the default QEMU user networking mode (like we do here), QEMU will simulate a DHCP server for you and the VM will be NAT-ed to the Internet through the host machine. So all we need to do, is DHCP the network interface:
iPXE> dhcp net0
Configuring (net0 52:54:00:12:34:56)...... ok
Next we will instruct iPXE to download the installer kernel (linux) and the initrd (initrd.gz) directly from the online netboot folder via HTTP:
iPXE> kernel http://ftp.debian.org/debian/dists/buster/main/installer-amd64/curr
ent/images/netboot/debian-installer/amd64/linux console=ttyS0
http://ftp.debian.org/debian/dists/buster/main/installer-amd64/current/images/ne
tboot/debian-installer/amd64/linux... ok
iPXE> initrd http://ftp.debian.org/debian/dists/buster/main/installer-amd64/curr
ent/images/netboot/debian-installer/amd64/initrd.gz
http://ftp.debian.org/debian/dists/buster/main/installer-amd64/current/images/ne
tboot/debian-installer/amd64/initrd.gz... ok
Notice that we've added the console=ttyS0 command line option for the kernel. This is because we run QEMU with the -nographic option and our VM input/output is done via an emulated serial port. So we need to tell the booting kernel to redirect its primary console to this serial port as well.
Finally, let's boot the downloaded installer:
iPXE> boot
Probing EDD (edd=off to disable)... o
[    0.000000] Linux version 4.19.0-13-amd64 (debian-kernel@lists.debian.org) ()
[    0.000000] Command line: console=ttyS0
[    0.000000] x86/fpu: x87 FPU will use FXSAVE
[    0.000000] BIOS-provided physical RAM map:
[    0.000000] BIOS-e820: [mem 0x0000000000000000-0x000000000009fbff] usable
[    0.000000] BIOS-e820: [mem 0x000000000009fc00-0x000000000009ffff] reserved
[    0.000000] BIOS-e820: [mem 0x00000000000f0000-0x00000000000fffff] reserved
[    0.000000] BIOS-e820: [mem 0x0000000000100000-0x00000000bffdffff] usable
[    0.000000] BIOS-e820: [mem 0x00000000bffe0000-0x00000000bfffffff] reserved
[    0.000000] BIOS-e820: [mem 0x00000000fffc0000-0x00000000ffffffff] reserved
[    0.000000] BIOS-e820: [mem 0x0000000100000000-0x000000013fffffff] usable
[    0.000000] NX (Execute Disable) protection: active
[    0.000000] SMBIOS 2.8 present.
[    0.000000] DMI: QEMU Standard PC (i440FX + PIIX, 1996), BIOS 1.12.0-1 04/014
...
When it finally boots, we will see the familiar Debian installation window:
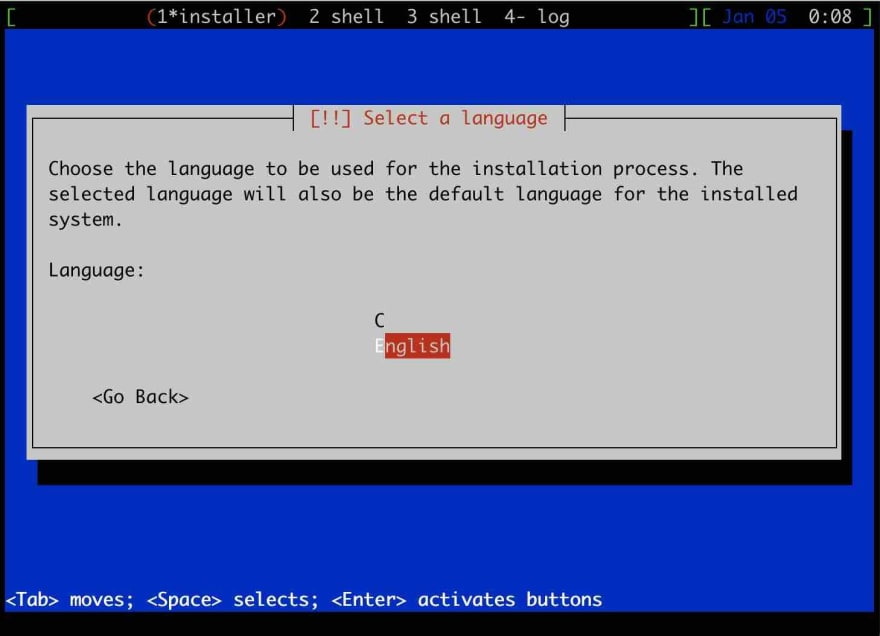
At this point we can proceed with the installation as if we've booted from the mini.iso, but we've downloaded only 34 MB (5 MB for linux and 29 MB for initrd.gz) and won't have any leftover ISO files lying around, when the installation is complete.
It is worth noting that the same approach works, if we run QEMU in UEFI mode.
Security considerations
One downside of this approach is that we've downloaded the installer over non-encrypted HTTP: even though the upstream iPXE supports HTTPS, it is not enabled in the QEMU builds as of now. This means we might not be able to fully trust the running software on our VM, but it is probably OK for simple testing and experiments. If you're concerned about the security of the installation, use the mini.iso approach instead.

Top comments (0)