
A SOCKS proxy server can serve various purposes, and in this guide, we'll explore how to set up one using Dante on Google Cloud. One common use case arises when you're running your applications on a serverless solution, and external services request your service's static public IP for whitelisting. Since we know that serverless solutions limit direct IP provision, employing a SOCKS proxy can be a versatile solution. All requests to the external service can be routed through the SOCKS server. It is advisable to assign a public static IP for the SOCKS server in this kind of solution. Another common use case we will consider in this article is enhancing privacy and security. We will be setting up our sock server to route all requests through the dynamic public IP address assigned to the server instance when created. For a guide on how to host this on AWS, you can click here.
Requirements
To set up a SOCKS proxy server, you'll need:
- A Google Cloud account
- A firewall rule
- A virtual machine (VM) instance
Firewall Rule Setup
Go to the GCloud console, navigate to VPC Network > Firewall.
Click on "Create Firewall Rule."
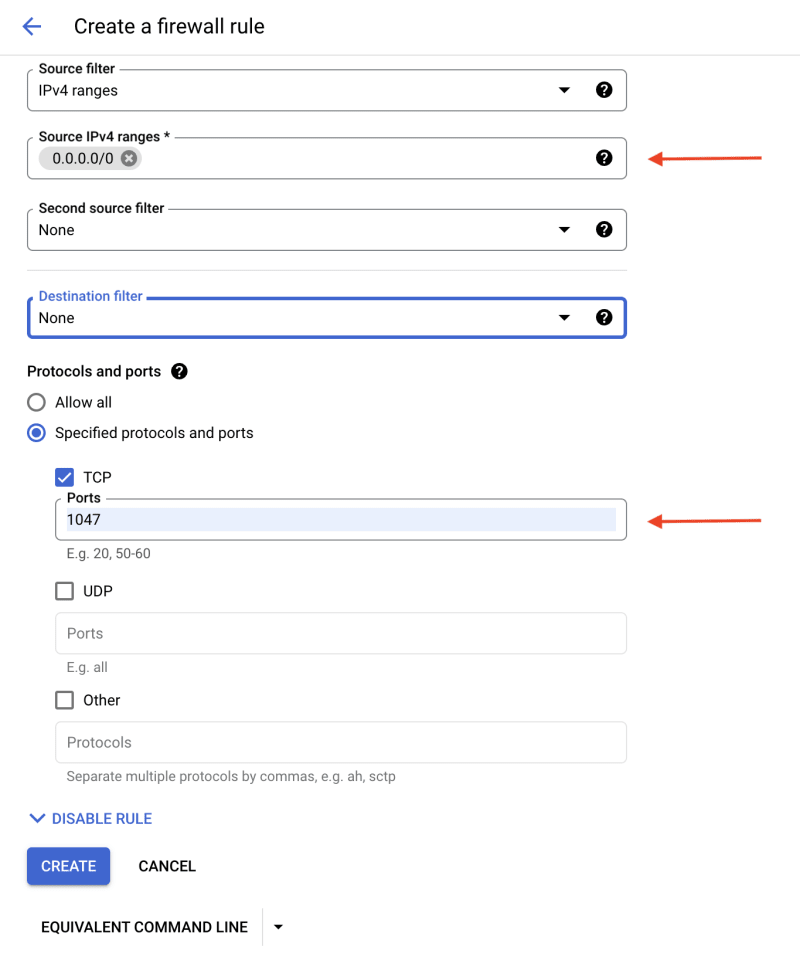
Name the rule (e.g., 'allow-sock-1047') and create a target tag that will be used to tag the VM. In this case, we are using the rule name as the target tag.

Set the rule to allow traffic on your desired port. For this guide, we will be using port 1047. You can apply additional security rules, such as IP restrictions, as needed.
VM Instance Setup
Navigate to Compute Engine > VM Instances.
Click on "Create Instance."
Name your instance (e.g., 'sock-server') and set the location to your preference.
Choose an appropriate machine type (e.g., e2-micro to reduce costs).

Under Advanced Options and Networking, add the 'allow-sock-1047' tag (firewall rule tag).
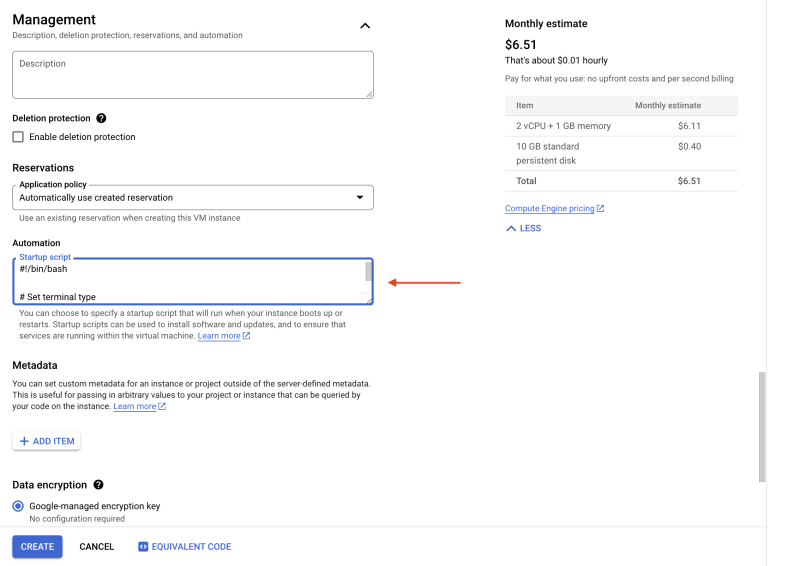
In the Management section, paste the provided script into the automation text field, then click create.
script
#!/bin/bash

# Set terminal type
export TERM=xterm-256color

# Variables - update these
SOCK_USERNAME="socksproxy"
SOKSPROXY_PASS="socksproxy"
SOCK_PORT=1047

# Function to print stage
print_stage() {
    local TEXT="$1"
    echo -e "\n\e[32m\e[1m $TEXT \e[0m\e[32m"
}

print_stage "Updating System and installing dante-server"
# Install gcc, make, and curl
apt-get update
apt-get install -y gcc make curl

# Download and install dante-server
curl -O https://www.inet.no/dante/files/dante-1.4.3.tar.gz
tar xvzf dante-1.4.3.tar.gz
cd dante-1.4.3
./configure
make && make install

# Create danted configuration file
cat <<EOF | tee /etc/sockd.conf
logoutput: /var/log/sockd.log
internal: 0.0.0.0 port = ${SOCK_PORT}
external: ens4
clientmethod: none
socksmethod: username
user.privileged: root
user.notprivileged: nobody
client pass {
    from: 0.0.0.0/0 to: 0.0.0.0/0
    log: error connect disconnect
}
socks pass {
    from: 0.0.0.0/0 to: 0.0.0.0/0
    log: error connect disconnect
}
EOF


# Add socksproxy user
print_stage "Adding ${SOCK_USERNAME} user"
useradd -r -s /bin/false ${SOCK_USERNAME}
echo "${SOCK_USERNAME}:${SOKSPROXY_PASS}" | chpasswd

# Start sockd
/usr/local/sbin/sockd -D

print_stage "Installation Completed"

# Get public IP address
PUBLIC_IPV4=$(curl -s -H "Metadata-Flavor: Google" http://metadata.google.internal/computeMetadata/v1/instance/network-interfaces/0/access-configs/0/external-ip)

# Display configuration details
print_stage "Configuration Details:"
echo -e "\033[1mIP:\033[0m ${PUBLIC_IPV4}"
echo -e "\033[1mUsername:\033[0m ${SOCK_USERNAME}"
echo -e "\033[1mPassword:\033[0m ${SOKSPROXY_PASS}"
echo -e "\033[1mPort:\033[0m ${SOCK_PORT}"
Script Explanation
For brevity, we'll focus on the Dante configuration in the script. For more configuration options you can visit here. The script uses Dante version 1.4.3 which is the latest at the time of writing this article. Version 1.5 is currently in testing phase and it is set to roll out first quarter of this year.
logoutput: /var/log/sockd.log: Specifies the path for the log file. In this case, it will be stored at /var/log/sockd.log.
internal: 0.0.0.0 port = ${SOCK_PORT}: Configures the internal IP address and port on which the SOCKS server will listen for incoming connections. The variable ${SOCK_PORT} is used to set the specified port (in this case, 1047).
external: ens4: Defines the external network interface to bind to. In this script, it uses the interface ens4.
clientmethod: none: Specifies that clients connecting to the SOCKS server do not need to authenticate.
socksmethod: username: Specifies that the SOCKS server will use username/password authentication for connections.
user.privileged: root: Sets the privileged user for the SOCKS server to root.
user.notprivileged: nobody: Sets the non-privileged user for the SOCKS server to nobody.
client pass { … }: Defines a rule allowing connections from any IP (0.0.0.0/0) to any destination. It logs errors related to connection and disconnection.
socks pass { … }: Similar to the client pass rule, this allows SOCKS connections from any IP to any destination and logs related errors.
Once the instance is running, SSH into it to view the script log using sudo journalctl -u google-startup-scripts.service. Please note that the script might take a while to complete due to the compilation of Dante and the use of a small machine type.
You can also rerun the startup script from the SSH terminal by using sudo google_metadata_script_runner startup. This could be useful when you edit the instance startup script and need to rerun it manually.
Testing the SOCKS Proxy
- Check if the configured port is open using:
nc -zv ${IP} ${PORT}
- Verify the SOCKS server functionality by curling Google's home page with the command:
curl -v -x socks5://${USERNAME}:${PASS}@${IP}:${PORT} https://www.google.com
SOCKS Usage
In browser
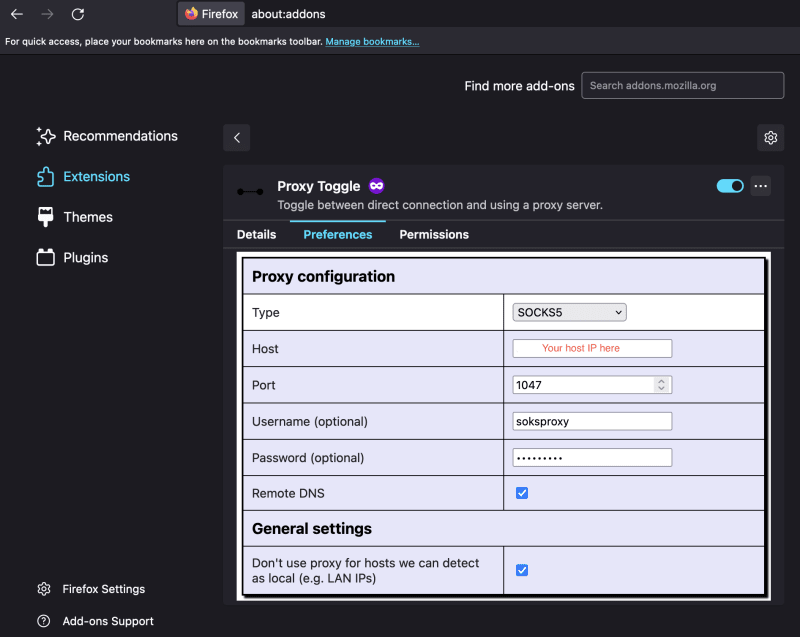
Install the Proxy Toggle Firefox extension and configure it with the SOCKS settings to route browser traffic through the SOCKS server.
In code
Use Axios in JavaScript with the socks-proxy-agent module for making requests through the SOCKS server.
import axios from 'axios';
import { SocksProxyAgent } from 'socks-proxy-agent';

// Get socks config from the environment. - Assuming the variables are available
const { SOCKS_HOST, SOCKS_PORT, SOCKS_USERNAME, SOCKS_PASSWORD } = process.env;

// Setup proxy agent
const socksV5Agent = new SocksProxyAgent(`socks5://${SOCKS_USERNAME}:${SOCKS_PASSWORD}@${SOCKS_HOST}:${SOCKS_PORT}`);

// Create socks axios instance
const socksClient = axios.create({
    httpsAgent: socksV5Agent,
    httpAgent: socksV5Agent,
});

// Use the instance
(async () => {
    try {
        const { data } = await socksClient.get('https://api.ipify.org');
        console.log(`Our socks IP is ${data}`);
    } catch (error) {
        console.error('Error fetching IP:', error.message);
        // Handle the error as needed
    }
})();
Conclusion
In conclusion, this guide has equipped you with the knowledge and step-by-step instructions to seamlessly set up a SOCKS proxy server on Google Cloud using Dante. By following the outlined procedures, from firewall rule setup to the execution of the installation script, you can establish a robust SOCKS proxy server ready to meet your specific needs.


Top comments (0)