
Table of Contents
- Building Cryptocurrency Price Tracker
- What you'll learn
- Building main page UI
- Fetching data from API
- Binding Data to Widgets
- Completing onRowSelected action
- Conclusion
Building Cryptocurrency Price Tracker
As the digital currency industry is increasing with newcomers joining every day, several companies are creating unique tools to help traders obtain decent returns. The best Cryptocurrency Price Tracker can help traders to improve trading and take it to the next level. Coding such a tracker feels difficult, but Appsmith makes it easy.
Appsmith is a low code platform that makes creating Admin Panels, Dashboards and more 10x faster. This tutorial assumes you have basic knowledge of Appsmith, if you're new checkout their documentation page here
What you will learn
- Building two page application with Appsmith.
- Using API as Datasources.
- Connecting data fetched from API to application widgets.
- How to navigate to next page on Table row select.
- How to use Table, Image and other widgets.
Building main page UI
Now let's start with building our main page application. This page will contain a table that displays Market Rank, Current Price, Market Cap and other details. On selecting a row the user should be redirected to a new page and give some more details of the selected digital currency.
If you are new to Appsmith, its free to use so go ahead and create your account. After you log in you might be redirected to Appsmith Dashboard.
Follow the below steps to create UI:
- Click on Create New button on the right hand side. This will redirect to our newly created app.
- Our app now has a default name as Untitled Application 1.
- Rename the app as Cryptocurrency Price Tracker.
- On the left hand side menu under Widgets section, drag and drop the Table widget. We'll use this Table to show all details about each digital currency. The Table will have some default values, go into the property pane of Table and delete the default values. Later we'll load data from API.
- To give title to our app use Text widget and rename the Label as Today's Cryptocurrency Prices by Market Cap. You can resize the Text widget or change its text color as per your choice. You can see how our Page1 looks in the below image-

- On the left sidebar click on + icon next to Pages section. This will create new page that we'll navigate to whenever a row is clicked on the Table.
- This page will have default name as Page2.
-
Drag and drop a Container Widget on the canvas of Page2. Inside this container we'll create one Image widget and 8 Text fields like Market Rank, Mkt cap and other details. Rename Text fields as follows:
- Coin Price
- Market Cap
- 24h Low /24h High
- Trading Volume
- Market Cap Rank
- All-Time High
- All-Time Low
With this we are done building UI for both pages.
Fetching data from API
In this section, we'll learn to integrate API with our application. The API used in this app to get realtime and accurate data is taken from CoinGecko. CoinGecko provides analysis of crypto market. The API is publicly available, reliable and provides data for over 1,000+ coins such as Bitcoin, Ethereum and more.
So now lets see how to connect API to Appsmith.
At the left hand side menu, click on the + icon besides Datasources. This will show all the Datasources that Appsmith can connect to, you have to click on the CURL Import option under API section. Copy paste the CURL import below:
curl -X 'GET' \
 'https://api.coingecko.com/api/v3/coins/markets?vs_currency=usd&order=market_cap_desc&per_page=100&page=1&sparkline=false&price_change_percentage=1h%2C24h%2C7d' \
 -H 'accept: application/json'
After importing you'll see the Headers of the GET request already set. The CURL import sets the Headers for us. The GET request has a default name as "Api1", let us rename this as Fetch.
Now click on the Run Button and this will show all the data in JSON format in the Response Section. You can see the response in the image below.

And its done, you see how easy it is to integrate Api with Appsmith.
Binding Data to Widgets
Now that we are done fetching data, we have to connect it with our Table widget. Under the Table property pane you can see Table details, it contains default data so you have to delete that and copy paste below code snippet.
{{
    {{Fetch.data.map(val => ({
        "Rank": val.market_rank,
        "Symbol":val.symbol,
        "Image":val.image,
        "Coin":val.name,
        "1h":val.price_change_percentage_1h_in_currency,
        "24h":val.price_change_percentage_24h_in_currency,
        "7d":val.price_change_percentage_7d_in_currency,
        "Mkt Cap":val.market_cap,
    }))}}
}}
This will now show all details in our Table widget. You can see how our Page1 looks in the below image.
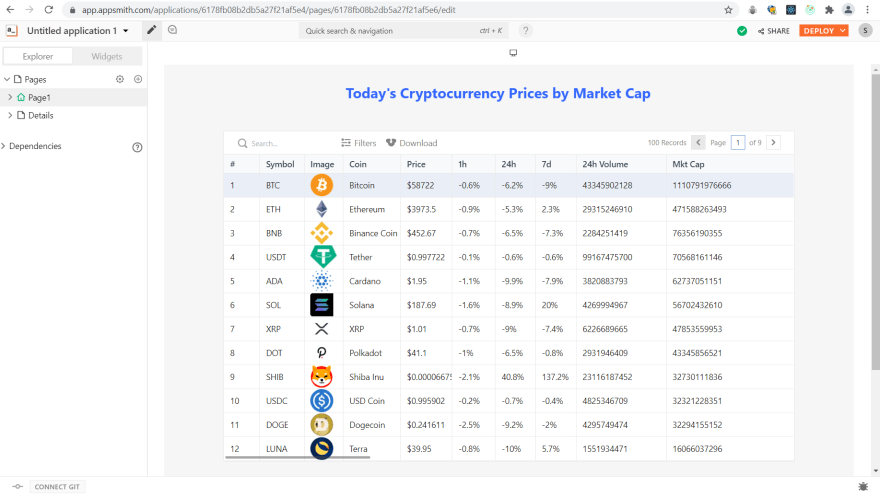
Awesome! our Main page is complete but we want to navigate our user to Page2 whenever a row on the Table is clicked. Lets see how to do this in the next section.
Completing onRowSelected action
In this section we'll learn how to navigate to next Page when a Table row is clicked. We'll also pass details from our Page1 Table to Page2.
When you go into the property pane of Table, you'll see list of Actions. Choose navigateTo() option under onRowSelected Action. Or you can even choose to write Javascript code and copy-paste below snippet-
{{navigateTo('Page2',Table1.selectedRow)}}
navigateTo method takes 2 arguments:
- First where to redirect(like Page2, Page3...)
- Next, queryparams that will provide info on Page2. Here we are passing the selected row's details to next page.
Now lets fill in the values in our Image and Text widgets-
- Image - appsmith.URL.queryParams.image
- Coin Price - appsmith.URL.queryParams.image
- Market Cap - appsmith.URL.queryParams.image
- 24h Low / 24h High - appsmith.URL.queryParams.low_24h / appsmith.URL.queryParams.high_24h
- Trading Volume - appsmith.URL.queryParams.total_volume
- Market Cap Rank - appsmith.URL.queryParams.market_cap_rank
- All-Time High - appsmith.URL.queryParams.ath
- All-Time Low - appsmith.URL.queryParams.atl
appsmith.URL.queryParams gives the value that we passed with navigateTo() method. With this our complete Page2 looks like this-

And we're done! here is how the complete application looks like-

Conclusion
You've seen how easy it is to build a Cryptocurrency Price Tracker with Appsmith. So if you want to create a app and have zero coding knowledge consider creating it with Appsmith. I hope you learned something useful here. Now, it is your turn. Go ahead and create a application with Appsmith.

Latest comments (0)