Hello everyone!
In this post, we will discuss about the interface VPC Endpoint, and how it permit to access AWS services from the private subnet without Internet access. Additionally, I will guide you on deploying this resource using the AWS Console and provide the Terraform code from my GitLab repository for deploying the proposed topology.
Introduction:
Interface VPC endpoints permit us to access specific AWS Cloud Services without the need to NAT Gateway, Internet Gateway, VPN, or a Direct Connect connection. As opposed to Gateway VPC endpoints that use the route table and a prefix list, as you've already talked about it on this link, interface endpoints create a Elastic Network Interface (ENI) in your subnet, so when you need to access an AWS Services from a private subnet you call it through an internal IP address or DNS created by own interface endpoint. This simplifies the routing and allows for more flexibility.
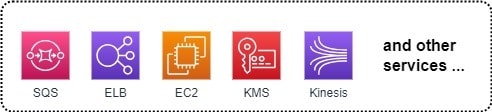
Follow some AWS services supported by interfaces endpoints:
Objective:
After introduction about the Interface VPC endpoint, and some importants points that highlights its importance, let's move to our example scenario to learn in the practice. Now, we are going to create an interface VPC endpoint to access the AWS SQS Queue service through the endpoint, and also send a message from our private EC2 instance to SQS queue created for testing the connectivity.
Scenario proposed:
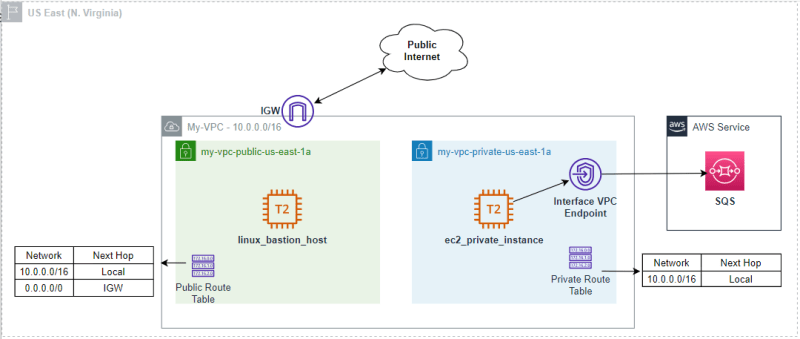
Note: I assume you know how to create the VPC, subnets, SG, route tables, so this post will only focus on deploying the resources to create the Gateway endpoint.
Deployment steps:
1 - Creating the Policy to allow send messages for the SQS Queue
In IAM dashboard, click on Policies, and then click create policy button

Click on JSON button, paste the policy and click in Next at the bottom of the page

Json policy:
{
    "Version": "2012-10-17",
    "Statement": [
        {
            "Action": [
                "sqs:SendMessage"
            ],
            "Effect": "Allow",
            "Resource": "*"
        }
    ]
}
Define a name, description, check the access level, and click on the create policy button

Policy created

2 - Creating the Role, and assiging the policy created to it
On the IAM dashboard, click in Roles, and then create role button.

Select AWS service once that we will connect to the AWS SQS Queue service, and EC2 because this IAM Role will be used by EC2 Instaces to call AWS service. After select them, click in the next button.

Find the the policy name created on the step before, select it, and next.

Define a name, description, check the policy and click in create role


IAM Role created:

3 - Assigning the IAM Role created to the private EC2 instance
On the EC2 Instance dashboard, select the Private EC2 Instance, Action, Security and Modify IAM Role

Find the IAM Role created, select it and update IAM Role

3 - Creating the simple SQS Queue
Search for "sqs", and then click on the "Simple Queue Service"

Click on the Create queue button

Select the Standard queue, and define a name

At the Access Policy, select advanced mode, change the action from "SQS:*" to "SQS:SendMessage" what it will only permit to send message and let the SQS queue more safe, and then click on the create queue at the bottom of the page.


SQS Queue created:

4 - Creating the Interface VPC Endpoint for accessing the SQS Queue
In VPC dashboard, select Endpoint, and click in create endpoint button

Define a name, select AWS service, select com.amazonaws.us-east-1.sqs (type Interface), select the VPC, private subnet where the VPC endpoint will created a ENI, and select a Security Group with HTTPS traffic allowed to all Private subnet CIDR block.


At the end of the page click on the create endpoint button

Interface VPC endpoint created

5 - Check the connectivity
After some minutes, Interface VPC endpoint will be came available, so let's test the connectivity.
Accessing the Linux bastion host. I'm using my Key to access the Instances, but you should your own key.

Accessing the Private EC2 instance from the Bastion host

Now before send the message to the SQS Queue, let's validate some importants information.
On the VPC endpoint, the endpoint has a DNS name and it was assigned to a private subnet where an ENI as you can see below

Note: it's important to note that it was created many DNS records. the first one it's recommended to use when the source live in different Availability Zone of the VPC endpoint, but live at the same region. The second one it's recommended to use when the source live on the same Availability Zone of the VPC endpoint, and there is also the Private DNS names.
ENI assigned to the endpoint has an IP address what it belong to the private subnet what it's correct

Also the SQS Queue service created a DNS name too as you can see below

Now with these information in our hands, let's test the connectivity and send a message to the SQS Queue from private EC2 instance.
Example command to send a message to the SQS Queue, please, replacing the AWS Account ID and SQS Queue name at the URL (Documentation link)
aws sqs send-message --region us-east-1 --endpoint-url https://sqs.us-east-1.amazonaws.com/ --queue-url https://sqs.us-east-1.amazonaws.com/<AWS_ACCOUNT_ID>/<SQS_QUEUE_NAME> --message-body "Hello SQS, this is test send message."

Ok, I ran a nslookup to see if the DNS resolution was working fine, and it correct. It showed that the DNS resolution is translating to the IP address assigned to the the Interface VPC Endpoint. And after this test, it was be able to send a message to SQS Queue.
From SQS Queue dashboard we can validate if the message was arrived on the queue. Go to the SQS Queue dashboard,click on the "Send and receive messages" button, and then "Poll for messages".


After poll, you will see a message, and if you click on it you will see the message that it was used on the AWS CLI command.


After this validation we concluded our test.
If you would like to deploy this env via Terraform code as the purposed topology, so feel free to access my Gitlab repository to clone and deploy it. Before deploy via Terraform, replace the profile in provider.tf file and replace your Key_name at the EC2 instace code as per your own settings.
Conclusion:
In conclusion, we have discussed about the interface VPC Endpoint, and also we saw an example to deploy an endpoint. We can effectively deploy this solution to enhance our infrastructure. I trust that you found this discussion enjoyable.
Reference Link:
https://docs.aws.amazon.com/vpc/latest/privatelink/create-interface-endpoint.html
https://docs.aws.amazon.com/cli/latest/reference/sqs/send-message.html


Top comments (0)