Ever heard of this thing called FaceBook? Every once in a while we snap a pic that features our good side so much we just have to put it on display and make it our profile picture. When you hit that "Edit Profile Picture", it opens upon a window on our local machine to upload a file, bypassing the need to utilize a web URL from something like Imgur. I'll be walking you through how to do this using active storage via a patch request to a user in our database. This guide assumes a few things: You are using React front-end, Rails back-end, and have a database with a User that has a profile-picture type column to hold the file (we can add this last one if you don't). If those three things check out for you, then let's get started.
Setting up Rails
The first thing we need to do is install Active Storage. In your terminal, run this command:
rails active_storage:install
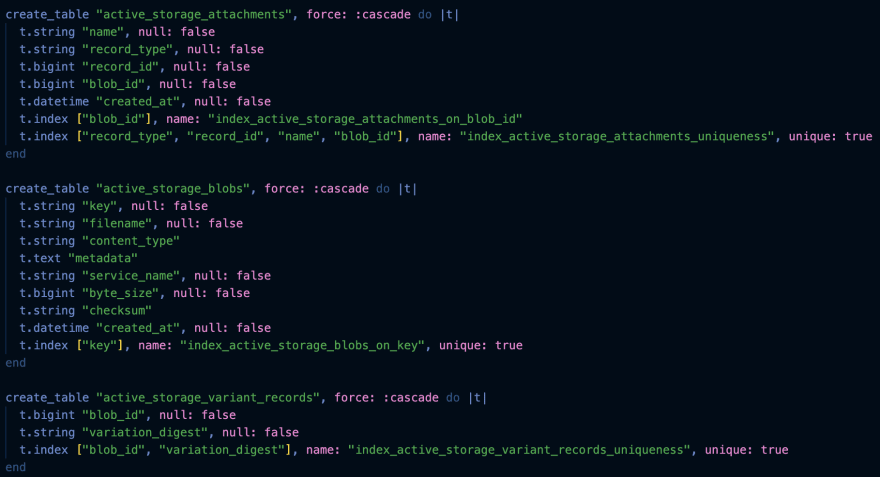
This will create some tables that handle most of the leg work for you. Check your migrations, you should see something like this:
All we need to do from here is migrate the changes.
rails db:migrate
For my project, I created a column in my User table called "avatar", with a data type of a string. The column can be called anything, but I suggest using something that indicates it should be some sort of file. If you check your schema, you'll see the migrated tables reflected from your migration.
Serializer
All you need to do here is replace the word avatar in my serializer with whatever column in your user table is supposed to hold the image file.
Do not forget to include Rails.application.routes.url_helpers!
Model association macro
In your user model, create a has_one_attached :avatar association.
Controller
Your controller can stay pretty much the same, just make sure in your params method you include the image attribute from your User table.
What if I don't have an image in my user table?
rails g migration addImageToUsers image
rails db:migrate
This will create a new table that adds the image column to our user table, and updates the schema when we migrate these changes.
Setting up React
For my project, I used MUI for styling. It doesn't change too much if you aren't using MUI, but this guide will show you the React setup with MUI.
State
This is all you need to hold the data when it comes to a patch request:
Form
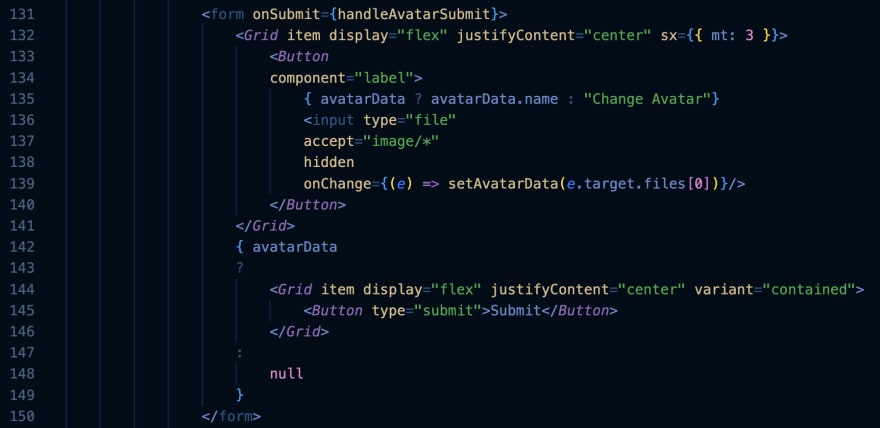
There's a few things going on here for the form, so let's go line by line.
- Line 131: Create the form element.
- Line 132: This grid item holds the button that we use to select the file from our local machine.
- Lines 133-140: The text in this button will change depending on if an image has been selected using a ternary expression. If the image has been selected, display the name of that image. If not, display "Change Avatar"
- Line 136: Input. Here we declare what type of input it is (136), what kind of file it can accept (137), the fact that it should be hidden (138), and the onChange function that will change our state variable to the image that we have selected (139).
- Line 142: Here is another ternary. If an image has been selected, then we will display the submit button that is responsible for running the function that makes our patch request. If no image is selected, no button will appear.
Making the request
Now it's time to write out our handleSumbit function that is responsible for carrying out our request. You will need a current user object in the component you're making request so Rails knows which user you are sending the patch request to.
In our new FormData() variable, we're setting the value of our image column on the database to the state variable holding the file, in this case a user's avatar. The string in our append represents what's in our schema, and the variable next to it represents the file that's been uploaded to our state variable.
For debugging purposes, if you want to check to see if a file has been uploaded before making the patch request, console.log(avatarData) outside of the patch request. When the file has been uploaded (but not sent), in your browser console you should see a file object holding the information about the file being uploaded.
That's it!
This is all you need to get Active Storage up and running. Having said that, getting Active Storage to run properly the first time you've learned it is... challenging. So here's some resources you can use to clarify any potential problems:
https://edgeguides.rubyonrails.org/active_storage_overview.html
https://dev.to/jblengino510/uploading-files-in-a-react-rails-app-using-active-storage-201c


Top comments (0)