
Testing is one of the essential steps in software development. Yet, testing and especially manual testing that clicks through the application is a tedious job that we often shy away from. But it doesn't have to be. With great tooling coming out over the past couple of years we now have what it takes to automate click-through testing in our build process. In this post, we will look at why manual or click-through tests are important and how to turn this tedious and bothersome task into a fun one that drives our development forward.
Restless readers can jump straight into the repo accompanying this post.
Why we need manual QA
From a developer point of view; testing and QA, especially manual QA can seem like an unreasonable burden placed on us to hamper our development velocity. While the developer community as a whole, as well as most of the management community, are slowly coming to their senses and seeing that writing well-tested and working code that forms a great product for users is way more valuable than squeezing in one more feature, we still frown on manual QA as a roadblock.
Manual test runs often turn into roadblocks.
But manual QA really isn't the issue we face. It is the way we use it. Originally manual QA comes from the realization that someone really should click through the finished website to make sure that it really works, before shipping it to customers. You can unit test the hell out of things, users and the real world can always break things. Thus we try our best to emulate real-world scenarios and users using manual QA.
Somewhere in the DevOps movement we realized that shipping small pieces of code and doing so often highly reduces the number of bugs we ship, makes our companies more able to react to user needs and market requirements as well as creates a good working environment for ourselves. Too often a big pain point in achieving a high release velocity is manual QA. Because for whatever reason our organizations require a full manual QA run for each release. This tempts us to stock up on features so that QA can process as much as possible at once (if you read the Phoenix Project, this is our heat treat often). We totally ignore that this is exactly what makes it hard to track down which of the dozens of commits introduced a bug and that by doing so we usually block development for a few days just to make a single release happen. We invent complicated procedures like a week of code freeze to create a "stable testing environment" that in reality it often turns out to be anything but stable.
Programming needs QA as much as any other industry does.
Still, we need manual QA just like any other industry does. But it is time to shift the focus. When we look at other disciplines we will always see manual QA, it is simply reassuring to have a human control that everything is going right. They are more flexible and more like the real world users than machines will be for a long while. But do you see quality assurance happen on every single, finished piece leaving traditional production chains? Of course not, that would be such a waste of time! When we build cars we don't need to check every single one. We take out one every so often to ensure the process runs smoothly and trust that the rest work just the same.
That is the mode of operation we want to achieve in software development as well. we make a release and we make dozens of them (maybe even per day). Every once in a while someone manually verifies a release and with that, we trust that the rest work just as well as this one did because we have trust in our processes.
Building trust
But we don't currently have that trust. Often enough companies are scared by experiences of deployments gone horribly wrong. And as a sad result they introduce cumbersome procedures meant to catch errors before they happen when in reality these processes cause the opposite and slow the company down. It is on us to rebuild this trust and to alleviate manual QA of the burden they currently carry. We can achieve this by automating the process QA manually goes through.
To go from where we are to where we want to be, which is not blocked by manual QA runs and releasing multiple times a day, we need to invest into automated testing as well as into building the trust within the organization that our code does what it's supposed to.
Today we will take a great step forward on this road by automating a click-through test for a website.
A simple web application
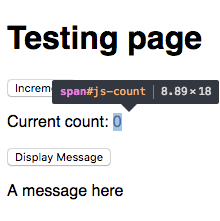
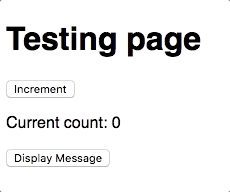
For today's test run, we will look at the website below which is a simple counter application. We will be able to hit a button "Increment" to increase the count by one. Furthermore, we will provide a button to display a message that was not previously seen, just to add more dynamic behavior for us to test.

And here is the code for the website:
<!DOCTYPE html>
<html>
<head>
  <meta charset="utf-8" />
  <meta http-equiv="X-UA-Compatible" content="IE=edge">
  <title>Testing Page</title>
  <meta name="viewport" content="width=device-width, initial-scale=1">
</head>
<body style="font-family: sans-serif">

  <h1>Testing page</h1>

  <!-- Counter interface -->
  <button data-test="button-increment" id="js-increment">Increment</button>
  <p>Current count: <span data-test="count-output" id="js-count"></span></p>

  <!-- Button to show a message -->
  <button data-test="button-display" id="js-display">Display Message</button>

  <script>

    // --- Counter ---
    let count = 0
    const incrementBtn = document.getElementById('js-increment')
    const countSpan = document.getElementById('js-count')

    incrementBtn.addEventListener('click', () => {
      count += 1
      countSpan.innerHTML = count
    })

    countSpan.innerHTML = count

    // --- Display ---
    document.getElementById('js-display').addEventListener('click', () => {
      const messageContainer = document.createElement('p')
      messageContainer.innerHTML = 'A message here'
      messageContainer.setAttribute('data-test', 'display')
      document.body.appendChild(messageContainer)
    })
  </script>
</body>
</html>
As you can see we have HTML that displays the count along with some buttons. Then we added some in-line JavaScript at the bottom to implement the logic. We expect the page to:
- Display when we visit it.
- Increase the count displayed when we click the "Increment" button.
- Display a message dialog when pressing the "Display Message" button.
Traditionally we would now manually click through this. We would host the website somewhere or locally run a web server to take a look. Then we would check that it opens and go through the requirements one by one. Let us make a computer do that for us.
The tools

We are going to use Jest, a framework for "Delightful JavaScript testing" as our testing framework. But you might as well use anything else that provides assertions. While we are going to use Jest here we will discuss things in a way so that we can also apply them to other tools.
Puppeteer will be our tool to automate the browser and interactions with it. Written by the Chromium Team Puppeteer provides an interface to the DevTools Protocol and can be used in combination with any browser supporting it. We will be using Puppeteer with the Chromium version that comes bundled with it.
For this post Jest was used in version 23.6.0 together with Puppeteer 1.11.0.
Apart from these, we will use live-server as a local web server. Using a local web server makes us independent of frameworks used. We will be able to test any website using this approach because no matter how you develop your site, be it React, Angular, Vue or some other flavor of the year framework, in the end, you will get a plain old website. And using this approach we can test them all.
I also decided that I would like ES6 module syntax in my code and included Babel to use import.
To get all of that into your project npm i --save jest puppeteer live-server.
Test environment Setup
Now that we have our toolbelt ready, it's time to dive into testing.
Earlier we said that before doing a manual test run we would host the website somewhere or run a local web server, we better do that in our test-suite before running our tests as well.
import puppeteer from 'puppeteer'
import { spawn } from 'child_process'

let browser
let serverProcess

// URL that the webserver will serve our website under.
const testUrl = 'http://localhost:8282'

beforeAll(async () => {
  // Wait until a local webserver is started to test against.
  await new Promise(resolve => {
    serverProcess = spawn('live-server', [`--port=${testUrl.split(':')[2]}`, '--no-browser'])
    // Better wait for a first response from the server to ensure the website is available.
    serverProcess.stdout.on('data', resolve)
  })

  browser = await puppeteer.launch({
    headless: false,
    slowMo: 100
  })
})
Here we remember the Puppeteer managed browser as well as a system process running our web server for all our tests by defining them as top-level variables. For now, we are telling Puppeteer to launch a browser that we can watch the tests being run in. We also slow this browser down using slowMo, later we will make this optional but it's always nice to see things happening when first trying them out.
Sadly we could not find a good web server solution that could be managed programmatically and live-server has an open issue about shutting down programmatically (see issue 196), thus we need to run it as a child process. It's basically like running the command live-server --port=8282 --no-browser in another terminal before doing your tests. We keep a reference so that we can later close the server.
beforeAll is a block that will execute once before any tests run. Thus it is the perfect place for our general setup. Here we use Puppeteer to launch a browser and wait for that to be done before using it to run our tests.
Of cause, we can't forget to shut all of this down once all our tests are done. For that Jest provides afterAll which will run once, after all, tests have finished. It is the perfect place to close our browser and web server.
afterAll(async () => {
  // Cleanup everything that is still running after all tests are through.
  serverProcess.kill()
  await browser.close()
})
While we start and stop the browser and web server for all tests we want to start with a clean, new tab for each individual test. We can achieve this using beforeEach and clean up in afterEach. We will also add a let page where we remember the browser as well so that our tests can access it.
beforeEach(async () => {
  // Get a new page for each test so that we start fresh.
  page = await browser.newPage()
})

afterEach(async () => {
  // Remember to close pages after tests.
  await page.close()
})
This will now open a new page for each test and store is always in the same variable named page that our tests have access to. Not that for your test-suite in your project you might or might not want to do it this way. For our website, it's nice to always start clean and we can achieve that by simply opening a new page for each test.
You might have noticed the extensive use of await within the code. We will continue to see that as the nature of all operations communicating with the browser are asynchronous. If you are unfamiliar with this Syntax, Mozilla has great docs on async and await.
Testing the site
Now it's finally time to write our first test!

We will wrap all our test for which we will use it blocks with the convention of "it should..." inside a describe block. As a quick recap: the idea behind this is to describe the part of an application tested and what it should do. With this we aim to get descriptive tests that precisely tell us what is broken, should they ever fail.
describe('Counter', () => {
  // "it" blocks go here.
})
As we would do in a manual test we will first make sure that we see the website. For that, we will check that a headline is present. We could also check to see if a specific text was in the headline but for us just having any headline will be good enough.
it('should have a headline', async () => {
  await page.goto(testUrl)
  await page.screenshot({ path: 'screens/basicRender.png' })
  const headlines = await page.$$('h1')

  expect(headlines.length).toBe(1)
})
This test navigates to the page that we want to test, finds all <h1> elements on it and expects to find exactly one h1 element on the page. We also decided to take a screenshot here. This can make it easier to check for what went wrong during a test or to debug your tests.
Congratulations, with your first test in place, it is time to run it. For that, we will follow nodes conventions and add a test script to our package.json. "test": "jest" will do the trick for us. Now you can run npm test and a browser will open and take a screenshot. Just make sure that you have a folder named screens that screenshots can be saved into.
Selecting Elements
The above verifies number 0 from the three things we want to check during our test. Next up is the counter itself and the displayed message.
- ✅ Display when we visit it.
- Increase the count displayed when we click the "Increment" button.
- Display a message dialog when pressing the "Display Message" button.
For the counter, we will want to check that it starts with 0 and then that it is incremented after we click a button. Checking the initial value is a simple matter of getting the contents of the <span> element that displays the count.
it('should initially have a count of 0', async () => {
  await page.goto(testUrl)
  const count = await page.$eval('[data-test="count-output"]', e => parseInt(e.innerHTML))
  await page.screenshot({ path: 'screens/initialCount.png' })

  expect(count).toBe(0)
})
Once again we visit the page and take a screenshot, but this time we also extract the initial value of the counter. Puppeteer provides many methods to interact with pages. Here we use $eval which takes an element selector that is used for a querySelect run on the page and as a second argument a function that gets the found element as it's input. The function passed to $eval is evaluated in the context of the page and its result becomes $evals return value. You can look up the full API in the official documentation.
Here we find an element identified by [data-test="count-output"] and then turn it's .innerHTML into an integer which we return. This exposes one crucial part of automated click-through testing. Our tests need to find the elements to interact with and run tests on. You could also solve this by searching for a certain text on the website but for sites with frequently changing text as well as for outputs we need a different way to select them.
A great approach is custom data-* attributes. Custom data attributes don't interfere with the rest of how web development works. They are here for exactly the case of an element needing some specific information that otherwise can't be provided.
The two alternatives would be classes and ids. While classes are meant to not be unique and thus are unusable to select exactly one thing, ids are meant for something else already. They are probably already used and are something you don't want to couple to your testing procedures, as it would block you from fully utilizing them for application development. Thus we use data attributes here to identify elements of interest for testing.
Interacting with Element
Once we can find elements on the page, we can also interact with them and for example, click a button to increment our counter.
it('should increment on click', async () => {
  await page.goto(testUrl)
  const incrementBtn = await page.$('[data-test="button-increment"]')
  const initialCount = await page.$eval('[data-test="count-output"]', e => parseInt(e.innerHTML))
  const expectedCount = initialCount + 1

  await incrementBtn.click()
  const newCount = await page.$eval('[data-test="count-output"]', e => parseInt(e.innerHTML))
  await page.screenshot({ path: 'screens/incrementedCount.png' })

  expect(newCount).toBe(expectedCount)
})
Here we get the initial count value and validate our expectation that clicking the "increment" button will increment the value by one. Using page.$ we can get an ElementHandle which provides us with certain convenience functions to interact with the selected element, like .click() to click it.
Within the repo for this blog post you can find another test for the counter that increments multiple times.
With that, we can check off another item from our testing list.
- ✅ Display when we visit it.
- ✅ Increase the count displayed when we click the "Increment" button.
- Display a message dialog when pressing the "Display Message" button.
Dynamic DOM content
All we have left now, are elements that dynamically get added to the page and we can test those too, like the message in our example website. To do so we simply execute the action that will cause the element to be added to the page and then look for it.
it('should display a message', async () => {
  await page.goto(testUrl)
  await page.$eval('[data-test="button-display"]', e => e.click())
  await page.screenshot({ path: 'screens/messageDisplay.png' })
  const displays = await page.$$('[data-test="display"]')

  expect(displays.length).toBe(1)
})
This time we don't use Puppeteers build in support for click events but a piece of JavaScript evaluated in the context of our page to click the button e => e.click(). In the same way, you can pass any code to be evaluated in the context of the page.
That already gets us pretty far in testing websites. Don't forget that when testing your actual site you can probably take a lot of shortcuts by sending requests to your backend directly instead of doing everything all the time through your UI. Take a moment to reflect on what you want to test before you do so and do your best to de-couple tests from one another. One test failing shouldn't make all others fail as well. Ideally, you want one test to fail on its own to ease finding the issue. Following this, it's often good to setup (or seed) data and state for a test that could come from a backend by making calls to it directly (or using a mock backend). That way you can verify displaying a list even while creating items for it is currently failing its tests.
- ✅ Display when we visit it.
- ✅ Increase the count displayed when we click the "Increment" button.
- ✅ Display a message dialog when pressing the "Display Message" button.
Congratulations, all tests are green!
Making visualization optional
Earlier we hardcoded displaying a browser with a delay to watch our tests happen. Since we don't always want to do that, let's change it up to depend on an environment variable SHOW_BROWSER. Cases were we might not want to get the visual especially include pipelines for build and deploy of out application which usually runs on systems where we don't care about visualization but speed.
const browserConfig = process.env.SHOW_BROWSER ? {
  headless: false,
  slowMo: 100
} : {}
browser = await puppeteer.launch(browserConfig)
We will simply check whether or not the environment contains a variable named SHOW_BROWSERand depending on that show the browser or not. To now see the browser you could run env SHOW_BROWSER=t npm test to run tests with a browser. You can replace t with anything you want, as long as SHOW_BROWSER has any value at all. You could even turn this into an npm script "test:visual": "env SHOW_BROWSER=t npm test and run npm run test:visual to use it.
Limitations and good tests
As with every approach, this automated click-through testing isn't omnipotent, it comes with some limitations. For instance that Puppeteer basically only runs with Chrome. But as we discussed earlier automated click-through testing shouldn't replace manual QA runs but help them. Once we achieve fast development iterations which will give us fewer bugs, testing in one browser for each build will be just fine, as long as we do periodic checks in all browsers. Always assuming that developers check their code in multiple browsers anyways 😉
You might find it helpful to introduce timeouts in your tests. You will notice when to use them, as tests will fail when the default timeout isn't long enough simply hand your desired timeout as a second argument to it().
Wrapping up

Our goal is reached, we started testing a website using Jest and Puppeteer. We took a look at where automated click-through testing fits within the greater context of software development and then went on to write our first test cases. Check out the repo with our finished code.
Now go out and automate all your tests 🚀

Next episode: Automated testing using Cypress to visually debug automated tests (coming soon)
Further reading:

Oldest comments (0)