
When we develop software, we want it to be technically remarkable. It's a common desire to ensure high code quality to benefit both others and your future self. Static code analysers are essential tools that assess your code against predefined rules without running it.
While enterprise-grade solutions for that might be enterprise-level expensive, some of the most advanced solutions - such as SonarQube - can be used for free if all the pieces of the stack are put together by yourself.
In this material, I will walk you through the process of creating personal SonarQube Community Edition instance and setting up the scanner on an example of NodeJS project that I wrote about some time ago (Creating a custom webpack loader for text files, compatible with TypeScript. PlantUML mind map example). In addition to that, I'll share a couple of thoughts about why a particular option is chosen and not an alternative.
Solution
This guide consists of a few parts:
- Setting up the stage. Listing system requirements, installing missing dependencies.
- Configuring and starting SonarQube CE instance.
- Creating a SonarQube project, configuring and running the SonarScanner.
- (Bonus). Installing and configuring SonarLint for getting feedback about the code right in IDE.
Setting up the stage
Using Docker as the Runner
We will use Docker for running SonarQube server and SonarScanner.
While it's possible to run the server and SonarScanner from a binary file, I choose the Docker way because of two benefits:
- It's much simpler to upgrade SonarQube with Docker: instead of extracting config files, placing binaries somewhere in
$PATHagain and adding config back, you simply restart the container from a newer image and bind volumes there. - You don't need to have Java in the host machine.
Providing existing database as a storage. Postgres example.
SonarQube needs to store a lot of information about the users, rules, projects, scanning sessions, etc. It uses a connected database instance for that.
SonarQube server supports different databases so we can use this advantage. The key for me is to use the database that you're used to and that is already running in your computer. That helps reduce the footprint of the running SonarQube server - no need to have an entire database instance for a specific use case.
In my case, it's Postgres. I'm not sharing the instructions on how to install Postgres itself but here is the link to official documentation about installing Postgres 12 on Ubuntu. SonarQube's Docker Compose example refers to PostgreSQL 12 so I'm using this version.
When the database is available, we need to create schema, database and the user that SonarQube server will be using for storing data. Below is the Postgres way:
NOTE: Don't forget to replace SONAR_DB_PASSWORD with the real one you'll be using.
CREATE SCHEMA sonarqube;
CREATE USER sonarqube WITH PASSWORD 'SONAR_DB_PASSWORD';
GRANT USAGE ON SCHEMA sonarqube TO sonarqube;
GRANT CREATE ON SCHEMA sonarqube TO sonarqube;
ALTER DEFAULT PRIVILEGES IN SCHEMA sonarqube GRANT ALL ON TABLES TO sonarqube;
ALTER DEFAULT PRIVILEGES IN SCHEMA sonarqube GRANT ALL ON SEQUENCES TO sonarqube;
ALTER DEFAULT PRIVILEGES IN SCHEMA sonarqube GRANT ALL ON FUNCTIONS TO sonarqube;
CREATE DATABASE sonarqube;
ALTER DATABASE sonarqube OWNER TO sonarqube;
Configuring and starting SonarQube CE instance
SonarQube server
Now, when the database and Docker engine are available in the host machine, we can start the SonarQube server container.
Some troubleshooting notes will follow the happy path of the installation.
Create the Docker volumes
sudo docker volume create --name sonarqube_data
sudo docker volume create --name sonarqube_logs
sudo docker volume create --name sonarqube_extensions
Start the SonarQube server container
sudo docker run --detach --name sonarqube \
    --add-host=host.docker.internal:host-gateway \
    --publish 9000:9000 \
    --env SONAR_JDBC_URL=jdbc:postgresql://host.docker.internal:5432/sonarqube \
    --env SONAR_JDBC_USERNAME=sonarqube \
    --env SONAR_JDBC_PASSWORD=SONAR_DB_PASSWORD \
    --volume sonarqube_data:/opt/sonarqube/data \
    --volume sonarqube_extensions:/opt/sonarqube/extensions \
    --volume sonarqube_logs:/opt/sonarqube/logs \
    sonarqube:community
NOTE 1: Don't forget to put the real SONAR_DB_PASSWORD password from the database created earlier.
NOTE 2: If you use different database, put your specific SONAR_JDBC_URL.
Common issues
If the Docker container is not starting, check the logs. The issues I encountered are listed below:
- If Elasticsearch complains about the heap size in Linux, update this setting:
vm.max_map_countto allow using more memory. - If the Postgres DB is not reachable, you might need to update
pg_hba.confto allow incoming connections forsonarqubeuser.
Access SonarQube UI
When the container with SonarQube server is running and is available on the port 9000 in your machine (see --publish parameter), you can access https://localhost:9000 in your browser. You'll be invited to log in. The most secure in the world admin - admin are your credentials. You'll need to change it as soon as you log in for the first time.
Running SonarScanner
Generate token for the scanner
Before creating and scanning projects, we need to generate a token that will allow the scanner to upload the results to SonarQube server. For a simple setup, we will create a global token. You can do that via opening the user dropdown in the top right corner of the screen and going to "My Account" -> "Security".
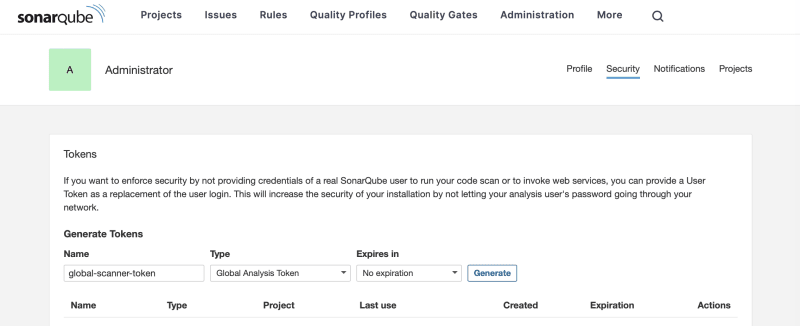
Other options are explained here.
Copy the token and save it in a secure place. You won't be able to see it in the UI ever again.
Create and configure a SonarQube project
In SonarQube dashboard, select "Create Project" and choose "Manually". Input display name and the project key, choose the default branch.

NOTE: For this setup, we will disable versioning so the branch name here doesn't really matter.
For the baseline, you can choose the global settings which is the default SonarQube preset.

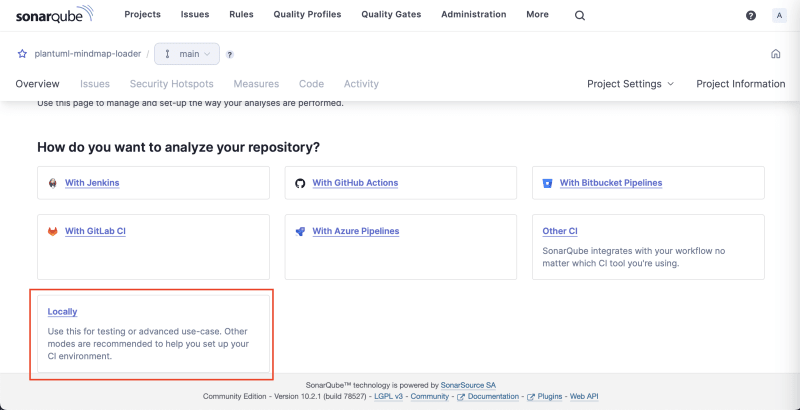
In the opened project page, choose "Locally" for scanning setup.
Provide the global token you generated before and click Next.
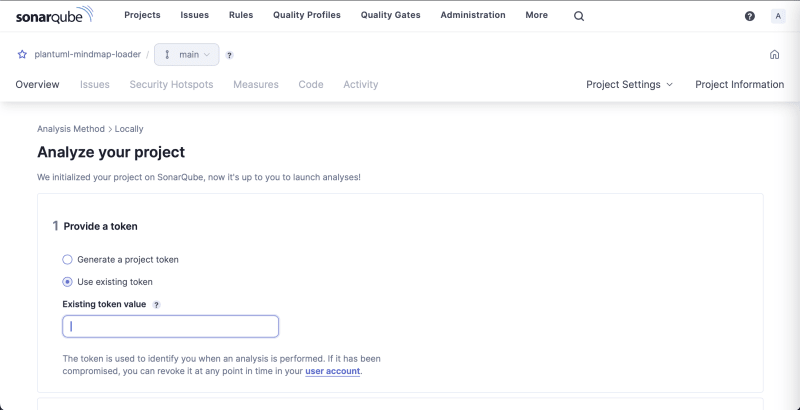
You will be given the CLI command to run but you can ignore it. We will be running the scanner in a Docker container. Also, we will provide the parameters via .properties file and not CLI arguments.
You can leave the browser page open, it will refresh automatically when the results of scanning were pushed to SonarQube server.
In the root of the project you're going to scan with SonarQube, create sonar-project.properties file with the following content:
sonar.projectKey=plantuml-mindmap-loader

sonar.sources=.
sonar.sourceEncoding=UTF-8
sonar.scm.disabled=true
sonar.exclusions=**/node_modules/**,**/coverage/**,**/lib/**
sonar.javascript.lcov.reportPaths=./coverage/lcov.info
NOTE: This file contains instructions on unit-test coverage because this project has Jest tests. If you don't have it in the project, exclude sonar.javascript.lcov.reportPaths parameter.
Run the scanner
As mentioned above, we will run the scanner in a Docker container. You need to execute the below command with a correct SONAR_GLOBAL_TOKEN and the path to the folder containing the code you scan (this folder should contain sonar-project.properties you created before).
docker run \
    --rm \
    -e SONAR_HOST_URL="http://localhost:9000" \
    -e SONAR_SCANNER_OPTS="-Dproject.settings=sonar-project.properties" \
    -e SONAR_TOKEN="SONAR_GLOBAL_TOKEN" \
    -v "./software/packages/plantuml-mindmap-loader:/usr/src" \
    sonarsource/sonar-scanner-cli:5
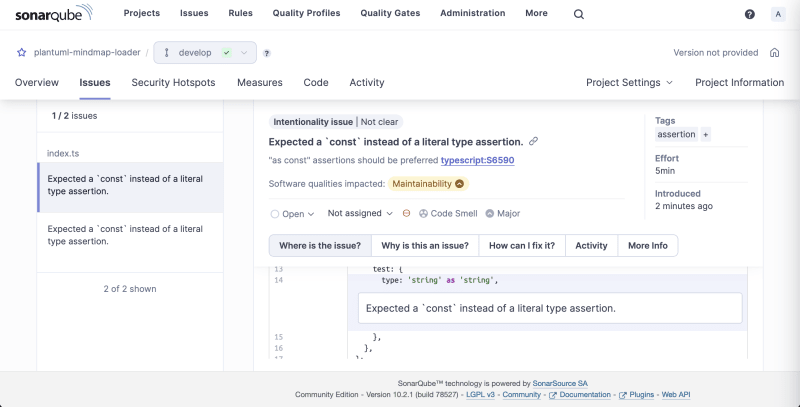
It will take a couple of minutes to execute and after it's completed you can enjoy the code quality assessment results in SonarQube
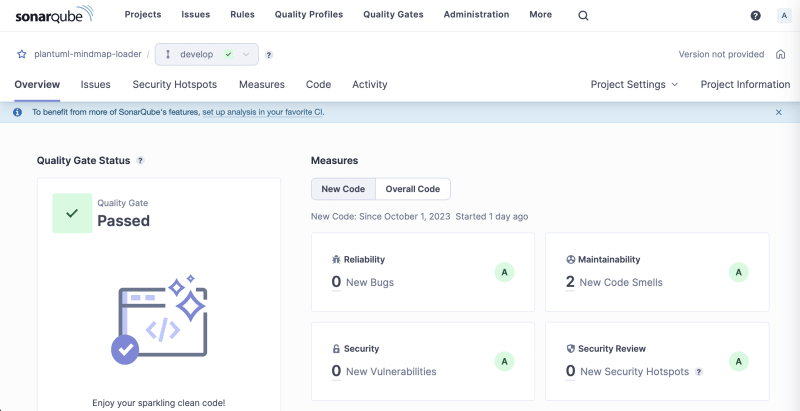
Review the issues, check suggested solutions, apply a patch and run the scan again. The setup is complete.

Bonus. Setup SonarLint in VS Code
While seeing the results of scanning in SonarQube is super helpful, in software development, shortening the feedback loop for code changes is essential for efficient workflow. For that, there is SonarLint extension available for quite a few modern IDEs, including VS Code.
What makes this extension especially impressive is the connected mode when the rules applied to the project are synchronised with SonarQube server.
To install and configure it:
- Find and install SonarLint extension in VS Code.
- Go to the "SonarLint" tab and click at the plus button in "Connected Mode" section.
- Add details: Server URL (
http://localhost:9000), User Token (can useSONAR_GLOBAL_TOKENfrom before).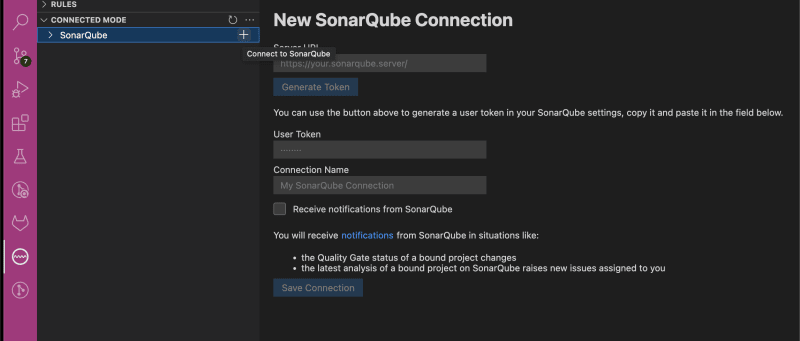
- Click "Save Connection".
- For this connection, click the plus button for "Add project binding".
- Select the workspace.
- Select the project created in SonarQube server.
- Enjoy the binding.
You can see the syntax highlight right in your IDE now and see the underlines going away as you address the quality concerns.

Results & Beyond
With this SonarQube Community Edition setup, you will be able to ensure outstanding quality in your projects with very little time and resource investments. Variety of benefits attracts:
- If your project evolves quickly, you can enjoy sturdier stance of your project against changes. Your project will be harder to break, easier to maintain, more challenging to hack.
- If it's a weekend project, future self will be extremely happy to start a new feature from a reliable checkpoint - with cleaner code, fewer bugs.
This guide focuses on the most straightforward setup possible and many possible improvements are not included in the scope not to lose focus on the MVP. A few evident things you might work out yourself:
- Integrate SonarQube with CI/CD to ensure the quality gate fully protects your shared branches from code of low quality.
- Create an automated local runner for SonarQube scanner to have a quality gate not before the code is merge but before the code is committed.
I hope the length of this guide doesn't intimidate you from trying this local setup. In fact, it's pretty straightforward and even lightweight. My objective was to provide information on the aspects of particular steps so that if in your situation a slightly different approach is more suitable, you make this turn and return to the main track with the solution that fits your needs the best.
And last but not the list, getting quality suggestions from SonarQube is a whole load of fun. You'll enjoy it.

Top comments (0)