This article was originally written by Samson Omojola on the Honeybadger Developer Blog.
Keeping your apps updated and constantly upgrading to the most recent version of the stacks they utilize has many benefits: preventing vulnerabilities, enhancing usability, and accessing bug fixes and new features. Therefore, even if your app still functions properly with old code, whenever you can, it’s usually best to perform an upgrade.
In this article, I’ll share tips on how to upgrade earlier Laravel versions to more recent releases in your existing apps.
What's New in Laravel 9
For a long time, Laravel has been a popular, if not the most popular, open-source PHP framework. It is flexible, scalable, and adaptive, and it has become the top-shelf choice for engineers and businesses working with PHP. The latest version of Laravel (Laravel 9) was released in February 2022, and the next release (Laravel 10) will be in February 2023. Laravel 9 comes with a number of new and interesting features. Some of the notable ones are described in the following paragraphs.
Symfony Mailer
Swift Mailer was used by earlier versions of Laravel to send outgoing emails. However, Symfony Mailer has replaced it since Swift Mailer is no longer maintained. Symfony Mailer is now used to enable email sending on Laravel apps via SMTP, Postmark, Mailgun, Amazon SES, and sendmail.
If the application that you are trying to upgrade uses Swift Mailer, you may need to install some mailgun driver prerequisites and rename some Swift methods to Symphony methods.
Flysystem 3.x
In Laravel apps, files are manipulated with the help of the Storage facade. And the Storage facade's whole filesystem interface is powered by Flysystem. In version 9, Laravel’s upstream Flysystem dependency was upgraded from Flysystem 1.x to Flysystem 3.x.
Improved Eloquent Accessors/Mutators
In Laravel 9, by type-hinting a return type of Illuminate\Database\Eloquent\Casts\Attribute, you can define an accessor and a mutator using a single non-prefixed method, unlike earlier versions where you had to define multiple prefixed methods. This simplifies getting and setting attributes.
Implicit Route Bindings with Enum
Enums were introduced in PHP 8.1. Laravel 9, which uses PHP 8.1, supports using Enums in route definitions. When Enums are used on a route, the route will be invoked only if its URL has a valid Enum value. If not, the route will return a 404 response.
Controller Route Group
Laravel 9’s Route::controller() method can be used to define a common controller for every route within a route group.
Full-Text Indexes/Where Clauses
To generate full-text indexes for MySQL or PostgreSQL database colums, the fullText method can be added to the definition.
$table->text('post')->fullText();
You can use the whereFullText and orWhereFullText methods to add “where” clauses to queries for fullText columns. When running your app, Laravel will transform them into the proper SQL for your chosen database system.
Laravel Scout Database Engine
If your application doesn’t deal with a huge load of data, Laravel’s Scout database engine should suffice for search features and serve as an alternative to dedicated search services, such as Algollia and MeiliSearch.
Rendering inline Blade Templates -: the Blade facade’s render method can be used to generate valid HTML from a raw Blade template string.
use Illuminate\Support\Facades\Blade;

return Blade::render('My name is {{ $name }}', ['name' => 'Samson Omojola']);
Above, we have Blade’s render method taking a Blade template string with which it will generate a corresponding HTML.
Blade’s renderComponent method can be used to render a class component. The method will render any component instance that’s passed into it.
use App\View\Components\NameComponent;

return Blade::renderComponent(new NameComponent('Samson Omojola'));
Slot-Name Shortcut
In Laravel 9, you can now specify a slot’s name without using the name attribute.
Before:
<x-slot name="options">
      <a>display</a>
      <a>hide</a>
</x-slot>
Now:
<x-slot:options>
   <a>display</a>
   <a>hide</a>
</x-slot>
Laravel Breeze API and Next.js
The Laravel Breeze starter kit now has an API scaffolding mode and a complimentary Next.js frontend. This starter kit will enable you build Laravel applications that serve as a backend for a JavaScript frontend, using Laravel Sanctum authentication.
New Helpers
Two new helper functions have been introduced with Laravel 9: str and to_route. The former returns a Illuminate\Support\Stringable instance for any string it’s given, while the latter helps you redirect to a named route from your controllers and routes.
Manually Upgrading to Laravel 9
Step 1
Before upgrading an application to Laravel 9, it is advisable to back up your existing code and the composer.json file. This can be done by simply creating a repository on GitHub and uploading your code to it.
Step 2
Change the PHP Version - Laravel 9 requires a minimum PHP version of 8.0 due to it’s dependence on Symfony’s most recent version (v6.0), which depends on PHP 8.
Navigate to your composer.json file and change the PHP version to 8.
"require": {
    "php": "^8.0",
}
Step 3
Update Dependencies - In your composer.json file, replace the following packages with their updated versions:
“laravel/framework” : “^9.0”,
“nunomaduro/collision”: “^6.1”,
“spatie/laravel-ignition”: “1.0”
}
Then, run composer update to update the dependencies.
After composer performs an update, some of your third-party packages might throw errors since they do not support Laravel 9. They’ll need to be updated to versions that do.
For example, you see an error like this:
spatie/laravel-backup requires illuminate/support ~6.0|~7.0|~8.0 -> satisfiable by illuminate/support[v6.0.0, ..., v6.20.16, v7.0.0, ..., v7.30.4, v8.0.0, ..., v8.28.1].
- Only one of these can be installed: illuminate/support[v4.0.0, ..., v4.2.17, v5.0.0, ..., v5.8.36, v6.0.0, ..., v6.20.16, v7.0.0, ..., v7.30.4, v8.0.0, ..., v8.28.1], laravel/framework[v9.0.-beta.1]. laravel/framework replaces illuminate/support and thus cannot coexist with it.
- Root composer.json requires laracasts/generators dev-master as 1.1.4 -> satisfiable by laracasts/generators[dev-master].
}
You’ll need to navigate to the GitHub page or official website of spatie/laravel-backup and check whether its latest version supports Laravel 9. If it does, then go to your composer.json and change the package’s version to the latest version.
After updating all the outdated third-party packages, run composer update again.
If you get any syntax errors, go to Laravel’s official upgrade guide page and search for the necessary update related to that error.
Updating Flysystem Code
Flysystem helps you interact with drivers, such as Amazon S3, FTP, and SFTP, that help you manage files. Previous versions of Laravel use Flysystem v1 to interact with these drivers. However, Flysystem 1 has been replaced with Flysystem 3 in Laravel 9, so utilizing any of these drivers in your Laravel 9 app will require using Flysystem 3 to install them.
Use the following code for Amazon S3:
composer require -W league/flysystem-aws-s3-v3 "^3.0"
Use the following code for FTP:
composer require league/flysystem-ftp "^3.0"
Use the following code for SFTP:
composer require league/flysystem-sftp-v3 "^3.0"
In version 1 of Flysystem, write methods, such as write and writeStream, only perform write operations if there's no file in the specified location. To write files to locations already occupied by other files, the update and updateStream methods must be used. In Flysystem 3, however, write and writeStream will automatically perform an update if used on locations that have existing files in them, eliminating the need for update and updateStream methods. Additionally, while these write methods throw exceptions when they fail in previous Laravel versions, they simply return a value of false in the latest version. However, if you'd prefer to have exceptions thrown, set throw to true in your filesystem disk's configuration code.
'public' => [
    'driver' => 'local',
    // ...
    'throw' => true,
],
Flysystem no longer supports cached adapters, so you can't use them in your Laravel 9 application.
If your old application has a custom filesystem driver, you should know that registering a custom filesystem driver now requires slightly different steps. In previous Laravel versions, the callback given to Storage::extend returns an instance of Filesystem.
use Illuminate\Support\Facades\Storage;
use League\Flysystem\Filesystem;
use Spatie\Dropbox\Client as DropboxClient;
use Spatie\FlysystemDropbox\DropboxAdapter;

Storage::extend('dropbox', function ($app, $config) {
    $client = new DropboxClient(
        $config['authorization_token']
    );

    return new Filesystem(new DropboxAdapter($client));
});
In Laravel 9, however, an instance of FilesystemAdapter is returned instead.
use Illuminate\Filesystem\FilesystemAdapter;
use Illuminate\Support\Facades\Storage;
use League\Flysystem\Filesystem;
use Spatie\Dropbox\Client as DropboxClient;
use Spatie\FlysystemDropbox\DropboxAdapter;

Storage::extend('dropbox', function ($app, $config) {
    $adapter = new DropboxAdapter(
        new DropboxClient($config['authorization_token'])
    );

    return new FilesystemAdapter(
        new Filesystem($adapter, $config),
        $adapter,
        $config
    );
});
Updating SWift Mailer Code
Since Swift Mailer has been replaced with Symfony Mailer, you should remove the wildbit/swiftmailer-postmark package and add symfony/postmark-mailer and symfony/http-client.
composer require symfony/postmark-mailer symfony/http-client
To use Mailgun, add the following packages:
composer require symfony/mailgun-mailer symfony/http-client
In previous Laravel versions, the methods send, raw, html, and plain from Illuminate\Mail\Mailer return void. In Laravel 9, they return an instance of Illuminate\Mail\SentMessage, which contains an instance of Symfony\Component\Mailer\SentMessage. Use the getSymfonySentMessage method to access this instance.
If you’ve used any of the following Swift Mailer methods in your application, they'll need to be replaced by their Symfony Mailer counterparts:
Message::getSwiftMessage(); ---------------> Message::getSymfonyMessage();

Mailable::withSwiftMessage($callback); ----> Mailable::withSymfonyMessage($callback);

MailMessage::withSwiftMessage($callback); -> MailMessage::withSymfonyMessage($callback);

Mailer::getSwiftMailer(); -----------------> Mailer::getSymfonyTransport();

Mailer::setSwiftMailer($swift); -----------> Mailer::setSymfonyTransport(TransportInterface $transport);

MailManager::createTransport($config); ----> MailManager::createSymfonyTransport($config);
If your old code uses the Illuminate\Mail\Events\MessageSent event, you should know that the message property, which used to return an instance of Swift_Message, now returns an instance of Symfony\Component\Mime\Email. Additionally, a new property sent has been added to the event. You can use it to retrieve information about a sent email.
If you defined stream options for SMTP in your old code, you should remove the code as it is no longer supported. Here is an example:
'smtp' => [
    // Laravel 8.x...
    'stream' => [
        'ssl' => [
            'verify_peer' => false,
        ],
    ],
 ],
All configuration options must now be defined directly under smtp, like this:
 'smtp' => [
    // Laravel 9.x...
    'verify_peer' => false,
 ],
Finally, if you use Mail::failures() to retrieve the list of failed recipients after an email has been sent, you should remove the code, as it is no longer supported. Unfortunately, there is no way to retrieve the list of failed recipients in Laravel 9, and you are advised to validate email addresses before sending messages to them.
To find out what other changes you might need to make, review the list of medium impact changes on the official upgrade page.
Automatic Upgrade with Laravel Shift
Shift is an automated (paid) tool that can be used to automatically upgrade applications with older versions of Laravel to later versions.
To use Shift, navigate to https://laravelshift.com in your browser.

Laravel Shift Homepage
On the homepage, click on the ‘Run Shift’ button on the top-right side of the page.
You should see a list of the different kinds of upgrades that can be done and their corresponding prices. Decide which one you want and click the purchase option on it.

Shift Packages
Next, select the option to sign in with your GitHub account and give Shift access to your repositories by clicking on ‘Authorize laravel-shift’.

Sign in with Github

Authorize Shift
On the next page, under Connection, ensure that the GitHub repo attached is your GitHub repo. Under REPOSITORY OR CLONE URL, enter the link to the specific repository you want to upgrade. Under Branch, enter the branch of the repository you want upgraded (e.g., main).
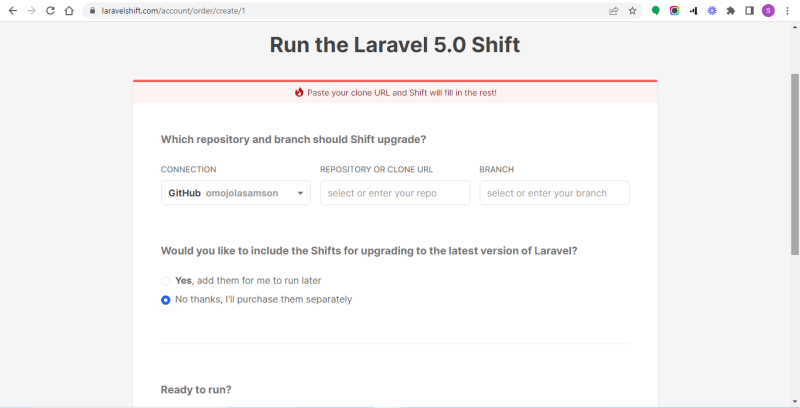
Add Repository
With the above information, Laravel Shift will create a pull request to that branch with the required changes for an upgrade. You can review the changes manually and decide what to accept. Next, click on "Checkout and run". On the next page, your credit card details will be requested. Enter your details and click on Purchase Shift.

Make Payment
After making the purchase, you’ll be directed to a page that will show you the status of your request.
You should see the "Running" status for some seconds, indicating that Shift is upgrading your application. When it's complete, the Running status will change to a link to the pull request Shift created for you. Click on it. Under the ‘Files changed’ tab, you’ll see the updates Shift made.
A downside of Shift is that it might be considered too expensive by some. It may also be considered slow because, if you are upgrading from a very old version to the latest version, Shift doesn’t do it in a single upgrade. It proceeds step-by-step; for example, if you’re upgrading from v7 to v9, Shift upgrades to v8 and then to v9. However, if you consider the amount of effort it saves you, you may find that it’s worthwhile.
Conclusion
You’ve made it to the end of the post! We covered the new features that the latest version of Laravel ships with, tips for manually upgrading the Laravel version of your existing application, and a tool (Laravel Shift) that automates the process for you.
For more info on upgrading Laravel versions, you can check out the official documentation.

Top comments (0)