
Read this article to find out how to configure a Wi-Fi router with the example of TP-Link AC750 Archer C20. Today I will tell you how to configure basic router settings to enable Internet access, create and set up a Wi-Fi network. We’ll be looking at how to configure a router with the help of a computer, but doing it from a smartphone or tablet PC is very similar.
This is a dual-band Wi-Fi router, but its settings are more or less conventional, so this guide can help you set up almost any kind of router.
How to Connect a Router?
So, you have just had a new Internet connection installed to your place, or you have decided to replace the old router and bought a new one.
Connect it before you go on to configuring it. Everything should be done according to the usual procedure:
Plug the Wi-Fi router into the socket and switch it on. Wait for its front panel indicators to light up.
After that, plug the provider’s cable (or the cable from an ADSL modem) into the Internet port – it’s blue (The choice depends on how you receive the Internet service from your provider).

If you are planning to configure a router from your PC or laptop using a network cable, take such a cable (which comes supplied with the router) and connect your computer with the Wi-Fi router. Plug one end of the cable into one of the yellow Ethernet ports on your router, and plug the other end of the cable into the Ethernet port of your computer. I recommend configuring a router with a cable connection – if possible. This method is more reliable.

You can also use Wi-Fi to connect to the router. When the router is switched on, your devices should detect a Wi-Fi network with a default name. To connect to this network, use the password (PIN code) printed on a sticker which you can find on the bottom of the router. On this sticker, you will also find default names for Wi-Fi networks as given by the manufacturer. If there is no sticker for some reason, all this information will be printed in the user manual.

How to Access the Router Settings?
To enter the settings of a TP-LINK router, connect to the router with a network cable or by Wi-Fi, open a browser on a device connected to the router and go to the address http://tplinkwifi.net (sometimes it can be tplinklogin.net).
You can find the address to enter the settings mode as well as other default values by looking at the sticker on the bottom side of the router. Typically, all routers also use IP addresses to open settings: 192.168.1.1 or 192.168.0.1

If you try to enter the settings page address but it doesn’t open, try resetting the router. Press the Reset button on the router and hold it 5 to 10 seconds. The router will start rebooting – you can tell it by the blinking indicator lights. After rebooting, try to access the router again, using the same method.

As a result, you will see an authorization page, asking you for a username and password. By default, these are admin and admin.
After that, a page containing router settings should appear. This is where you can set all necessary values.
Take a note – there is an option named Quick Setup. Don’t confuse it with automatic setup – we are going to discuss it a bit later.

How to Configure an Internet Connection for the Router?
In the settings, go to the tab Network – WAN.

Choose connection type: in our case, that is Dynamic IP. If you have this connection type, there is no need to choose anything: it will be set by default. In fact, you should have an Internet connection via the router by now.
But if you have a PPPoE or L2TP connection, select the corresponding connection type from the menu and set the appropriate values which you should receive from your provider. Contact your provider and double-check the following information:
- Username;
- Password;
- IP address or server name, and so on.
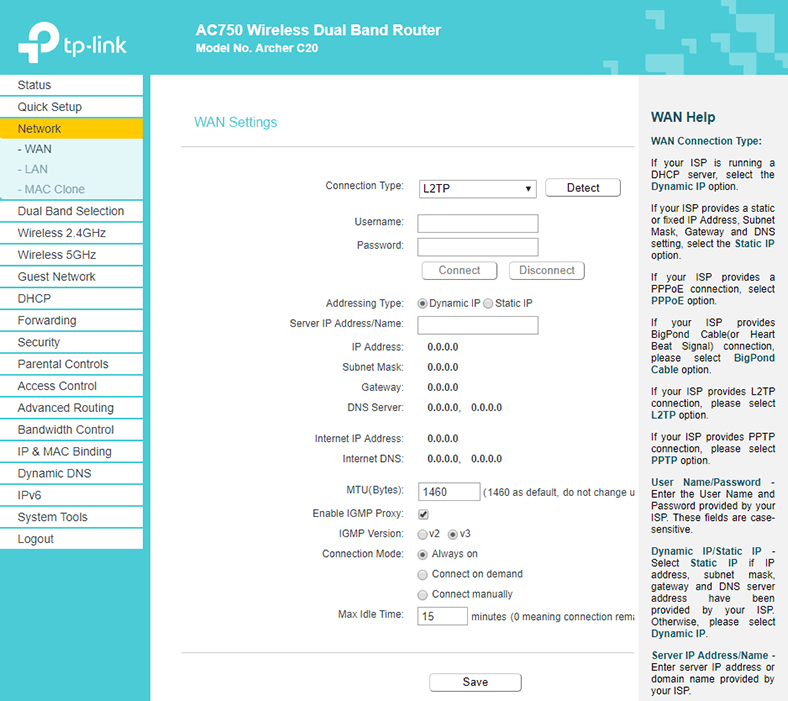
Some routers also have a Detect button next to the connection type: when you click on it, the router will try to determine what connection type you are using. Click on it if you don’t know the connection type.

Don’t forget to click Save after modifying the settings.
To have an Internet connection working through this TP-LINK Archer C20 router, the round indicator should be green. This indicator may look different in other routers, but it is always there to notify the connection is active.

Binding the Internet Connection to the MAC Address of the Device
Bear in mind: if you have Dynamic IP, your provider may use binding of the Internet connection to the MAC address of the router or another device. If the router can’t establish an Internet connection, contact your provider: you may have to submit your MAC address.
Sometimes it happens because certain Internet providers practice MAC address binding. This is when your Internet connection is bound to a particular device: a computer, laptop or router. The matter is that if your Internet connection is bound to the MAC address of a computer’s network card, you are not going to have a working Internet connection after you plug the cable into your laptop or router instead. That is because MAC addresses of the router or laptop differ the corresponding address you have previously registered with your ISP.
So if your provider makes use of MAC address binding, there are two options:
- In the router settings, use the MAC address to which your Internet connection is bound.
- Alternatively, give your ISP the MAC address of your router so that the Internet connection should be bound to this new address. The MAC address of the router (assigned by the manufacturer) is always given on the sticker that you can find on the bottom side of the device.
To change the router’s MAC address, go to its settings – Network tab / MAC Clone.
There are two options as well:
- you can enter the new MAC address manually in the field WAN MAC address,
- or clone it from the computer connected to the router with the cable (I mean the computer you are configuring the connection from).

If you want to clone the MAC address from the computer, use the network cable to link the router and the computer that your Internet connection was bound to. Then use the computer to configure the router. This is an important aspect.
Don’t forget to save the settings and reboot the router after you have modified MAC address settings.
As a result, the Internet connection for your computer should already be established. To find out if the Internet connection is active, look at the indicator lights on the router – they should be green or blue, but never yellow or red.
Otherwise, check the network connection symbol in the system tray of your computer – there should not be any symbols like a yellow exclamatory mark or red cross.


Top comments (0)