
Why this post?
Angular has been my frontend-framework of choice for the last few years and I've been loving it. However, if you want to create a full-stack web-application, it only covers half of the requirements. For a while now, I've been pairing it with NestJS and it's been working really well in multiple projects.
I keep recommending this combination to friends and coworkers, so I wanted to finally write down the setup I use as a reference/starting point. Maybe this post inspires you to also give it a try. If so, please let me know how it worked for you.
TLDR: Angular will be our frontend-framework for this example, we will use NestJS for our backend, and all of this will sit happily married inside an Nx workspace. We will introduce a few quality-of-life improvements as well as bundle both projects up into one single package.
To recap really quickly, NestJS is an abstraction layer that sits on top of Express or Fastlify, both NodeJS-powered REST-frameworks. It is written in Typescript and follows a lot of the same patterns found in Angular (annotations, DI, etc.). Nx is a set of tools developed by ex-Googlers which help develop in Monorepos. They also offer pretty sensible default choices and configuration overrides.
You ready? Let's go!
Scaffolding
First, we'll setup a new Nx workspace and create an Angular and NestJS application inside it:
⇒  npx create-nx-workspace@latest

? Workspace name (e.g., org name)     my-fullstack-project
? What to create in the new workspace angular-nest
? Application name                    client
? Default stylesheet format           CSS
? Use the free tier of the distributed cache provided by Nx Cloud? No
// (to keep things simple for now)
When finished, this will have done the following:
- create a new directory with the workspace name
- generate a fresh Angular project located under
apps/client - create a new NestJS project located under
apps/api - generate a sample typescript library inside the workspace - to be used by both client and api (located under
libs/api-interfaces)
What's also neat is that Nx comes with improved tooling for both projects, such as:
- using Jest over Karma as a unit-test runner
- using Cypress over Protractor for E2E specs (Angular only)
- using Prettier to format the code automatically
- decent TSLint settings for the whole workspace
There's tons more features offered by Nx, but those are the ones I wanted to point out right now.
Running the projects
Now that we have the basic projects set up, it's time to boot them up. Open 2 Terminal windows and run the following commands:
[Terminal 1]: npm run nx -- serve client
[Terminal 2]: npm run nx -- serve api
The first command will run the default Angular dev-server, compile and serve the frontend under http://localhost:4200. The second will start the NestJS dev-server, compile the Typescript down to NodeJS-compatible JavaScript and serve the result under http://localhost:3333/api. As a nice bonus, Nx has added a proxy configuration for the Angular dev-server, which will proxy requests to http://localhost:4200/api to the NestJS dev-server for us, so that we don't run into any CORS issues while developing. The proxy config can be found under apps/client/proxy.conf.json and it's referenced inside the angular.json project definition file.
If you open now your browser on http://localhost:4200, you should see a page similar to this one:

If you inspect the network and refresh, you'll see an XHR request to http://localhost:4200/api/hello showing that the proxy has been set up properly.
Wait, what?
Let me explain what's going on:
The NestJS project was configured with a prefix to use for all controllers. This prefix was defined as follows under (apps/api/src/main.ts)
  const globalPrefix = 'api';
  app.setGlobalPrefix(globalPrefix);
Nx also generated a sample REST-controller, called AppController (apps/api/src/app/app.controller.ts) that currently serves a static chunk of data, in our case an object of the Typescript interface Message defined like this (libs/api-interfaces/src/lib/api-interfaces.ts):
export interface Message {
  message: string;
}
Because the interface Message is defined in the shared library, it can be used both by frontend and backend. Sweet, type-safety across both projects!
The AppController method is annotated with
  @Get('hello')
  getData(): Message {
    return this.appService.getData();
  }
which tells NestJS to expose a new GET-endpoint under http://localhost:3333/api/hello and return our message object, when the server is running.
On the other end of the stack we have the Angular project, which was configured to do a sample GET request to this exact endpoint. The sample code can be found in the AppComponent of the frontend under apps/client/src/app/app.component.ts
export class AppComponent {
  hello$ = this.http.get<Message>('/api/hello');
  constructor(private http: HttpClient) {}
}
and it's invoked using the async pipe directly in the template:
<div>Message: {{ hello$ | async | json }}</div>
Now, since the Angular dev-server is running on http://localhost:4200, the request will go to http://localhost/4200/api/hello due to the relative path in the httpClient call. This gets picked up by the Angular proxy config and is forwarded to our NestJS server. Awesome 🎉
Tweaking the application for development
Congratulations, we now have a workspace with both NestJS and Angular running beside each other as well as sample code on how to call the backend from the frontend. That's already pretty neat!
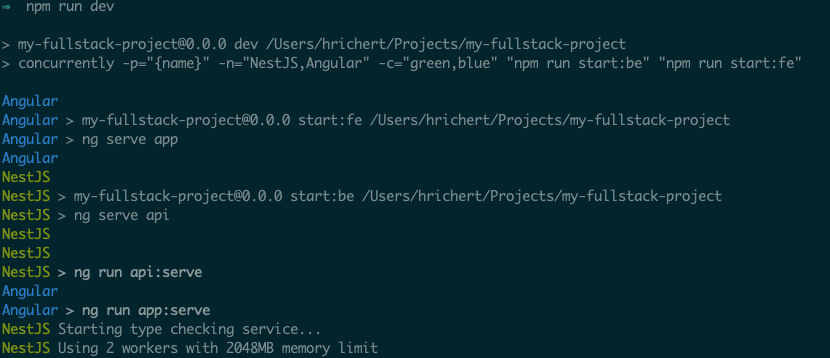
What I like to do in order to make for a better development experience, is starting both frontend and backend dev-server in parallel, with a single command. For this we will install a node-helper called concurrently.
npm install --save-dev concurrently
Once that's done, we can adapt the package.json as follows:
"start:fe": "ng serve client",
"start:be": "ng serve api",
"dev": "concurrently -p=\"{name}\" -n=\"Angular,NestJS\" -c=\"green,blue\" \"npm run start:fe\" \"npm run start:be\"",
Now running npm run dev will start both dev-servers in parallel, prefix each line to the Terminal with either "Angular" or "NestJS" and color the prefixes in green and blue. Awesome!
Serving frontend and backend from a single server for production
Okay, now we have a full-stack application ready for development. Let's finalise it by packaging our app as a single executable npm package that will serve both our frontend and backend.
To achieve this we will create a production build of our Angular application and configure our NestJS server to serve the frontend under its root path, so that we can bundle both in a self-contained package (to deploy it e.g. to CloudFoundry or some other cloud provider).
First, we'll create a production build of the Angular frontend:
⇒  npm run nx -- build client --prod

> my-fullstack-project@0.0.0 nx /Users/hrichert/Projects/my-fullstack-project
> nx "build" "client" "--prod"


> ng run client:build:production
Generating ES5 bundles for differential loading...
ES5 bundle generation complete.

// ... A few seconds later...

Date: 2020-06-17T16:14:41.427Z - Hash: 4957569a994e1b83d273 - Time: 34832ms
Now our frontends compiled (minified, uglified, polyfilled) output can be found under dist/apps/client
Let's configure NestJS to serve this folder when we access its root path.
First, we'll install the NestJS serve-static package to allow serving of static assets
npm install --save @nestjs/serve-static
Now all we need to do is import and configure the ServeStaticModule provided by this package inside the AppModule (apps/api/src/app/app.module.ts)
import { ServeStaticModule } from '@nestjs/serve-static';
import { join } from 'path';

// ...

@Module({
  imports: [
    ServeStaticModule.forRoot({
      rootPath: join(__dirname, '..', 'client'),
    }),
  ],
  // ...
})
export class AppModule {}
which instructs NestJS to traverse into ../client from its own dist-folder (dist/apps/api) and serve the contents on its root path.
And sure enough, running only the backend via npm run start:be and navigating to http://localhost:3333/ should yield the same result as before, when we ran the Angular dev-server:
Packaging the application for deployment
All that's left now is to bundle everything in an npm package and we'll be ready to deploy our full-stack application. Let's do that now.
We need to edit the package.json to only include the dist-files and as a convenience we'll add a start-script:
{
    ...
    "files": ["dist/apps/client", "dist/apps/api"],
    ...
    scripts: {
    "serve": "node dist/apps/api/main.js",
    ...
    }
}
Now, if we run npm pack, a tarball file will be generated for us in the project directory:
⇒  npm pack
npm notice
npm notice 📦  my-fullstack-project@0.0.0
npm notice === Tarball Contents ===
// ...
npm notice === Tarball Details ===
npm notice name:          my-fullstack-project
npm notice version:       0.0.0
npm notice filename:      my-fullstack-project-0.0.0.tgz
npm notice total files:   14
We can now upload this package to our favourite cloud provider, have it run npm install --production after the upload and provide the serve script as a startup command for the package (this step varies depending on your cloud provider).
Of course you can also run this package locally, by simply unpacking the tarball file, running npm install --production inside the directory, then running npm run serve.
I hope you found this post helpful. Let me know if you're missing any important steps! There's obviously a lot more we can do now that we have this setup, like runtime type validation for our frontend or backend, sharing logic across frontend and backend by using a shared library in the same workspace, etc. If you're interested in those topics, I'll gladly write a follow-up post to this one :)
Thanks for reading!


Top comments (8)
Nice article! And that is exactly what i searched for :D
You have an little error in your npm script:
this line : "dev": "concurrently -p=\"{name}\" -n=\"Angular,NestJS\" -c=\"green,blue\" \"npm run start:be\" \"npm run start:fe\"",
should be this: "dev": "concurrently -p=\"{name}\" -n=\"NestJS,Angular\" -c=\"green,blue\" \"npm run start:be\" \"npm run start:fe\"",
Thanks for the bug report :) I've updated the post!
The line
ng run client:build:productiononly works if you have angular-cli globally installed (I forgot this and didn't have it installed on a new machine), easy enough to fix.Additionally,
my-fullstack-project@0.0.0 nx /Users/hrichert/Projects/my-fullstack-projectis not a line that works on Windows terminals (by default). It always needs an application, batch, or cmd file preceding it.Personally I'd rather dev on *nix more often myself (but it's not always my choice)
Otherwise, great guide!
Thank you for your great tutorial.
I have this postinstall line in my
package.jsonfile which doesn't allow me to runnpm install --productionsuccessfully, unless I move@angular/cliand@angular/compiler-clifrom devDependencies to dependencies."scripts": {"postinstall": "node ./decorate-angular-cli.js && ngcc --properties es2015 browser module main"
...
}
Is moving dependencies ok? What's the best way to solve this problem?
Hey Hendrik,
today i've build a docker image and what i noticed is... u don't mention "npm run nx -- build api --prod" anywhere.
Maybe that's worth an edit
Good point. You're right. I'll set aside some time in the next days to follow up!
it sound Easy really.
thanks for the Explanation.
if you end up trying it for a future project, please let me know how it goes! :-)