This post focuses on the very essential takeaways on linux network interfaces from my learnings. This comes handy when you are working with the ecosystem of Containers , Kubernetes (Azure Kubernetes Service, Amazon EKS) with a mix of WireGuard (Encryption) and Network Policy (Calico).
What is Network Interface ?
A network interface is a software interface to a networking hardware.
A network interface is how the kernel links up the software side of networking to the hardware side.
Linux kernel distinguishes between two types of network interfaces: physical and virtual.
Physical network interface represents an actual network hardware device. This is typically eth0 interface, which represents Ethernet network card.
Virtual network interface doesn’t represent any hardware device and is usually linked to one.
There are different kinds of virtual interfaces e.g. Loopback, bridges, VLANs, tunnel interfaces and so on but that is not discussed in this post.
The ifconfig or ip commands allows us to configure network interfaces. This post uses ip command.
I have created an Amazon Linux instance of type t3.micro in AWS and connected to it to take as a concrete example.
Useful commands for dealing with Network Interfaces
To show network interface information for all interfaces
$ ip link show

This shows two network interfaces lo and eth0 . The second line for each interface shows the link layer adddress associated with the device.
The interface flags inside the <> are summarised as below.
LOOPBACK — this interface does not communicate with other hosts. All packets sent through it will be returned
UP — device is turned on and is ready to accept packets for transmission
BROADCAST - has the facility to send packets to all hosts sharing the same link
MULTICAST — indicating that the interface is aware of multicasting i.e. sending packets to some subset of neighbouring nodes
To see the statistics of specific interface
$ ip -s link show eth0

To show ip addresses assigned to interfaces
$ ip address show
or
$ ip a
or
$ ip addr

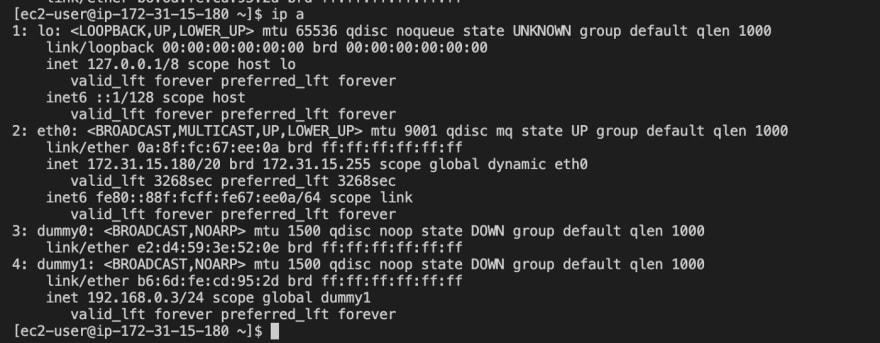
1 : lo : is having an IP address of 127.0.0.01 (a.k.a localhost)
2: eth0 : shows IP of 172.31.15.180
This is the private IP assigned by AWS to an EC2 instance. This IP is obtained from the subnet 172.31.0.0/20 CIDR block in which the instance is launched.
Create dummy interface
A dummy interface is entirely virtual like, for example, the loopback interface. The dummy interface address look like a real address for local programs. The purpose of a dummy interface is to provide a device to route packets through without actually transmitting them. This is very handy when you want to simulate a network computing environment for testing purpose.
create dummy interface
sudo ip link add dummy1 type dummy# assign address to dummy interface
sudo ip addr add 192.168.0.3/24 dev dummy1# make interface up
ip link set dummy1 up
You will see that dummy interface is created and IP address is also assigned to that dummy interface.
Note that this IP address is entirely different — virtual than the subnet CIDR range is 172.31.0.0/20 provided by AWS and this could be any valid CIDR block.

test the connectivity
ping 192.168.0.3

Run HTTP server with new virtual IP
Scenario 1 : Run http server on port 8000 and serve the content from direcory /tmp
python3 -m http.server 8000 --directory /tmp

- If you curl to public ip 13.232.86.139:8000 you should receive HTTP 200 response as shown here.
- Similarly curl to 127.0.0.1 also works !

If you curl to the new network interface with IP 192.168.0.3 it also gives HTTP 200 reponse.
This works fine since the the traffic is accepted on all the network interfaces (0.0.0.0/0)on port 8000 of host !

Scenario 2 : Run Python Server on the new IP address 192.168.0.3
python3 -m http.server --bind 192.168.0.3 8000 --directory /tmp

Now the following result is seen
a) curl to public ip 13.232.86.139:8000 does not work
b) curl to 127.0.0.01:8000 does not work
c) curl to 192.168.0.3:8000 Works !


This is as expected as the web server is now tied to only specific network interface IP i.e. 192.168.0.3 on port 8000 so any traffic which is not destined to new ip adresss will not be accepted by the HTTP server !
To delete the network interfaces
$ sudo ip link set dummy1 down
$ sudo ip link del dummy1

This deletes the network interface dummy1 as seen above.
That is all about this minimal know how on network interface.
I hope to build on this in my future posts.
Stay tuned !

Top comments (0)