
Let's assume you already played around with Hasura open source GraphQL engine and you were wondering how to add an authentication layer with AWS Cognito. Couple of words about Hasura if you are not familiar. Hasura is free and open source engine that auto generates GraphQL API on top of new or existing Postgres database. If this is the first time you hear about it, I suggest to check my introductory article here:
I just published Effortless Real-time GraphQL API with serverless business logic running in any cloud link.medium.com/DET666lI3T11:47 AM - 05 Feb 2019


and if you were wondering about how to use Authentication with Hasura you can read about it here:
Just published a blog post explaining @HasuraHQ Authentication options including @awscloud Cognito, @auth0, @Firebase, custom auth servers or custom auth webhooks. Check it out.
dev.to/hasurahq/hasur…06:38 AM - 08 Apr 2019
In last article I showed AWS Cognito as one of solutions how to create your authentication for your app and pass Auth token to Hasura. In this article I want to explain how you do that with aws-amplify CLI as well as how you connect your users to actual cognito user pool users.
In a nutshell we will cover
- How to deploy Hasura
- How to setup aws amplify with aws cognito
- How to setup a AWS lambda to update our database after user is created in cognito
- Customise cognito JWT creation to enable hasura permission rules
Table of Contents
- Creating and deploying our engine
- Setting up Hasura CLI
- Setting our database structure
- Setting our Auth with Amplify CLI
- Creating your Frontend
- Adding a new User pool user into Hasura
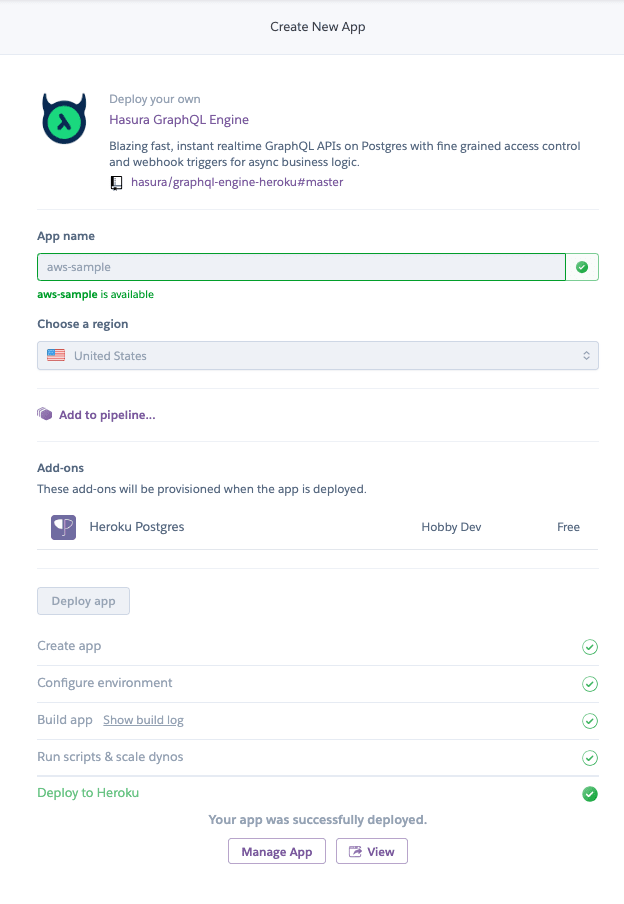
Creating and deploying our engine
Let's start by regular step of Deploying to Heroku
We also can use AWS RDS to deploy our engine which is described in detail here
Now before we setting any auth or continue in general we will secure our endpoint by setting HASURA_GRAPHQL_ADMIN_SECRET

Setting up Hasura CLI
We want changes done in our console to be reflected as migrations files and stored in source control as explained in detail here
What we will do is set HASURA_GRAPHQL_ENABLE_CONSOLE to false in our heroku config vars

Now it's time to init our hasura project with through Hasura CLI
hasura init --endpoint https://aws-sample.herokuapp.com
And then
cd hasura
hasura console --admin-secret=<your admin secret>
Console will open up on localhost and whatever you do in the console will be saved in local migration files that you can store in source control.
Setting our database structure
Now when we have our engine set up, we need to create database structure. We will create simple blog cms so we will have only posts and users table. Important part is that users table id have to be of a text format so we can wire it up with AWS user pool properly.
Posts table will look like this:

User table will look like this:

I also added object relationship from posts userId to user object

so we can query our users from posts query like so
query {
  posts {
    title
    content
    user {
      name
    }
  }
}
Now when our backend ready it's time to set up our frontend and authentication.
Now I don't know what frontend framework you use, so I will use React for this example, but the process is similar in Vue and Angular. I hardly will touch Frontend here. My main goal is so you will understand the flow.
Setting our Auth with Amplify CLI
npm install -g @aws-amplify/cli
amplify configure
This will open up the AWS console. Once you are logged in to the console you can jump back to the command line. Then we need to specify AWS region.
In the next step we will need to specify a new AWS IAM user we about to create.
It will open up IAM dashboard with the user we already set up with the one we specified through CLI.

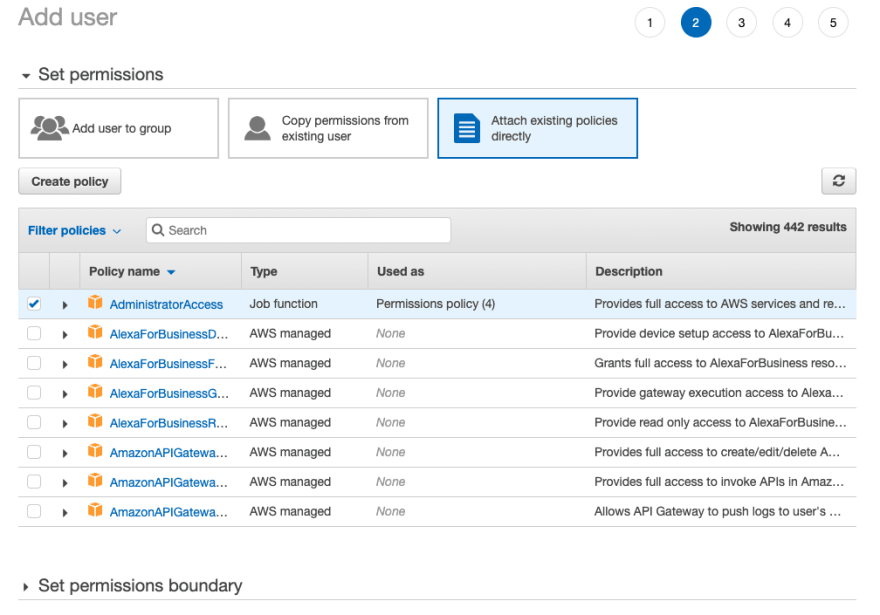
Next we will need to set up AWS permissions. I will just click Next, Review and will create a user. You will be presented with a screen with Access key and secret which you should type in amplify cli


Creating your Frontend
We will use Amplify auth module with React, but you can choose your own favorite framework. Check Amplify Vue docs and Angular docs for more detail.
we will start by creating our frontend with
npx create-react-app react-frontend
and then run
amplify init

To add basic authentication with User pools run amplify add auth with default configuration. After adding auth we need to deploy it to AWS. This can be done by running amplify push which will update our resources in the cloud and will add Cognito User Pool
It's time to add auth to our React app:
yarn add aws-amplify aws-amplify-react
In our App.js file let's wrap our app with Amplify withAuthenticator HOC
import Amplify, { Auth } from 'aws-amplify';
import awsmobile from './aws-exports';
import { withAuthenticator } from 'aws-amplify-react'; // or 'aws-amplify-react-native';

Amplify.configure(awsmobile);


export default withAuthenticator(App, true);
What we will be presented is AWS auth screen where we will have sign up, sign in etc. We won't cover how to customize everything for your app, so let's just use the default one

Now let's add some behavior on sign up/sign in.
Whenever our App is authenticated, basically our App component will be rendered.
So if I will add this code to our App.js:
import { Auth } from 'aws-amplify'

//....rest of code

componentDidMount(){
    Auth.currentAuthenticatedUser().then(user => {
      console.log(user)
    })
}

//rest of code
you will be able to get user data.
So far we have authentication, but there is a problem. We need to add this auth data to our Hasura.
Adding a new User pool user into Hasura
If we open our AWS console on User pool tab we will be able to see that we can create custom Triggers for different stages in authentication process. We will need to create at least two triggers. Pre sign-up and pre token generation.

Let's start with sign up trigger
Pre Sign Up Lambda
Let's go to AWS Lambda console and create a new lambda. You will have to create it locally first because we will have node-fetch dependency, so we will need to upload a zip to AWS console. Our lambda index.js file will look like this:
const fetch = require('node-fetch');

const adminSecret = process.env.ADMIN_SECRET;
const hgeEndpoint = process.env.HGE_ENDPOINT;

const query = `
mutation addUser($id: String!, $phone:String!, $email: String!){
  insert_users(objects:[{
    email: $email
    id: $id
    phone: $phone
  }]) {
    returning {
      email
    }
  }
}
`

exports.handler = (event, context, callback) => {

try {
  const qv = {
    email: event.request.userAttributes.email,
    phone: event.request.userAttributes.phone_number,
    id: event.userName
  };

  fetch(hgeEndpoint + '/v1alpha1/graphql', {
      method: 'POST',
      body: JSON.stringify({query: query, variables: qv}),
      headers: {'Content-Type': 'application/json', 'x-hasura-admin-secret': adminSecret},
  })
  .then(res => res.json())
  .then(json => {
      callback(null, event);
  });


} catch (e) {
  callback(null, false)
}


};
What we are trying to do here is to insert a new user to database by executing mutation. You can notice that we pass our Admin Secret at headers, but this is fine for server to server communication. What is happening here is that our id will be cognito username
Let's try to Sign Up now.
We will get notification mail with our verification code

Now we can sign in and see our Auth token in the console.
The cool part is also that we will have our user created in Postgres. Let's check our console:

Pre Token Generation lambda
We are getting our token, but it's not enough. If we want to use JWT_TOKEN with Hasura we need to do several things. (I explained JWT auth in details here):
Set HASURA_GRAPHQL_JWT_SECRET
Set HASURA_GRAPHQL_JWT_SECRET as env variable in our Heroku. Our config will be:
{
"type":"RS256",
    "jwk_url": "https://cognito-idp.{region}.amazonaws.com/{userPoolId}/.well-    known/jwks.json",
"claims_format": "stringified_json"
}
Note that {userPoolId} should be substituted to your userPoolId taken from AWS console as well as {region} to correct region you are using
Create our Pre Token generation lambda.
For our pre token generation lambda we need to add custom claims. We will pass username as user id so we will be able to reference it in Hasura permission system
exports.handler = (event, context, callback) => {
    event.response = {
        "claimsOverrideDetails": {
            "claimsToAddOrOverride": {
                "event": JSON.stringify(event.userName),
                "https://hasura.io/jwt/claims": JSON.stringify({
                    "x-hasura-allowed-roles": ["anonymous","user", "admin"],
                    "x-hasura-default-role": event.userName === "vnovick" ? "admin": "user",
                    "x-hasura-user-id": event.userName
                })
            }
        }
    }
    callback(null, event)
}
Let's copy signInUserSession.idToken.jwtToken from Auth.currentAuthenticatedUser() response and paste it in Hasura console as Authorization Bearer token
Now all custom claims will be passed to Hasura permissions system and we will be able to reference them there.
Create Roles in Hasura Permission system
Let's see how it's done. We will create two additional roles - anonymous without any permissions and a user role.
I want user to be able to query only their own user data as well as see only their posts. We can set up permissions in the console accordingly:

user role will be able to see only their own data.
Let's double check that by querying all users:

Summary
This blog post is only a brief overview of what you can do with Hasura and AWS Cognito, but I hope you get the idea of main auth workflow you should stick to. As you can see, because we use Lambda triggers and plug them into Cognito auth process we can do any level of complexity. We can validate if our user exists, add custom variables to hasura custom claims and so on.
After reading this blog post I will appreciate if you can give me feedback what parts you want me to cover more in depth so I can either write another more advanced blog post or lead you to resources explaining these parts.

Top comments (7)
A better trigger would be the
Post Confirmationtrigger instead of the Pre sign-up one. The latter wouldn't be useful if the user creation fails in Cognito but the former one guarantees that the user exists in Cognito BEFORE they can be created in the database.That's a good suggestion. I will make sure to try it out. Thanks!
Thanks for this, Vladimir. A few questions. How did you get your env variables into the lambda?
Also, is this the dir structure you are working with?
Or did you set the env vars in your cloudformation manually?
Thank you, sir.
Thanks for the great tutorial. I managed to get this working easily, but I'm having a lot of trouble with the next step, which is connecting my newly authenticated app to Hasura via Apollo. The token I get works fine if I paste it into Hasura, but when I set up Apollo to send requests to Hasura I get the following error:
Error: GraphQL error: Malformed Authorization header
I don't know what the problem is or whether it's Hasura or Apollo or Cognito, but if I console log the jwt before passing it to Apollo I can paste it into Hasura and it works fine. Is there a step I'm missing? Here's my code, pretty much right out of the Apollo docs example:
async function getSession() {
Auth.currentSession().then(res=>{
let idToken = res.getIdToken()
let jwt = idToken.getJwtToken()
//You can print them to see the full objects
console.log(JSON.stringify(idToken))
console.log(jwt)
return jwt
})
}
const token = getSession()
const client = new ApolloClient({
uri: 'api.example.com/v1/graphql',
headers: {
authorization: token ?
Bearer ${token}: "",}});
//backtics don't show in headers section
getSession is async function and you missed await keyword calling getSession. Your token is a promise.
Hi, can you elaborate on when you say this:
"Let's copy signInUserSession.idToken.jwtToken from Auth.currentAuthenticatedUser() response and paste it in Hasura console as Authorization Bearer token"
If you are caught up on setting up the lamda, here is an example using hasura. github.com/vnovick/bad-words-lambd.... Vnovick comes thru again!