
In this post, we will look at building a GraphQL API backend with Deno and create a unified GraphQL layer with Hasura and Deno to solve custom business logic requirements of an app.
What's Deno? A Quick Primer
Deno is a runtime for JavaScript (and TypeScript) that is secure by default, ships only a single executable that uses V8 engine (and hence performant). What more? It is written in Rust. The Deno runtime runs in a sandbox and hence doesn't have access to the file system (I/O), networking, envs etc unless explicitly specified. With Deno, you can import modules by URLs, alleviating the registry issues that are typically present in the Node.js ecosystem.
New to GraphQL? Check out our Introduction to GraphQL tutorial and how Hasura fits in as a GraphQL API backend.
Choosing the Deno module for GraphQL
Alright, to setup a GraphQL server with Deno, we have a couple of modules to choose from.
Oak is a web server framework for Deno and feels very relatable for users coming from a Node.js/Express background. oak-graphql is a middleware for oak adding GraphQL support.
Obsidian is a fullstack GraphQL framework for Deno that comes with both a server and client module (works with SSR react apps) and specialised in normalized caching.
In this example, we will make use of oak framework and the GraphQL middleware oak-graphql to create an endpoint. Create a new file called server.ts and add the following imports:
import { Application, Router, RouterContext } from "https://deno.land/x/oak@v6.2.0/mod.ts";

import { applyGraphQL, gql } from "https://deno.land/x/oak_graphql/mod.ts";

const app = new Application();
In the above code, we are importing modules from oak and oak_graphql and creating a new instance of the Application that will be used later.
Defining GraphQL Schema and Types
Next up, we go ahead and define GraphQL schema with type definitions. I'm just going to assume a simple User schema that has 3 fields id, first_name and last_name. Add this code below to server.ts.
const types = gql`
type User {
  id: Int
  first_name: String
  last_name: String
}

type UserOutput {
  id: Int
}

type Query {
  fetchUser(id: Int): User
}

type Mutation {
  insertUser(first_name: String!, last_name: String!): UserOutput!
}
`;
We have declared a couple of operations; one Query (fetchUser) and one Mutation (insertUser).
GraphQL Resolvers in Deno
For the operations above, we need to define the resolvers. We are sticking to returning sample data, but this is the place for writing the logic to perform data fetching or inserts to the database, perform any validations etc.
const resolvers = {
  Query: {
    fetchUser: (parent: any, { id }: any, context: any, info: any) => {
      // make database calls or http requests inside and return data
      return {
        id: 1,
        first_name: "Praveen",
        last_name: "Durairaju",
      };
    },
  },
  Mutation: {
    insertUser: (parent: any, { first_name, last_name }: any, context: any, info: any) => {
      console.log("input:", first_name, last_name);
      return {
        id: 1,
      };
    },
  },
};
Finally, glue this typedefs and resolvers to create a GraphQL server. The server is running on port 8090.
const GraphQLService = await applyGraphQL<Router>({
  Router,
  typeDefs: types,
  resolvers: resolvers,
  context: (ctx: RouterContext) => {
    console.log(ctx);
    return { user: "Praveen" };
  }
})

app.use(GraphQLService.routes(), GraphQLService.allowedMethods());

console.log("Server start at http://localhost:8090");
await app.listen({ port: 8090 });
Running Deno Server
To run the deno server, we can execute a command like the one below:
deno run --allow-net server.ts
Note that deno ships with a single executable and we are passing it some flags to apply some permissions. By default Deno is secure and hence --allow-net flag lets you run the server on a given port and host.
Now head to http://localhost:8090/graphql. You should see GraphQL Playground loading at this endpoint for this GET request. The POST requests to this endpoint will hit the GraphQL server.
Make the following GraphQL query to verify our implementation:
query {
  fetchUser(id: 1) {
    id
    first_name
    last_name
  }
}
And the following mutation:
mutation {
  insertUser(first_name: "Praveen", last_name: "Durairaju") {
    id
  }
}
That's it! The above queries should give our hardcoded response from the server.
Context
The ctx argument is where you will have the auth context for the incoming request. Typically this is where you will handle Authorization headers sent from the client.
Packaging and Deployment of Deno with Docker
Deno can be packaged as a docker image and can be run with docker-compose. Let's look at the Dockerfile steps:
FROM hayd/alpine-deno:1.7.2

EXPOSE 8090

WORKDIR /app

USER deno

COPY . .
RUN deno cache server.ts

CMD ["run", "--allow-net", "server.ts"]
We can ofcourse change the PORT exposed. Throughout this example, we have used the PORT 8090, but can be replaced with any port of choice. I run Hasura on my local machine at 8080 and hence my custom business logic servers run at 8090 usually.
Create the following docker-compose.yaml file in the same directory:
version: "3.7"

services:
  deno:
    image: "deno-docker:0.0.1"
    build: .
    ports:
      - "8090:8090"
    networks:
      - deno

networks:
  deno: {}
And finally let's create the image and run it!
docker-compose up -d
For further changes, we can use the above docker-compose command to restart the server and serve the endpoint at http://localhost:8090.
Local Dev with ngrok
We can run this container setup on cloud vendors in production. But for local development, I'm going to make use of ngrok to expose this to the outside world. This is needed because once we create the Hasura Cloud project and try to add a remote schema (covered later below), we need a publicly accessible endpoint for things to work.
Once you setup ngrok, run ngrok http 8090 to expose the local port 8090 on a publicly accessible URL. You should get a URL similar to https://2f10a069dc2a.ngrok.io.
Deploy Hasura to get a GraphQL API
- Click on the following button to deploy GraphQL engine on Hasura Cloud including Postgres add-on or using an existing Postgres database: <!--kg-card-begin: markdown-->

Open the Hasura console by clicking on the button "Launch console".
Create table users.
Head to the Data tab and create a new table called users with columns:
- id (Int)
- email (text)
- created_at (timestamp now()).
Select the primary key as id.

Once the table has been created, create a new record by heading to the Insert Row tab of the users table. Create a user with id : 1. (Remember we hardcoded a user with the same id in our deno server?)
Adding Deno GraphQL Server as a Remote Schema
Head to the Remote Schemas tab of the Hasura Console to add the Deno server to Hasura's GraphQL schema.
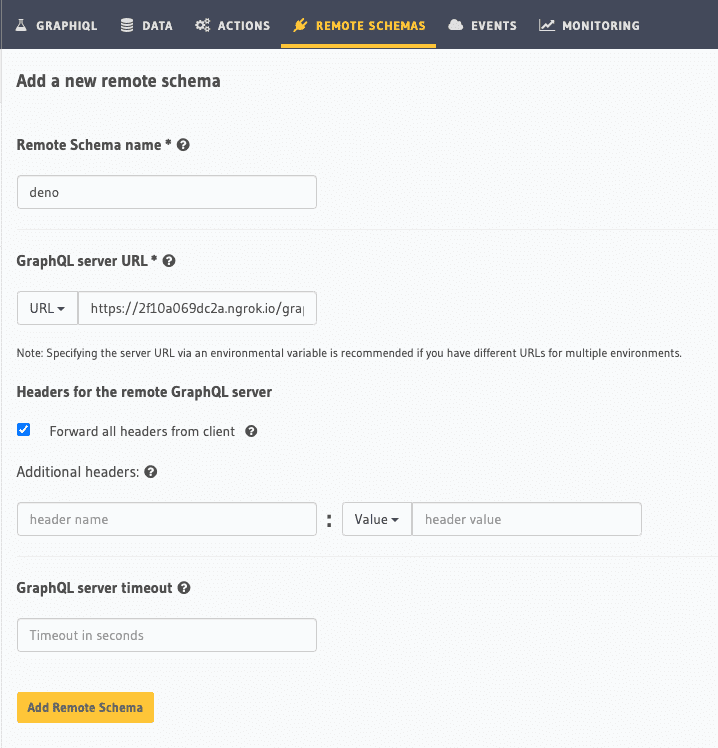
The GraphQL server URL will be the /graphql endpoint of the deno server. Once we add this, we will get a unified API layer with Hasura's endpoint.
Establishing remote relationships
Now that we have users table in Postgres and the fetchUser query from Deno, we can merge data from these by establishing a remote relationship. Head to the Relationships tab and configure a new Remote Schema Relationship as shown below:

Now you can make the following query from Hasura's API Explorer to fetch the merged data:
query {
  users {
    id
    created_at
    user_metadata {
      first_name
      last_name
    }
  }
}
Note that, data for id and created_at fields come from the database (Postgres) and user_metadata fields like first_name and last_name come from our Deno server.
Deno Server as a Hasura Action handler
The example that we tried out above is for a standalone GraphQL server written with Deno that can be added as a Remote Schema on Hasura. But if you are comfortable writing REST APIs with Deno with oak, then you can totally do that as well. Once you have a REST API endpoint, you can define an Action handler with the GraphQL schema and types and point to that endpoint as the webhook URL. We can look at this in detail in an another post!
Link to Github - https://github.com/praveenweb/deno-graphql
Are you already using Deno for writing your REST APIs or GraphQL due to the sandbox environment? Let us know in the comments.

Oldest comments (0)