Push Notifications
Push notifications allow users to get updates and engage with your content. You can send push notifications via browsers (Desktop/Mobile) which support Push & Notification API.
Below browsers support Push & Notification API:
- Chrome Desktop and Mobile (version 50+)
- Firefox Desktop and Mobile (version 44+)
- Opera on Mobile (version 37+)
Overview
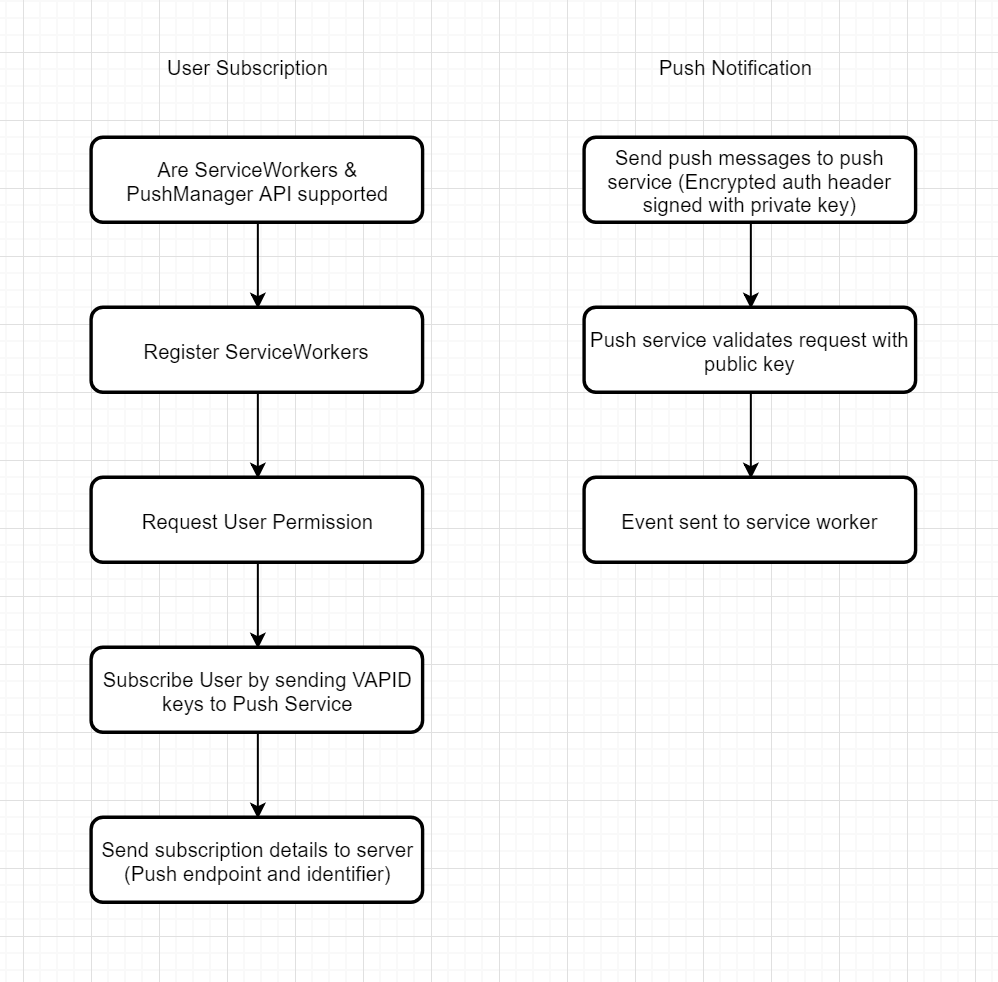
Let’s see what’s involved in setting up a push notification service for a site.
Service Worker
Push is based on service workers because service workers operate in the background. A service worker is a “special” JavaScript file.
The browser can execute this JavaScript without your page being open. This means the only time code is run for a push notification (in other words, the only time the battery is used) is when the user interacts with a notification by clicking it or closing it.
It’s inside the service worker’s ‘push’ event that you can perform any background tasks. You can make analytics calls,cache pages offline and show notifications.
You must check if the browser supports service workers.
Push Manager
The PushManager interface of the Push API provides a way to receive notifications from third-party servers as well as request URLs for push notifications.
You must check if the browser supports push manager.
Service Worker Registration
Once we know that the browser supports service worker and push manager we register our service worker javascript file.
The browser will then run the file in a service worker environment.
User Permission
Once we register the service worker we need to get permission from the user to send push notifications.
If the user blocks the permission request then they have to manually unblock the site in the browser settings panel.
User Subscription
After registering the service worker and getting user permission, we need to subscribe the user.
We need to generate VAPID keys and submit to the push service. These keys are used by the push service to identify the application subscribing the user and ensure that the same application is the one messaging the user.
Once you subscribe you will receive an endpoint, associated with the app’s public key and an identifier (push subscription).
Later, when you want to send a push message, you’ll need to create an Authorization header which will contain information signed with your application server’s private key and submit to that endpoint.
Subscription Storage
We need to store the push subscription details by sending it to our server so that we can use it to send messages to a user.
Push Notification
To send a push message we need to do a web push by sending a payload with an Authorization header signed with the private key.
The push service will use the public key to decrypt the authorization header and verify that it is the same application that subscribed the user which is trying to send a message.
It will then send the push message to the user’s device when the browser becomes active.
Firebase Cloud Messaging
Firebase Cloud Messaging (FCM) is a cross-platform messaging solution that lets you reliably deliver messages at no cost.
We’ll see how we can use FCM to send notification messages to the client.
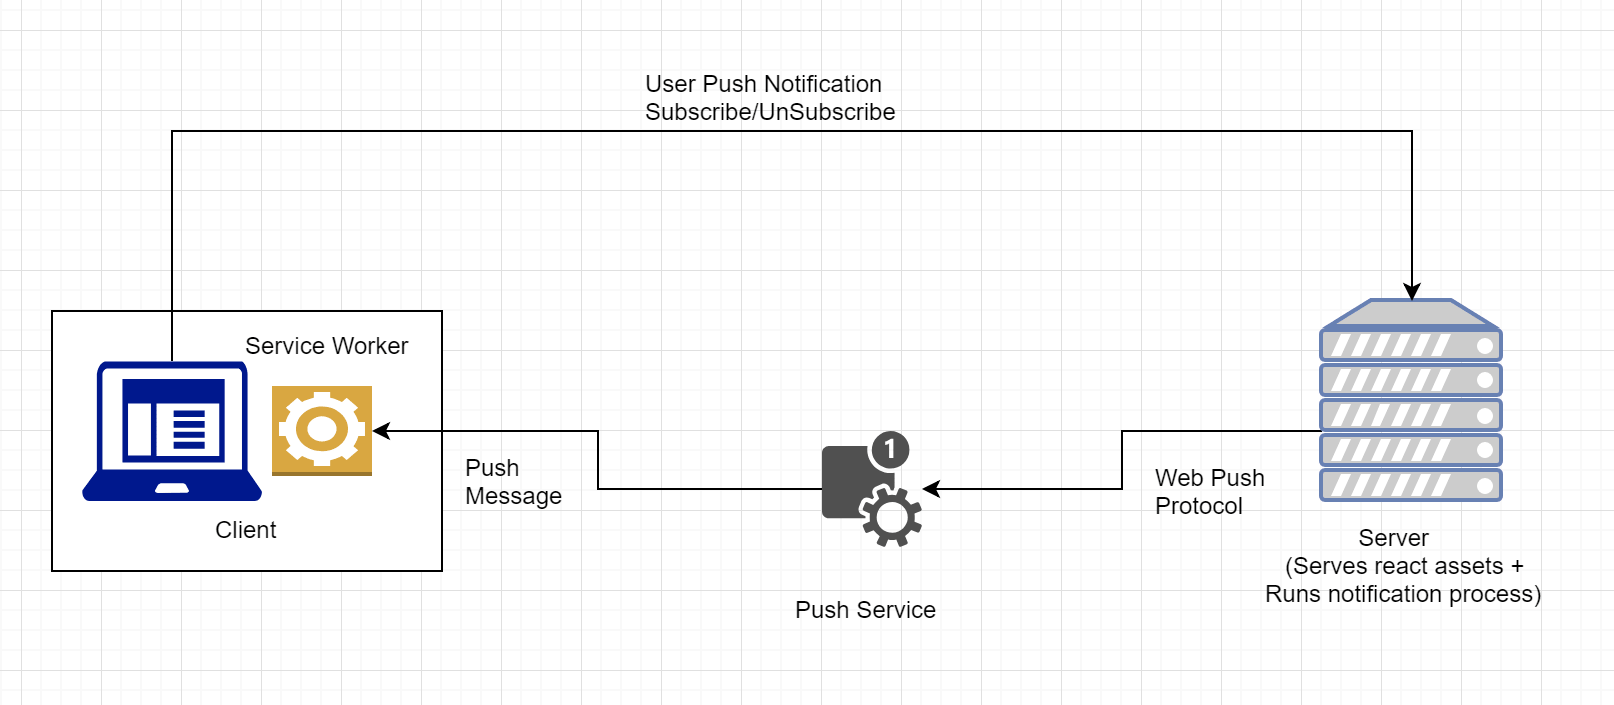
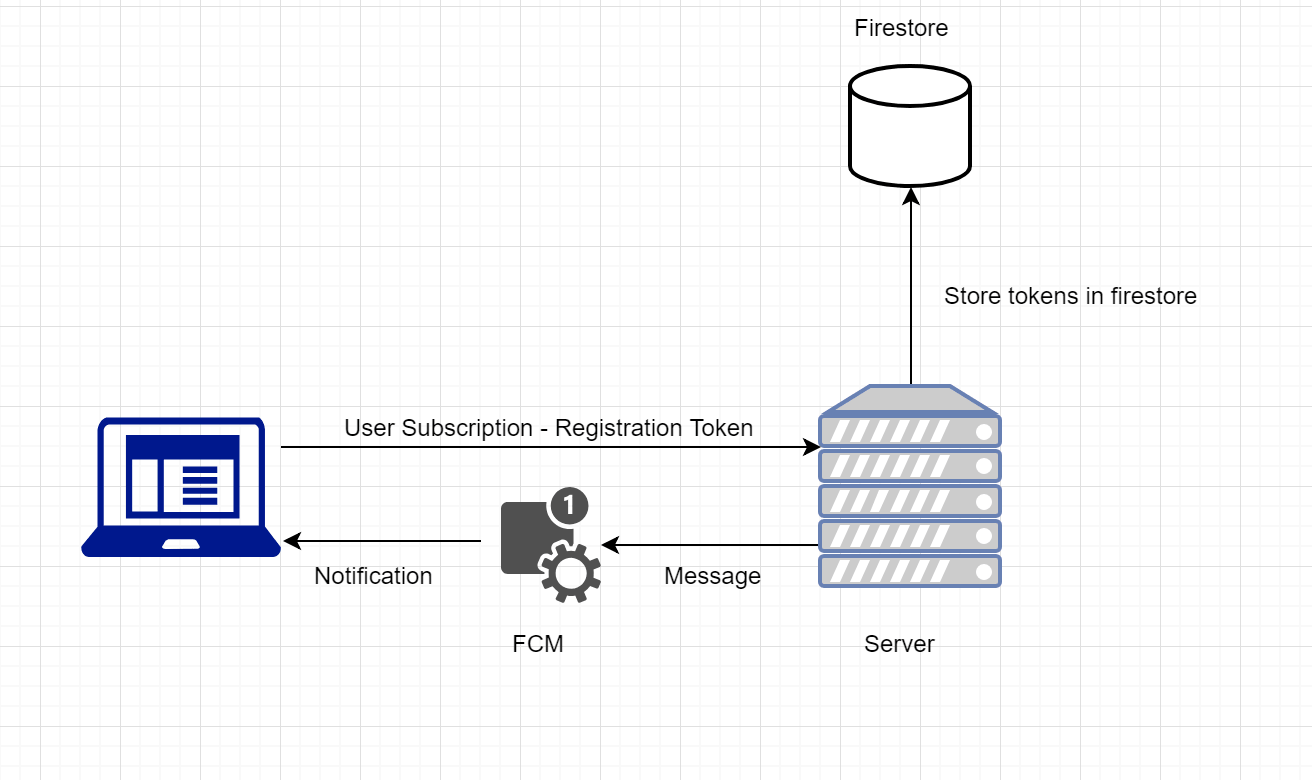
Below is how our application will work. We won’t go into the details of how to build and deploy a react app as it is outside the scope of this guide.
Source code of the application can be found here -
 HarshadRanganathan
/
gnib-visa-app
HarshadRanganathan
/
gnib-visa-app
Find appointment slots for GNIB (Irish Residence Permit) and Re-Entry Visa without hassle

gnib-visa-app
Find appointment slots for GNIB (Irish Residence Permit) without hassle.
App is hosted at https://gnib-visa-app.rharshad.com/
This App utilizes:
-
React
- axios for promise based http requests
-
Redux
- redux-thunk for middleware
- Express minimalist web framework
- Webpack for bundling
- Babel for transpiling
Running the App locally
You'll need Node & NPM installed on your local development machine.
Install the project dependencies by running below commands.
# install react project dependencies
npm install
# install notification project dependencies
cd notifications/
npm install
Development mode
npm run dev
Runs the app in development mode with webpack recompiling and tests re-run whenever any files change.
Open http://localhost:8080 (defaults to port 8080) to view the app in the browser.
The page will automatically reload if you make changes to the code.
Production mode
npm run build
Builds the app for production to the public folder.
It bundles React in production mode, minifies the files and the…
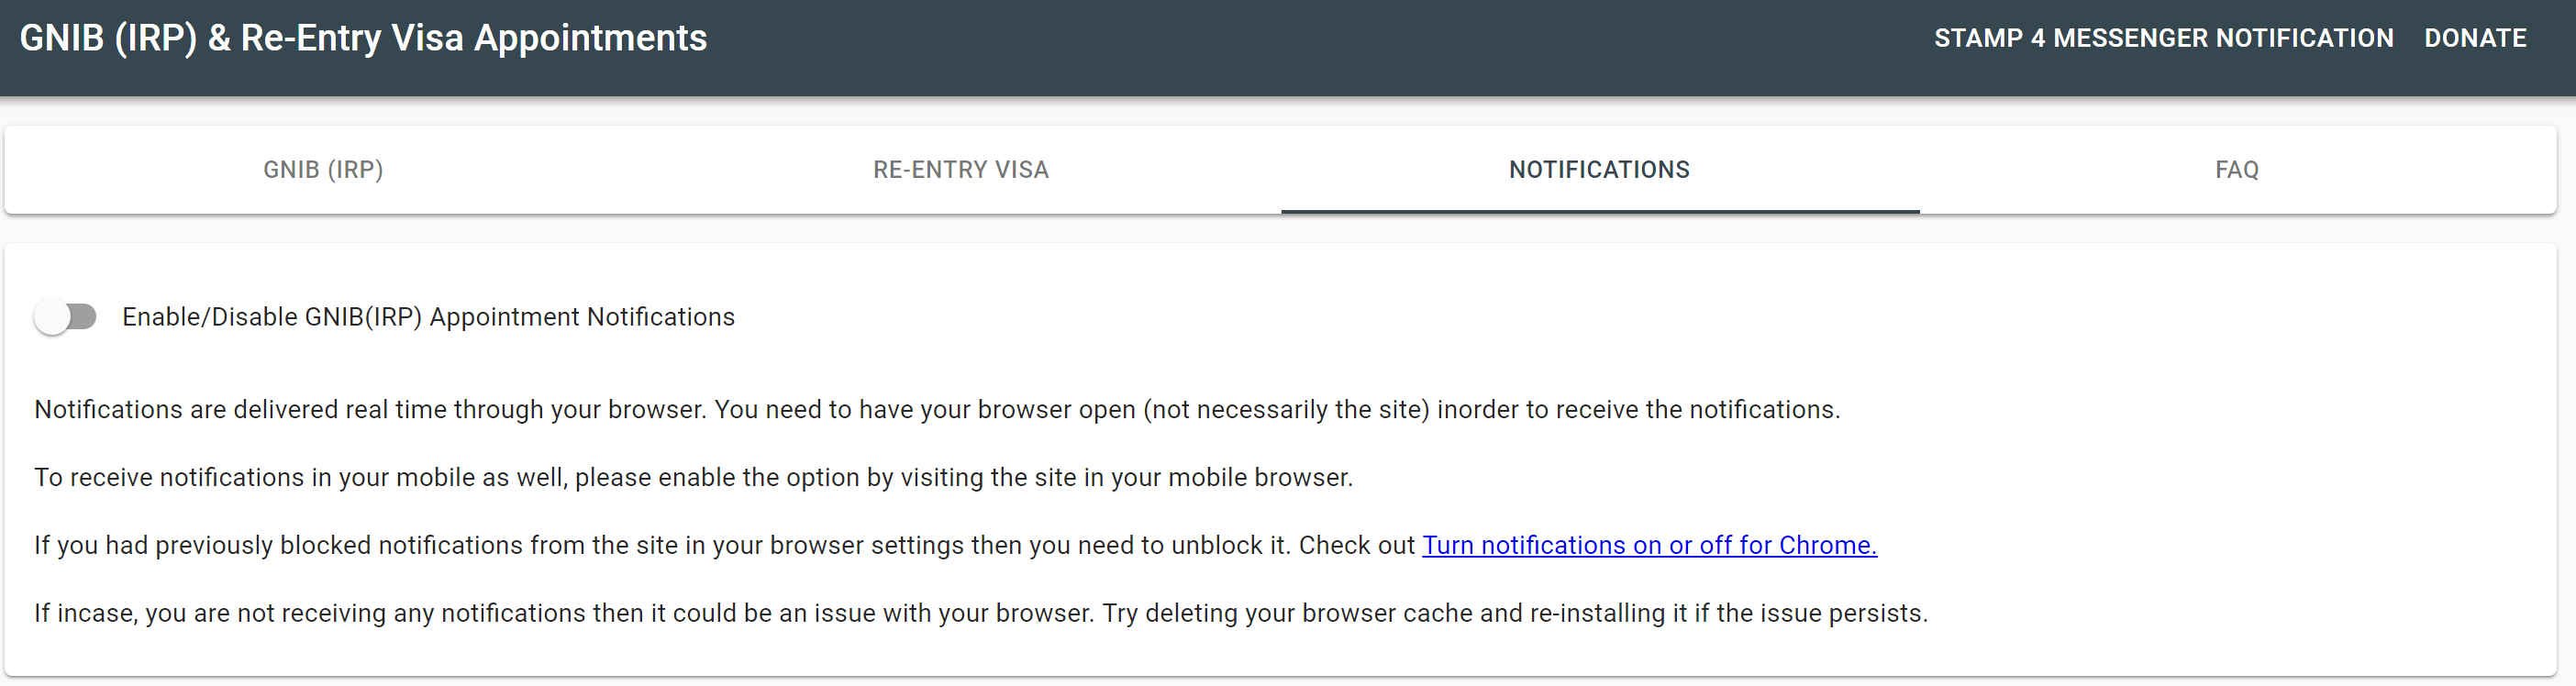
Sample notification page:
Client Side
Push API relies on a few different pieces of technology, including Web App Manifests and Service Workers.
Let’s see the steps involved in enabling Push API for your react app. We’ll use Firebase SDK to facilitate instant messaging.
Add Firebase to your app
To add Firebase to your app, you’ll need a Firebase project.
- Create a firebase project in the Firebase console.
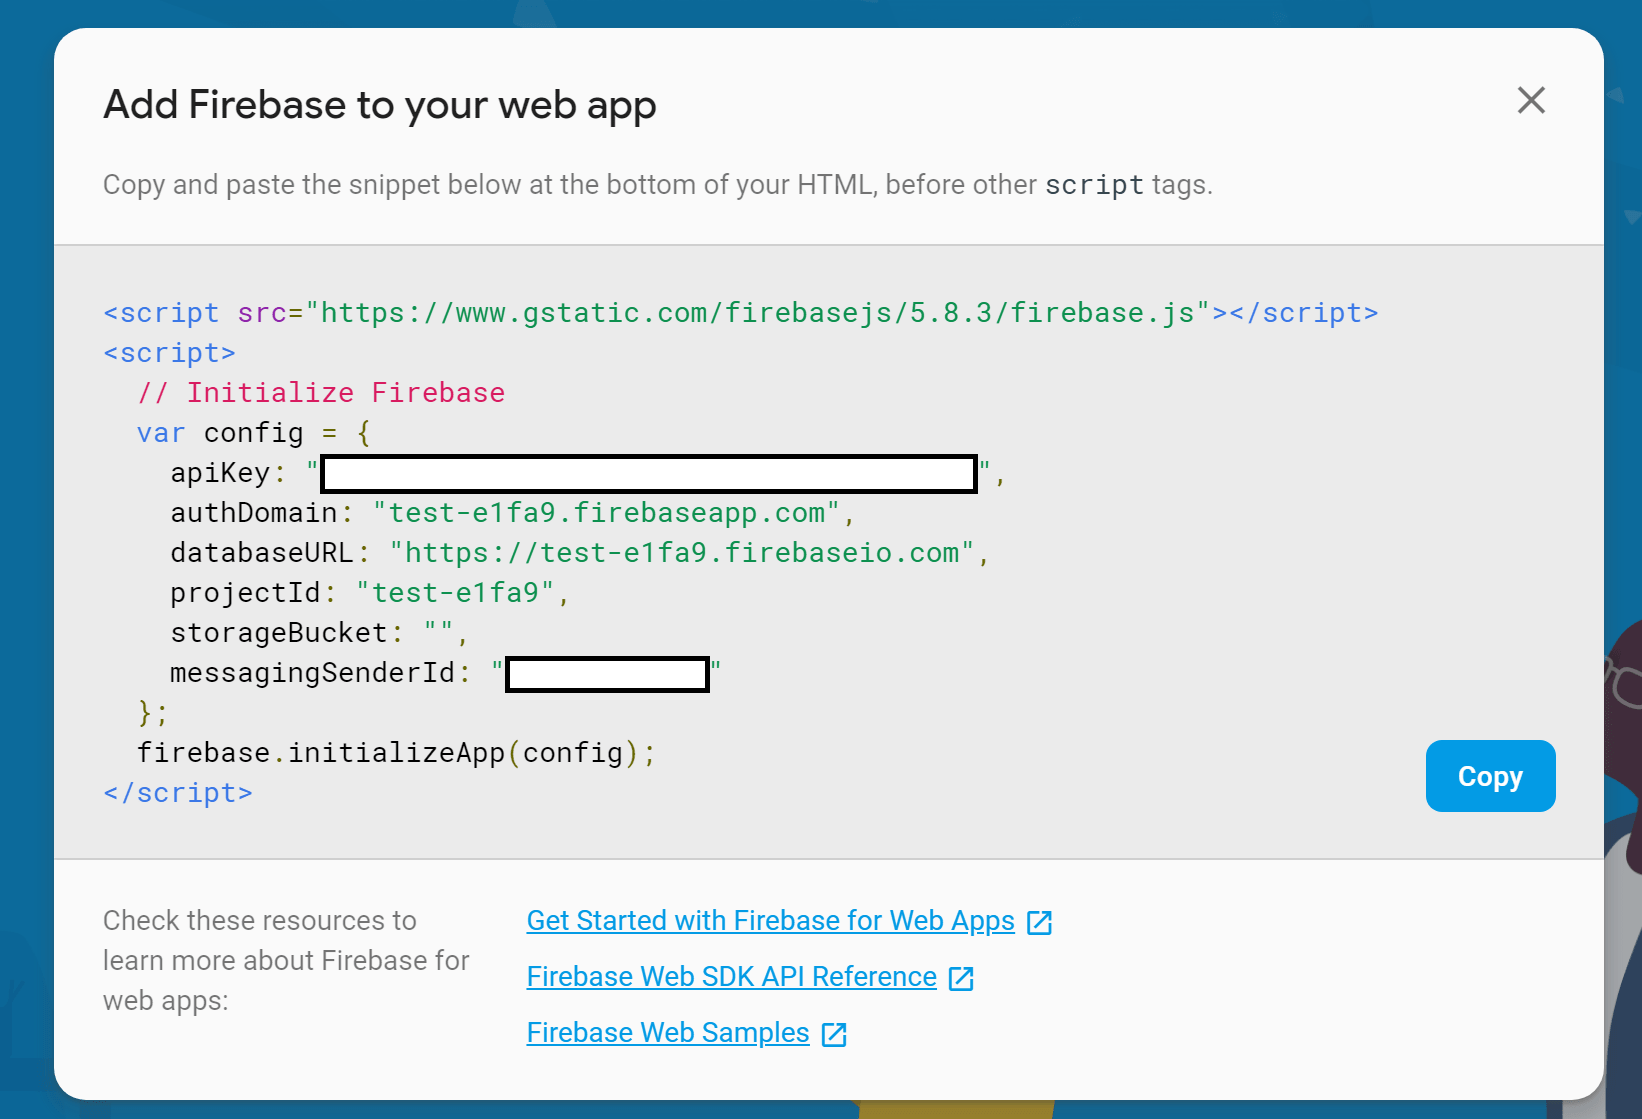
- Get your app config which we will use to initialize firebase in your react app.
- Install firebase npm module.
npm install --save firebase
Create a firebase.js file where we will initialize our app with the configuration details we got from our firebase project and also export the messaging component.
We will use the messaging reference later to register our service worker and handle incoming push notifications.
import firebase from 'firebase/app';
import '@firebase/messaging';

const config = {
    messagingSenderId: '<your-app-messaging-sender-id>'
};

firebase.initializeApp(config);

let messaging;

// we need to check if messaging is supported by the browser
if(firebase.messaging.isSupported()) {
    messaging = firebase.messaging();
}

export {
    messaging
};
Subscription Page
Next, we will create a notifications.js react component page which will check if the browser supports Service Worker and Push API. Based on it we will either display a message mentioning that push notifications are not supported or our subscription options.
Here, we have used material-ui for styling the page. Also, we import our firebase.js file which we had created previously.
We are following the passive approach here, which is to have a button or toggle switch that enables / disables push messages in a location on the page that is consistent throughout a site. Good UX design is to offer a way out for the user from the push messages and also not to ask for push permissions as soon as the user visits the page.
import React, { Fragment, Component } from 'react';
import PropTypes from 'prop-types';
import { withStyles, Card, CardContent, Typography, Switch, FormControlLabel } from '@material-ui/core';
import { messaging } from '../component/firebase';

const styles = theme => ({
    card: {
        marginTop: theme.spacing.unit * 2,
        marginBottom: theme.spacing.unit * 2,
        marginLeft: theme.spacing.unit * 2,
        marginRight: theme.spacing.unit * 2
    },
    noteTextPos: {
        marginTop: theme.spacing.unit * 2
    }
});

class Notifications extends Component {
    constructor(props) {
        super(props);
    }

    renderSubscriptionOptions(classes) {
        if(!('serviceWorker' in navigator) && !('PushManager' in window)) {
            return(
                <Typography className={classes.noteTextPos}>
                    Notification feature is supported only in:<br/>
                    Chrome Desktop and Mobile (version 50+)<br/>
                    Firefox Desktop and Mobile (version 44+)<br/>
                    Opera on Mobile (version 37+)
                </Typography>
            );
        } else {
            return (
                <Fragment>
                    <FormControlLabel
                        control={<Switch />}
                        label="Enable/Disable GNIB(IRP) Appointment Notifications"
                        onChange={this.gnibApptSubscriptionToggle}
                        checked={this.state.gnibApptSubscriptionToggleSwitch}
                    />
                </Fragment>
            );
        }
    }

    render() {
        const { classes } = this.props;
        return (
            <Fragment>
                <Card className={classes.card}>
                    <CardContent>
                        {this.renderSubscriptionOptions(classes)}
                    </CardContent>
                </Card>
            </Fragment>
        );
    }
}

Notifications.propTypes = {
    classes: PropTypes.object.isRequired
};

export default withStyles(styles)(Notifications);
Service Worker
Next, we need to create a service worker file and register it.
Create a new file firebase-messaging-sw.js inside the pwa directory with below contents.
// import firebase scripts inside service worker js script
importScripts('https://www.gstatic.com/firebasejs/5.7.2/firebase-app.js');
importScripts('https://www.gstatic.com/firebasejs/5.7.2/firebase-messaging.js');

firebase.initializeApp({
    'messagingSenderId': '<your-app-messaging-sender-id>'
});

const messaging = firebase.messaging();
We then register the service worker file by updating firebase.js file.
// register service worker
if ('serviceWorker' in navigator) {
    window.addEventListener('load', async () => {
        const registration = await navigator.serviceWorker.register('/firebase-messaging-sw.js', {
            updateViaCache: 'none'
        });
        messaging.useServiceWorker(registration);
    });
}
Few points:
We mentioned the path of the worker file as
/firebase-messaging-sw.jsbut we had placed the file insidepwadirectory. This is because, later, we will be updating webpack config to copy the files to thepublicfolder from where the static assets will be served. Based on your app design and bundler used you might have to update the path accordingly.We have set
updateViaCachetonone, so that the HTTP cache will not be consulted when making requests for either the top-level /service-worker.js or for any imported scripted. Prior to Chrome 68, the update request for /service-worker.js would be made via the HTTP cache. Starting in 68, the HTTP cache will be ignored when requesting updates to the service worker script, so existing web applications may see an increase in the frequency of requests for their service worker script. Requests for importScripts will still go via the HTTP cache.Every time our page loads, the browser will download the latest copy of service worker and will do a byte-to-byte comparison to see if anything has changed. If so, it will activate the new copy otherwise it won’t perform the update.
Also, if it notices any difference with the latest copy it won’t immediately activate the new service worker. The browser will wait until the current service worker controlls zero clients. You can however, force an update to be done.
Notification Message
Notification messages are handled differently depending on whether the page is in the foreground (has focus), or in the background, hidden behind other tabs, or completely closed.
Background Message Handling
We had earlier defined firebase-messaging-sw.js file which imported the firebase scripts and initialised the messaging component. That will take care of background message handling.
Whenever, a push event is sent, the service worker will get activated. The JS script is then run and the messaging component will make use of the Notification API to display the message in a standard format.
We will look at how the message is constructed with the content and action links in our server side section.
Foreground Message Handling
When your page in focus, then you need to explicity handle how your message gets displayed. For example, we need to make use of the onMessage function to handle the incoming message and show the notification using the service worker.
We update firebase.js file with the onMessage handler.
// register service worker & handle push events
if ('serviceWorker' in navigator) {
    window.addEventListener('load', async () => {
        const registration = await navigator.serviceWorker.register('/firebase-messaging-sw.js', {
            updateViaCache: 'none'
        });
        messaging.useServiceWorker(registration);
        messaging.onMessage((payload) => {
            const title = payload.notification.title;
            const options = {
                body: payload.notification.body,
                icon: payload.notification.icon,
                actions: [
                    {
                        action: payload.fcmOptions.link,
                        title: 'Book Appointment'
                    }
                ]
            };
            registration.showNotification(title, options);
        });
    });
}
Here, we get the message, icon, link and use the service worker to display the notification. We also create a notification action to handle click events.
Refer:
Update firebase-messaging-sw.js with the notificationclick listener:
importScripts('https://www.gstatic.com/firebasejs/5.7.2/firebase-app.js');
importScripts('https://www.gstatic.com/firebasejs/5.7.2/firebase-messaging.js');

firebase.initializeApp({
    'messagingSenderId': '<your-app-messaging-sender-id>'
});

const messaging = firebase.messaging();

self.addEventListener('notificationclick', (event) => {
    if (event.action) {
        clients.openWindow(event.action);
    }
    event.notification.close();
});
Whenever, the notification is clicked, it will open the link in a new window and will close the notification.
Refer:
[1] Notification Click Listener
User Permissions
So far, we have seen how to register service workers, display notifications etc. Inorder to display push notifications the user has to accept it. If incase, the user rejects or blocks the site we won’t be able to send any notifications until the user manually revokes it.
Let’s update notifications.js file with logic to handle user permissions.
/**
 * Check if user has already given permission for sending notifications
 * If not, request permission from user, generate instance token and store it in firestore
 */
async notificationPermission() {
    let permissionGranted = false;
    try {
        /* request permission if not granted */
        if (Notification.permission !== 'granted') {
            await messaging.requestPermission();
        }
        /* get instance token if not available */
        if (localStorage.getItem(INSTANCE_TOKEN) !== null) {
            permissionGranted = true;
        } else {
            const token = await messaging.getToken(); // returns the same token on every invocation until refreshed by browser
            await this.sendTokenToDb(token);
            localStorage.setItem(INSTANCE_TOKEN, token);
            permissionGranted = true;
        }
    } catch (err) {
        console.log(err);
        if (err.hasOwnProperty('code') && err.code === 'messaging/permission-default') console.log('You need to allow the site to send notifications');
        else if (err.hasOwnProperty('code') && err.code === 'messaging/permission-blocked') console.log('Currently, the site is blocked from sending notifications. Please unblock the same in your browser settings');
        else console.log('Unable to subscribe you to notifications');
    } finally {
        return permissionGranted;
    }
}
We do couple of things here:
- Check if the user has already granted the permission to send push notifications. If not, we request for it.
- Also we check if the token is available in the local storage (we will store it later).
- Finally, if above conditions aren’t satisfied we request for a token. If you request for it multiple times you will only get the same instance token back. We then send this token to our server to have it stored in firestore (or any file/database) as we need it to send push notifications. Also, we store the token in localStorage to quickly identify if the user has subscribed for notifications or not and display appropriate toggle switches.
- If incase, the user has refused the permission then we can display the required messages to the user perhaps as a toast/snackbar.
- Registration token may change when:
- The app deletes Instance ID
- The app is restored on a new device
- The user uninstalls/reinstall the app
- The user clears app/site data
You need to call ‘onTokenRefresh’ to send the refreshed token to your server.
Subscribe/Unsubscribe
We need to provide subscription options to our user based on whether he has already subscribed / not.
For example, in our notifications.js we could do something like below:
import axios from 'axios';

const ROOT_URL = ''; // define your server subscription url (sample express server setup for handling subscriptions described at the end)

class Notifications extends Component {

    constructor(props) {
        super(props);
        this.state = { gnibApptSubscriptionToggleSwitch: false }; // we set the toggle switch to false on component load
        this.gnibApptSubscriptionToggle = this.gnibApptSubscriptionToggle.bind(this);
        this.subscribeGnibApptNotifications = this.subscribeGnibApptNotifications.bind(this);
        this.unsubscribeGnibApptNotifications = this.unsubscribeGnibApptNotifications.bind(this);
        this.notificationPermission = this.notificationPermission.bind(this);
    }

    /**
     * If registration token is available in localStorage we enable the subscription option to indicate that the user has
     * already subscribed
     */
    componentDidMount() {
        localStorage.getItem(GNIB_APPT_NOTIFICATION_SUBSCRIBED) === "TRUE" ? this.setState({ gnibApptSubscriptionToggleSwitch: true }) : this.setState({ gnibApptSubscriptionToggleSwitch: false });
    }

    /**
    * Send the subscription details (token and topic) to the server endpoint
    */
    async subscriptionActions(mode, token, topic) {
        try {
            return await axios.post(`${ROOT_URL}/${mode}`, { token, topic });
        } catch(error) {
            if (error.response) {
                console.log(error.response.status);
                console.log(error.response.data);
            } else if (error.request) {
                console.log(error.request);
            } else {
                console.log('Error: ', error.message);
            }
            return null;
        }
    }

    /**
     * Subscribe app instance to notification topic if user permissions given
     */
    async subscribeGnibApptNotifications() {
        const notificationPermission = await this.notificationPermission();
        if(notificationPermission) {
            const isSubscribed = await this.subscriptionActions(SUBSCRIBE, localStorage.getItem(INSTANCE_TOKEN), GNIB_APPT_NOTIFICATIONS_TOPIC);
            if(isSubscribed) {
                localStorage.setItem(GNIB_APPT_NOTIFICATION_SUBSCRIBED, "TRUE");
                this.setState({ gnibApptSubscriptionToggleSwitch: true });
                this.displayMessage(<span>GNIB(IRP) appointment notifications have been enabled for your device</span>);
            } else {
                this.displayMessage(<span>Unable to subscribe you to notifications</span>);
            }
        }
    }

    /**
     * Unsubscribe app instance from notification topic
     */
    async unsubscribeGnibApptNotifications() {
        const isUnSubscribed = await this.subscriptionActions(UNSUBSCRIBE, localStorage.getItem(INSTANCE_TOKEN), GNIB_APPT_NOTIFICATIONS_TOPIC);
        if(isUnSubscribed) {
            localStorage.removeItem(GNIB_APPT_NOTIFICATION_SUBSCRIBED);
            await this.deleteTokenFromDb();
            this.setState({ gnibApptSubscriptionToggleSwitch: false });
            this.displayMessage(<span>You have been unsubscribed from notifications</span>);
        } else {
            this.displayMessage(<span>Unsubscribe failed</span>);
        }
    }

    /**
     * Subscribe/UnSubscribe appointment notifications
     */
    gnibApptSubscriptionToggle(event ,checked) {
        if(checked) this.subscribeGnibApptNotifications();
        else this.unsubscribeGnibApptNotifications();
    }
}
Initially, we set the subscription toggle switch state to false. In our previous function, notificationPermission we had set the token in localStorage.
When the component mounts, we check if that token is available, if so we enable the toggle switch to indicate to the user that he has already subscribed.
If incase, this is a new subscription, we first get the permissions from the user and generate the registration token. In our notificationPermission function, we store the registration token in our database and also in localStorage.
We are also subscribing the user to a topic in function call subscriptionActions.
You can either send notifications to a set of users using their registration tokens (or) subscribe them to a topic and just publish a message to the topic. If incase, of publish-subscribe model, the message will get sent to all subscribers of topic.
We will look into them more in detail later.
Manifest file
Create a pwa directory in src folder which will contain the manifest.json file.
{
    "gcm_sender_id": "103953800507"
}
This indicates that FCM is authorized to send messages to this app.
Link the manifest in your index file.
<link rel="manifest" href="manifest.json">
If you are using webpack to generate your build files then you can use copy-webpack-plugin to copy the manifest file to the build directory.
npm install --save copy-webpack-plugin
const path = require('path');
const CopyPlugin = require('copy-webpack-plugin');
const srcPath = path.join(__dirname, 'src');
const buildPath = path.join(__dirname, 'public');
module.exports = () => {
    plugins: [
        new CopyPlugin([
            { from: path.join(srcPath, 'pwa'), to: buildPath }
        ])
    ]
};
If you are using Nginx to serve your static assets then you can specify to gzip the manifest file and specify content expiry time.
// virtual.conf
map $sent_http_content_type $expires {
    default off;
    application/json 2628000;
    application/manifest+json 2628000;
}

// gzip.conf
gzip on;
gzip_static on;
gzip_comp_level 6;
gzip_types
    text/plain
    text/css
    text/js
    text/javascript
    application/javascript
    application/manifest+json
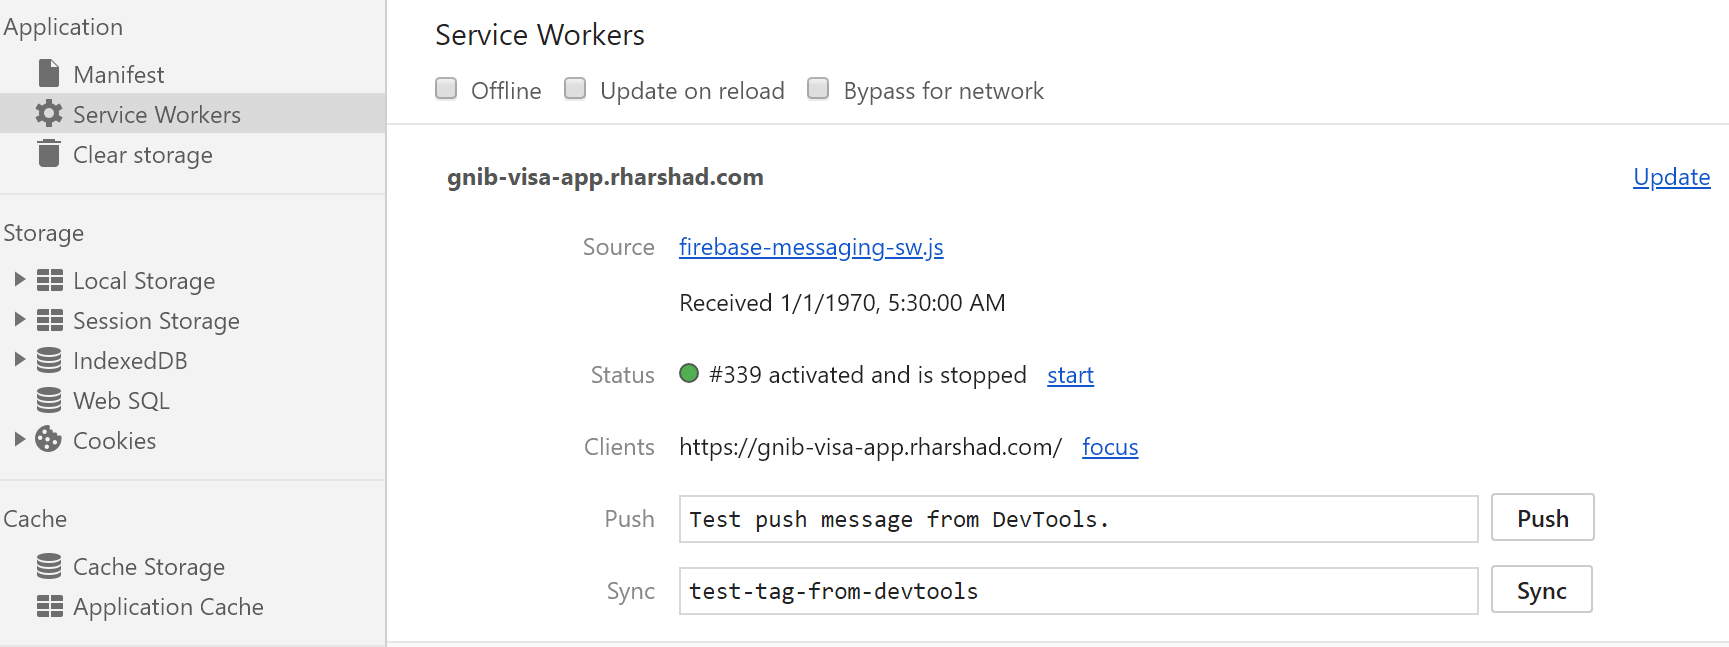
Testing
We now have everything wired up on our client side. So, how can we test everything works fine on our client side before proceeding to the server side of things.
Run your react app in your local. In your subscription page, provide the user permissions and get the registration token from localStorage or your database.
Once you have the registration token we can then publish a message to test if the notification gets displayed when the app is in focus or in background.
Check Registration Token Status
Send a curl request to Google IID API with the registration token in the url and apiKey (from your firebase project configuration) in the Authorization header.
curl -X GET \
  'https://iid.googleapis.com/iid/info/<instance_token>?details=true' \
  -H 'Authorization: key=<apiKey>'
You will get back details like below:
{
    "connectDate": "2019-03-04",
    "application": "com.android.chrome",
    "scope": "*",
    "rel": {
        "topics": {
            "notifications": {
                "addDate": "2019-02-23"
            }
        }
    },
    "connectionType": "WIFI",
    "platform": "BROWSER"
}
Sample Notification Message
We then send a message to test if the notification gets shown to the user. We had previously used the project apiKey.
But, for sending the message we will use the FCM v1 HTTP protocol instead of the legacy protocol which will require JWT access token to be passed along the request.
To generate the access token you can make use of fcm-http-oauth. Follow the steps in the README to generate a service account in your firebase project.
Let’s now send the message to a particular user by providing firebase project id, jwt and the registration token:
curl -X POST \
  https://fcm.googleapis.com/v1/projects/<firebase_projectId>/messages:send \
  -H 'Authorization: Bearer <jwt_token>' \
  -H 'Content-Type: application/json' \
  -d '{
    "message":{
        "token": "<registration_token>",
        "notification": {
                "title": "New Appointments",
                "body": "14 February 2019 - 15:00\n18 February 2019 - 11:00\n18 February 2019 - 12:00"
                },
                "webpush": {
                    "headers": {
                        "TTL": "0"
                    },
                    "notification": {
                        "icon": "https://img.icons8.com/color/96/e74c3c/ireland.png"
                    },
                    "fcm_options": {
                        "link": "https://gnib-visa-app.rharshad.com"
                    }
                }
        }
    }'
Refer:
Server Side
We had looked so far on how to subscribe a user to receive push notifications. We will now look at storing the registration tokens in firestore and sending notification messages using firebase SDK.
Firestore
Cloud Firestore is a flexible, scalable database for mobile, web, and server development from Firebase and Google Cloud Platform.
It keeps your data in sync across client apps through realtime listeners and offers offline support for mobile and web so you can build responsive apps that work regardless of network latency or Internet connectivity.
Creating New Database
Create a new firestore database in test mode inside your firebase project.
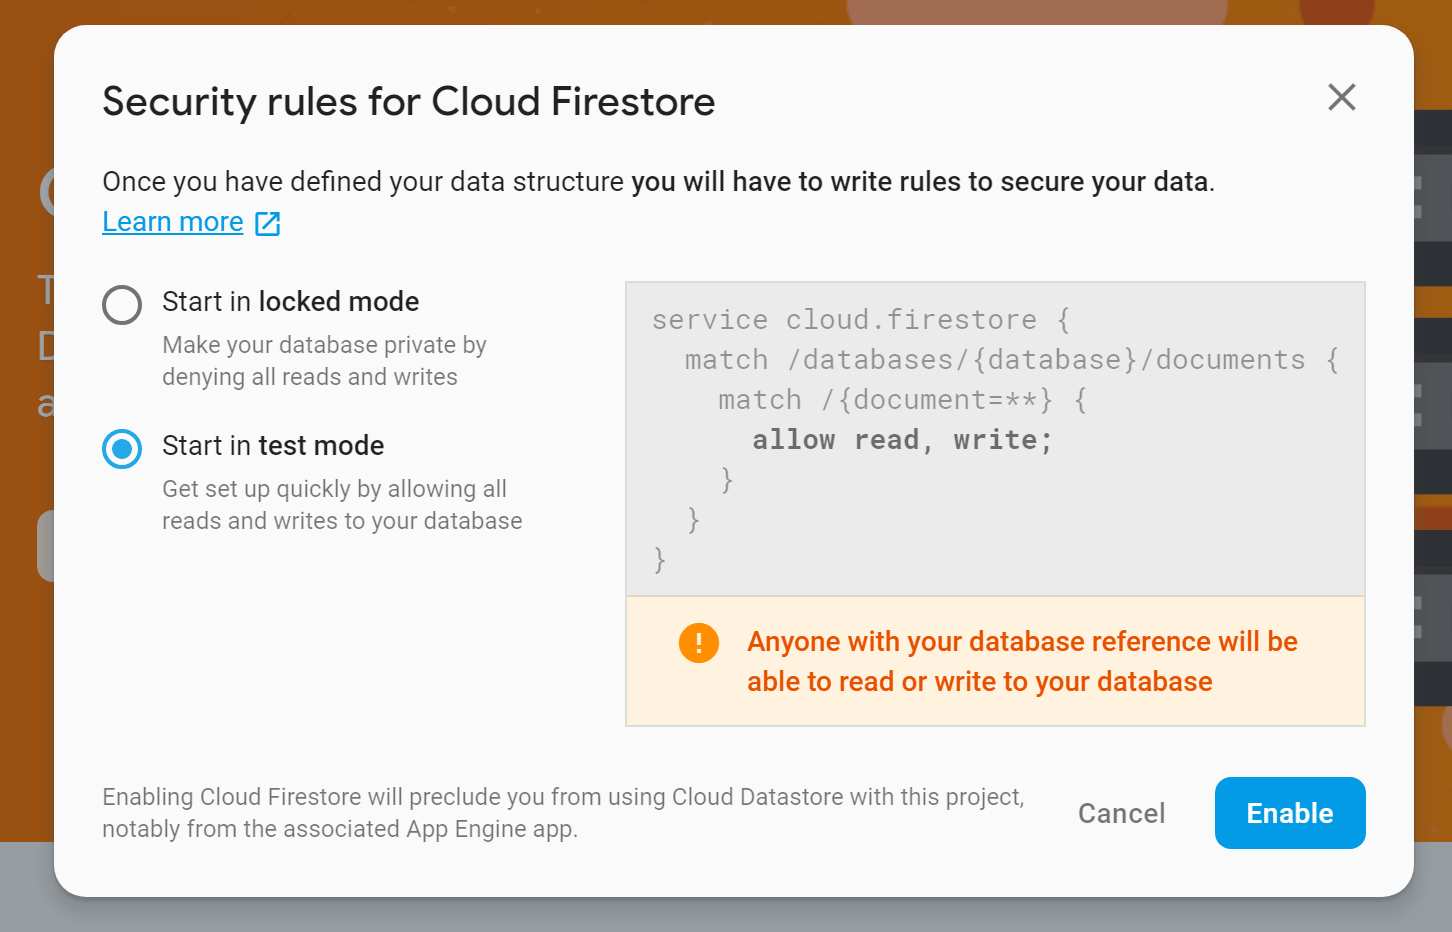
In the Rules tab add below rule to allow reads/writes only from your account:
service cloud.firestore {
  match /databases/{database}/documents {
    match /{document=**} {
      allow read, write: if request.auth.uid != null;
    }
  }
}
Storing Registration Token
You can create a node js project which will be sending notifications to your users/use cloud functions/any other framework. In this guide, we will see how we can store tokens in firestore using node.js.
Generate a service account by following these steps:
In your firebase project, under project settings, choose Service accounts tab.
Select Generate new private key to download your service account file.
We will use the service account to access firestore.
Install firebase-admin SDK to your node.js project.
npm install --save firebase-admin
We will define firebase.js file which will perform the required operations.
const serviceAccount = require('./service-account.json');
const admin = require('firebase-admin');

/* initialise app */
admin.initializeApp({
    credential: admin.credential.cert(serviceAccount)
});

/* initialise firestore */
const firestore = admin.firestore();
firestore.settings({
    timestampsInSnapshots: true
});
const FIRESTORE_TOKEN_COLLECTION = 'instance_tokens';

async function storeAppInstanceToken(token) {
    try {
        return await firestore.collection(FIRESTORE_TOKEN_COLLECTION)
        .add({ token, createdAt: admin.firestore.FieldValue.serverTimestamp() });
    } catch(err) {
        console.log(`Error storing token [${token}] in firestore`, err);
        return null;
    }
}

async function deleteAppInstanceToken(token) {
    try {
        const deleteQuery = firestore.collection(FIRESTORE_TOKEN_COLLECTION).where('token', '==', token);
        const querySnapshot = await deleteQuery.get();
        querySnapshot.docs.forEach(async (doc) => {
            await doc.ref.delete();
        });
        return true;
    } catch(err) {
        console.log(`Error deleting token [${token}] in firestore`, err);
        return null;
    }
}

module.exports = {
    storeAppInstanceToken,
    deleteAppInstanceToken
}
This script exports two functions -
[1] storeAppInstanceToken - You will pass in the token which needs to be stored in a firestore collection. Also, adds a server timestamp to the document.
[2] deleteAppInstanceToken - Gets the docs which match the token and deletes them.
Sending User Notifications
We update the script firebase.js to export below functions to be able to send push notifications -
const messaging = admin.messaging();

function buildCommonMessage(title, body) {
    return {
        'notification': {
            'title': title,
            'body': body
        }
    };
}

/**
* Builds message with platform specific options
* Link: https://firebase.google.com/docs/reference/fcm/rest/v1/projects.messages
*/
function buildPlatformMessage(token, title, body) {
    const fcmMessage = buildCommonMessage(title, body);

    const webpush = {
        'headers': {
            'TTL': '0'
        },
        'notification': {
            'icon': 'https://img.icons8.com/color/96/e74c3c/ireland.png'
        },
        'fcm_options': {
            'link': 'https://gnib-visa-app.rharshad.com'
        }
    };

    fcmMessage['token'] = token;
    fcmMessage['webpush'] = webpush;
    return fcmMessage;
}

async function sendFcmMessage(fcmMessage) {
    try {
        await messaging.send(fcmMessage);
    } catch(err) {
        console.log(err);
    }
}

module.exports = {
    buildPlatformMessage,
    storeAppInstanceToken,
    deleteAppInstanceToken,
    subscribeAppInstanceToTopic,
    unsubscribeAppInstanceFromTopic,
    sendFcmMessage
}
We can use buildPlatformMessage to generate a message and then pass it on to sendFcmMessage to notify the user.
Topic Subscription
You can also subscribe/unsubscribe users to topics by calling subscribeToTopic & unsubscribeFromTopic methods.
async function subscribeAppInstanceToTopic(token, topic) {
    try {
        return await messaging.subscribeToTopic(token, topic);
    } catch(err) {
        console.log(`Error subscribing token [${token}] to topic: `, err);
        return null;
    }
}

async function unsubscribeAppInstanceFromTopic(token, topic) {
    try {
        return await messaging.unsubscribeFromTopic(token, topic);
    } catch(err) {
        console.log(`Error unsubscribing token [${token}] from topic: `, err);
        return null;
    }
}
We had used firebase SDK for sending FCM messages. You can also make use of webpush or send the messages to the FCM HTTP App server endpoint.
Express Server
So far, we had defined subscription, firebase and fcm actions.
We will use Express to expose them as API’s in a web server so that our client app can access them.
Install express as a dependency.
npm install --save express
Create a new file named index.js and define below API’s.
const { storeAppInstanceToken, deleteAppInstanceToken, subscribeAppInstanceToTopic, unsubscribeAppInstanceFromTopic } = require('./firebase');

const
    express = require('express'),
    bodyParser = require('body-parser'),
    app = express().use(bodyParser.json());

app.post('/storetoken', async (req, res) => {
    if (!req.body) res.sendStatus(400);
    if(req.body.token) {
        result = await storeAppInstanceToken(req.body.token);
        result?res.sendStatus(200):res.sendStatus(500);
    } else {
        res.sendStatus(400);
    }
});

app.delete('/deletetoken', async(req, res) => {
    if (!req.body) res.sendStatus(400);
    if(req.body.token) {
        result = await deleteAppInstanceToken(req.body.token);
        result?res.sendStatus(204):res.sendStatus(500);
    } else {
        res.sendStatus(400);
    }
});

app.post('/subscribe', async(req, res) => {
    if (!req.body) res.sendStatus(400);
    if(req.body.token) {
        result = await subscribeAppInstanceToTopic(req.body.token, req.body.topic);
        result?res.sendStatus(200):res.sendStatus(500);
    } else {
        res.sendStatus(400);
    }
});

app.post('/unsubscribe', async(req, res) => {
    if (!req.body) res.sendStatus(400);
    if(req.body.token) {
        result = await unsubscribeAppInstanceFromTopic(req.body.token, req.body.topic);
        result?res.sendStatus(200):res.sendStatus(500);
    } else {
        res.sendStatus(400);
    }
});

app.listen(process.env.PORT || 1338, () => {
    console.log('Server is running');
});
You can run the server with below command and access the endpoints via localhost e.g. send a POST request to http://localhost:1338/subscribe with appropriate JSON body content.
node index.js
There are various cloud platforms available where you can deploy the node express server.
References
https://developers.google.com/web/fundamentals/push-notifications/
https://developers.google.com/web/fundamentals/primers/service-workers/#update-a-service-worker
https://developers.google.com/web/fundamentals/primers/service-workers/lifecycle
https://developer.mozilla.org/en-US/docs/Web/API/ServiceWorkerRegistration/update
https://developers.google.com/instance-id/reference/server#get_information_about_app_instances
https://developer.mozilla.org/en-US/docs/Web/API/Notification
https://firebase.google.com/docs/reference/fcm/rest/v1/projects.messages

Latest comments (0)