What is WebGL?
WebGL is a cross-platform, royalty-free API used to create 3D graphics in a Web browser. Based on OpenGL ES 2.0, WebGL uses the OpenGL shading language, GLSL, and offers the familiarity of the standard OpenGL API.
The main features of WebGL are the following:
- Cross-platform and Cross-browser
- GPU 3D acceleration
- Native API with GLSL support
- Works inside a canvas
- Integration with DOM interfaces
How it works
In order to render some graphics, we will need to learn what is the Rendering Pipeline and how it works.
The Rendering Pipeline is the sequence of stages that WebGL takes when rendering 3D graphics. This rendering model fits properly since the GPU is a highly parallel processor: pipeline stages run simultaneously in the GPU processing units.
In the following image we can see the stages of the rendering pipeline:

The output from a stage is used as the input for the next stage, and so on. The Vertex Shader and Fragment Shader stages are programmable, so we can program our own.
The Vertex Shader handles the vertex processing of our graphic. At this stage we must provide a stream with the vertices. Then, the Vertex Shader receives a single vertex from this stream and generates a single vertex to the output vertex stream. There must be a 1:1 mapping from input vertices to output vertices. This is the stage in which we can apply vertex transformations, such as rotations, translations or scaling.
The Fragment Shader process a Fragment generated by the Rasterization stage into a set of colors and a single depth value. This is the stage after a primitive is rasterized (at the rasterization stage the geometric primitives are converted to fragments related to the pixel area). For each sample of the pixels covered by a primitive, a “fragment” is generated. Each fragment has a Window Space position, a few other values, and it contains all of the interpolated per-vertex output values from the last Vertex Processing stage. This is the stage in which we can apply colors or textures to the graphics.
In the next section we will see how to render a simple triangle as example. To do it, we will program a Vertex Shader and a Fragmend shader.
Rendering a triangle in WebGL
As we said before, we will need to define a canvas to render our graphics inside it, so we will make a simple HTML template like the following:
<!DOCTYPE html>
<html lang="en">

<head>
    <meta charset="utf-8" />
    <title>WebGL Sample Triangle</title>
    <meta name="author" content="Martín Lamas" />
    <meta name="description" content="WebGL Triangle" />
</head>

<body>
    <canvas id="canvas" width="600" height="600"></canvas>
    <script>
      // We will put our WebGL code here
    </script>
</body>

</html>
The width and height attributes of the canvas define the viewport size, but there is a consideration that we have to take into account: WebGL expects all the vertices that we want to become visible, to be in Normalized Device Coordinates after each vertex shader run. That is, the x, y and z coordinates of each vertex should be between -1.0 and 1.0 values; coordinates outside this range will not be visible. These Normalized Device Coordinates and the size of the viewport are then given to the rasterizer to transform them to 2D coordinates/pixels on your screen, so we must worry about taking into account the viewport size and its aspect ratio.
We will use a square canvas to make this example simpler. We will need to define three vertices to make the triangle, as we can see in the following image:

In the script section we will declare the vertex array first:
const vertices = new Float32Array([
   0.0,  0.5, 0.0, // First vertex
  -0.5, -0.5, 0.0, // Second vertex
   0.5, -0.5, 0.0  // Third vertex
]);
We must skip the z coordinate since we are drawing in 2D.
Then, we will initialize the context and we will define the vertex shader first:
const gl = document.getElementById("canvas").getContext("webgl");

// Vertex shader
const vertexShader = `
    attribute vec4 position;
    void main() {
        gl_Position = position;
    }`;
As we learned before, the vertex shader runs for each input vertex and generates a new one as output. In the example, we use the position attribute as input (attributes are inputs to a Vertex Shader that get their data from buffers, more on this later) and we place the output in the gl_Position variable (the built-in gl_Position variable holds the output vertex in the Vertex Shader). No conversions are made so the output vertex will be the same as the input one. We will see how to initialize the buffer with the input vertex array in a moment.
Now we will define the Fragment Shader:
// Fragment shader
const fragmentShader = `
    precision mediump float;
    uniform vec4 color;
    void main() {
        gl_FragColor = color;
    }`;
Here we are using a uniform that holds the color of the fragment (uniforms are values that stay the same for all vertices of a single draw call). Just as the Vertex Shader, the built-in gl_FragColor variable holds the output color of the shader. As we can see no color conversions are made.
At last, we will compile these shaders so that the GPU can run them and we will define a WebGL program attaching these shaders to it:
// Compile vertex shader
const vs = gl.createShader(gl.VERTEX_SHADER);
gl.shaderSource(vs, vertexShader);
gl.compileShader(vs);

// Compile fragment shader
const fs = gl.createShader(gl.FRAGMENT_SHADER);
gl.shaderSource(fs, fragmentShader);
gl.compileShader(fs);

// Create and initialize the WebGL program
const program = gl.createProgram();
gl.attachShader(program, vs);
gl.attachShader(program, fs);
gl.linkProgram(program);
gl.useProgram(program);
Once we have defined and compiled these shaders we must provide the input data of our triangle.
First, we will create a array buffer and fill it with the vertex coordinates. The Vertex Shader we defined before will use this buffer as input through the position attribute. To make this, we create the buffer with the gl.createBuffer method and bind it as a gl.ARRAY_BUFFER type. Then, we fill this buffer with data using the gl.bufferData method. Finally, we point the position attribute to the buffer and bind it calling the gl.vertexAttribPointer and gl.enableVertexAttribArray methods, respectively:
// Shader attribute variable for position
const position = gl.getAttribLocation(program, "position");

// Create the GPU array buffer with the vertices
const buffer = gl.createBuffer();
gl.bindBuffer(gl.ARRAY_BUFFER, buffer);
gl.bufferData(gl.ARRAY_BUFFER, vertices, gl.STATIC_DRAW);
gl.vertexAttribPointer(
  position, // Target
  3,        // Chunk size (send the values 3 by 3)
  gl.FLOAT, // Type
  false,    // Normalize
  0,        // Stride
  0         // Offset
);
gl.enableVertexAttribArray(position);
Now we will define the color using the gl.uniform4f method and pass it to the Fragment Shader through the color uniform:
// Shader uniform variable for color (read-only)
const color = gl.getUniformLocation(program, "color");

// Set color        R  G  B  A
gl.uniform4f(color, 0, 1, 0, 1);
Note that the color coordinates must be defined using Normalized Device Coordinates, so we compute each coordinate using the following formula: RGBA normalized coordinate = RGBA coordinate / 255.
At this point we have all we need to render the triangle. Then, we clear the canvas background and we render the triangle by calling the gl.drawArrays method:
// Set the clear color
gl.clearColor(0.0, 0.0, 0.0, 1.0);

// Clear canvas
gl.clear(gl.COLOR_BUFFER_BIT);

// Render
gl.drawArrays(
  gl.TRIANGLES, // Mode
  0,            // Start
  3             // Count
);
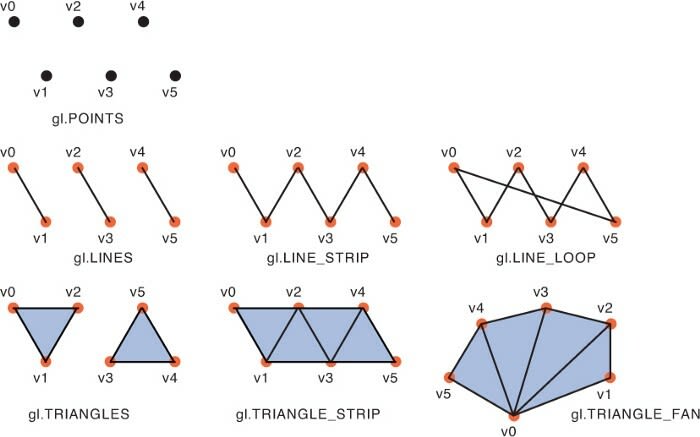
The gl.drawArrays method uses the bounded array buffer as input data. In this example the three vertices are taken from the buffer and the gl.TRIANGLES mode is selected to render the shape. In WebGL the following shapes are available:
As you can see we could render a wireframe of our triangle simply replacing the mode with the gl.LINE_LOOP value.
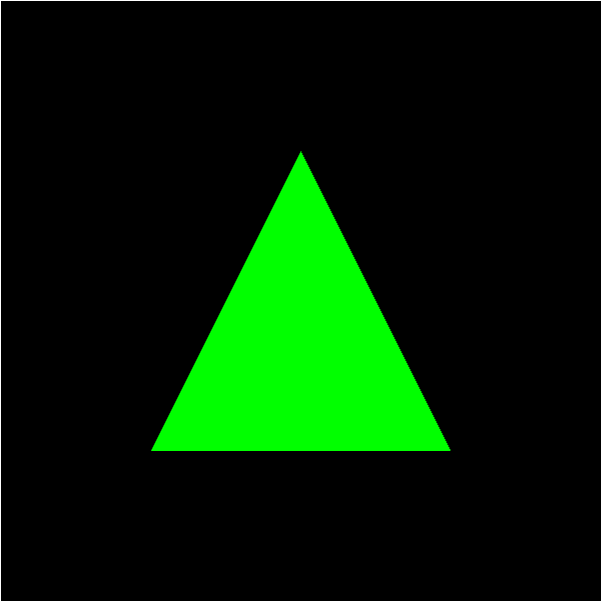
Finally, we can see the triangle opening the template in the web browser. Something like the following :)
Summing up
Currently, the WebGL API is available on most web browsers. We can use it to render accelerated 2D and 3D graphics in our web applications. Some high-level libraries are built on top of WebGL API making the programmer’s job easier. However, it is interesting to learn the low-level WebGL API and how the rendering pipeline works.
In future posts we will see how to render 3D shapes and how to apply some transformations like rotation or translation. Also, we will see how to apply textures and we will take a look at some interesting libraries that work on top of WebGL.
EPIC PROGRAMMER IS BUILDING WEBGL PROJECTS! SOME OF THEM ARE
Twitter:- Santosh Arron
Instagram:- Santosh Arron
Credits - @santosharron


Top comments (0)