
React Native has made the mobile application development comprehensive and quicker. Brands and businesses can build helpful apps for both Android and iOS by utilizing the same platform.
Today, we are going to build a simple chat application by React Native.
Here’s a detailed guide for you to build a simple chat app with React Native.
Step 1: Install Required Tools
Since we are using React Native for successfully developing the cross-platform mobile app, we will need some essential tools already installed in our systems so that we can easily synchronize native platforms and react native.
First of all, make sure that that the React Native is installed in your system. Since there are so many resources available online, we are not going to add a sub-guide on how to install React Native in Windows/Mac.
Then, based on your choice on Android or iOS, You will have to download Android Studio or Xcode in your system. We can also go with other 3rd party simulators to test the code.
When are you building a mobile application, you will need to run the app on a mobile simulator. From our experience, we will use Expo to execute this task efficiently.
For advanced development in the subsequent steps, verify that the installed version of Node.js is 10+ before installing Expo.
Just type Node --version to identify its version, and make sure it is above 10.
Now, we are going to install expo command-line tools. You can replace npm with yarn in this step if you are more comfortable with Yarn.

Then, we need to create a project file for building our simple chat app with React Native. You can write below snippet in the CLI to create a project ‘AwesomeChat.’

Step 2: Use Stream Chat
We'll build a simple chat application. As a developer, we must avoid writing an extended line of code for building a chat application from scratch, as it will take a lot of time and increase the size of your source code file.
Therefore, it is a smart choice to create a library file and intelligently synchronized with the main application. There are so many relevant libraries available that can help you with your requirements for developing a chat application.
We are going to use the Stream Chat library here to leverage attractive and elegant chat UI components in our system.
With Stream Chat, you can quickly add chat functionality in your mobile application of any kind.
This is the smartest way to conduct the React Native App Development process by smartly enable the chatting feature in your mobile application.
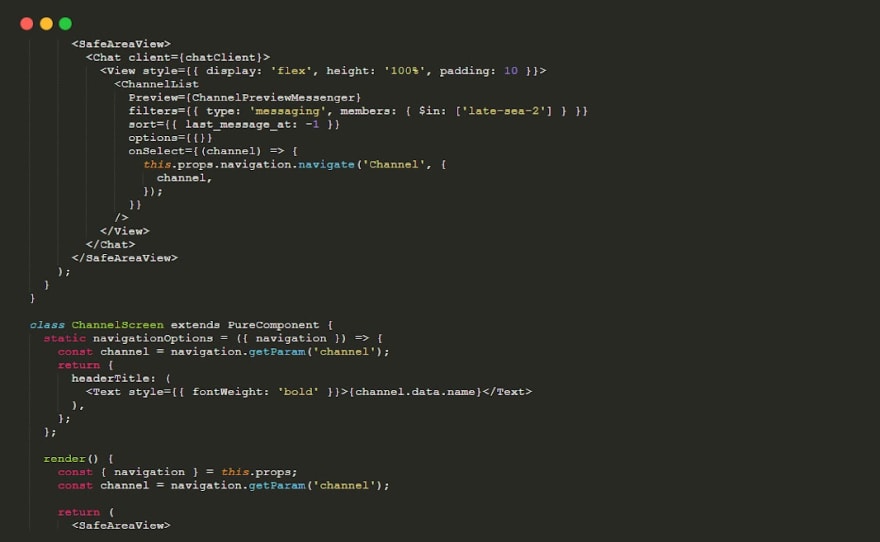
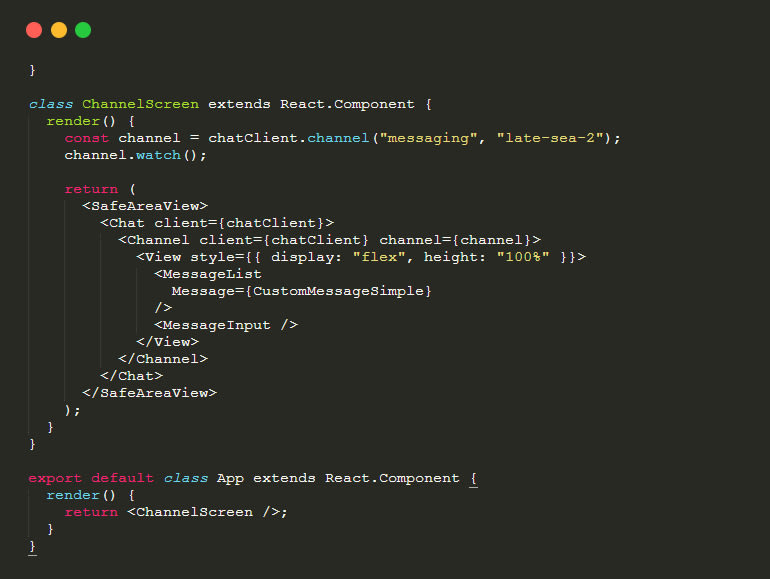
In this process, we will add a simple chat screen in our mobile application using Stream Chat.
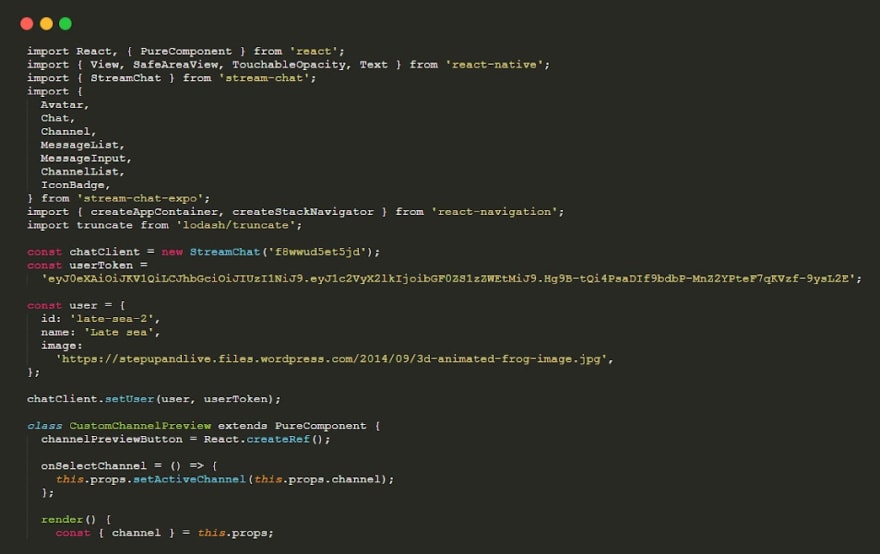
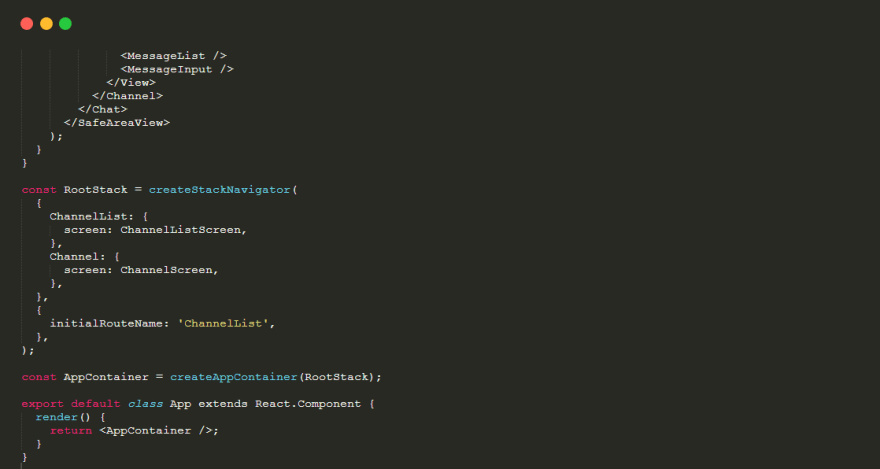
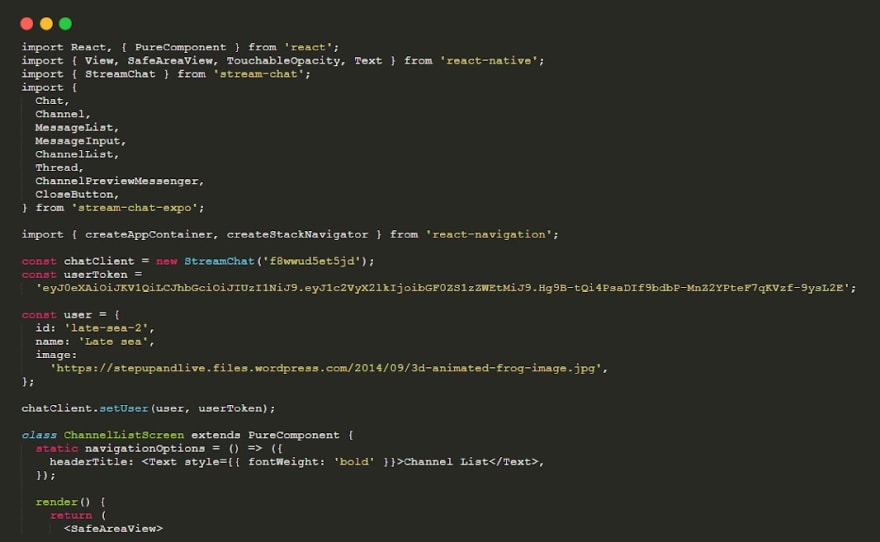
Now, open the App.js file in a text editor. Write below code snippet inside the file and save it.
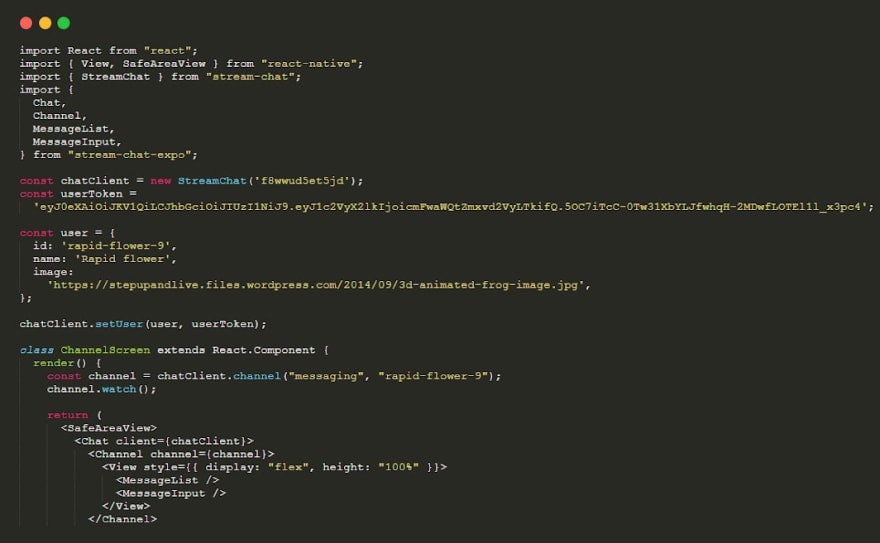
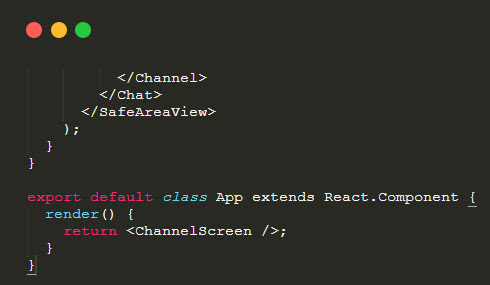
Please note that this code snippet is the foundation behind the smooth working of our chat application built from React Native.
So, make sure that you are making these changes without any glitches or typos or syntax errors.
The above code snippet will handle all the API calls in your mobile chat application and maintain the state of the app along with manipulating all the other child components.
Therefore, the fundamental working of a simple chat application is heavily dependent on the above code snippet.
You can see from the above code snippet; we have a chat component that is responsible for managing all the API calls.
Any developer or tester should know where they are going invalid developing mobile applications. An efficient way to determine the development cycle is to run the mobile app on the smartphone.
As soon as you run the application on the smartphone, you will get certain types of screens and layouts that will help you identify your code is behaving.
In our case, to get the preview of the screen that we have written below, we are going to install Expo on our smartphone.
After installing Expo in your phone, make sure that the smartphone is connected with the same Wi-Fi network where your computer system is connected with.
It might happen that you are using the Android Studio or Xcode to develop the application. In that case, you can also utilize your inbuilt simulator to evaluate the performance of your code.
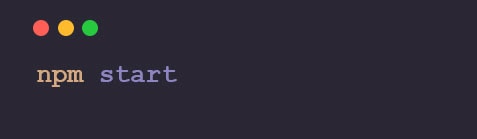
After writing the above line, the React Native development server will be initiated. Please note that the server will keep your application changing as soon as you make any changes in your code snippet.
Step 3: Manage Multiple Chats on One Screen
The feasibility of any application or software is determined by the way it can handle multiple tasks in a given moment. The more task it can execute, the better the app is.
Similarly, the chat application must be able to manage multiple conversations in a given moment and provide efficient notifications as receiving multiple messages from multiple contacts.
In the single application, you will be able to talk with multiple users simultaneously.
You cannot run the application again or from the other device to chat with another user.
Just like Facebook messenger, Hike, Telegram, WhatsApp, and most of the other chat applications, you must be able to talk to several contacts simultaneously within a single login.
Therefore, we need a screen where we can have a list of conversations with whom you are talking to.
Moreover, we will also need robust navigation facilities in our chat application to effortlessly roam around the mobile app and have a seamless chatting experience with our contacts.
The package which we have installed earlier can execute all the tasks efficiently and help us enable multiple chats efficiently.
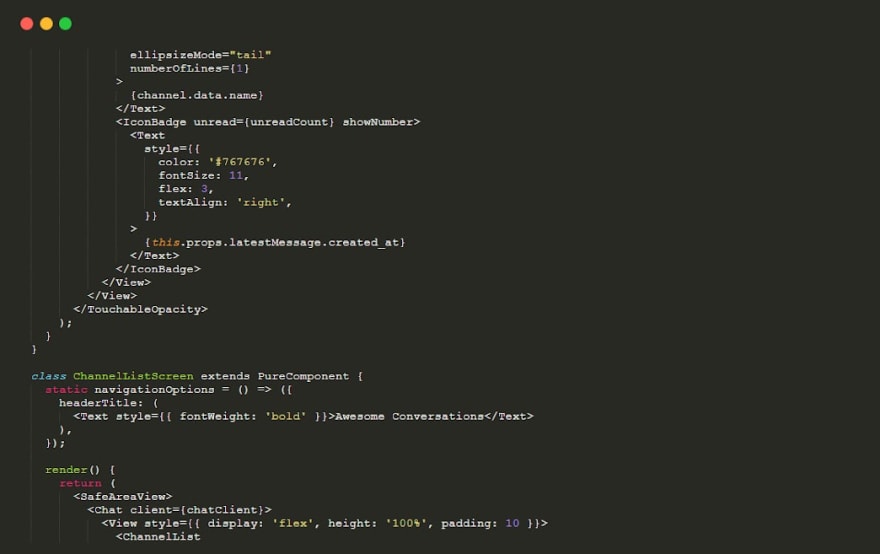
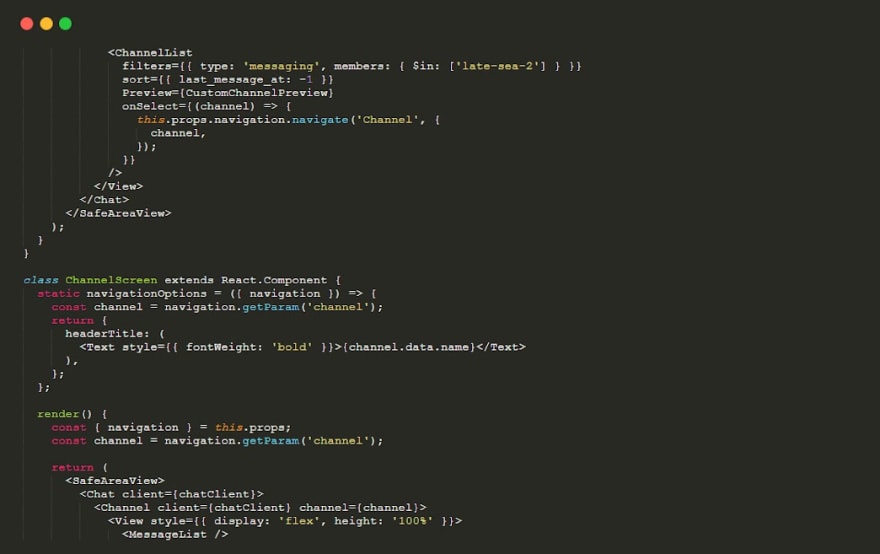
So, we would again go to the App.js file and make the following changes.
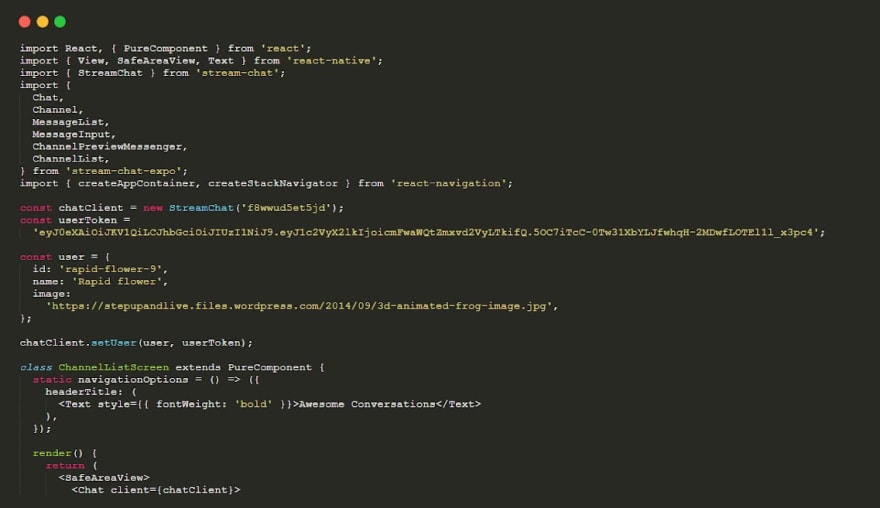
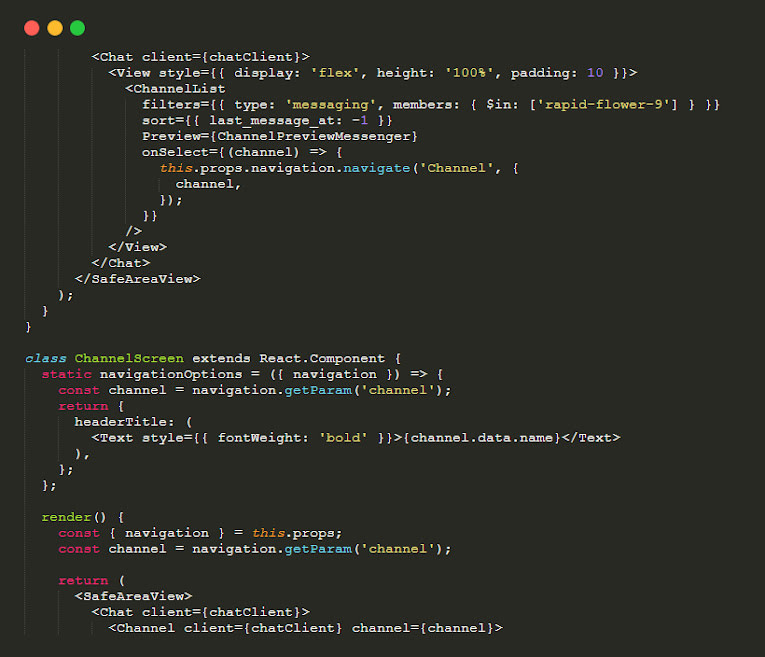
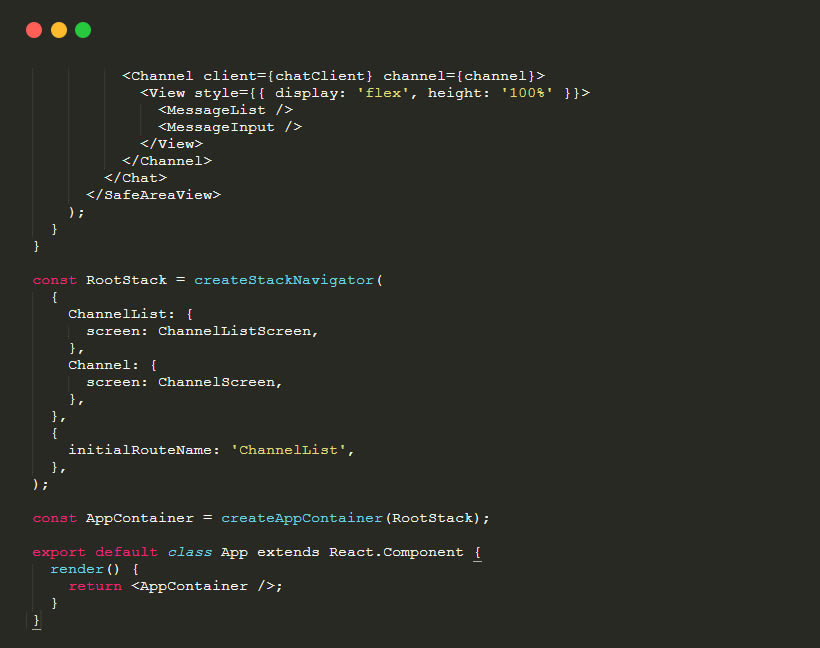
After making changes in the App.js file and saving it, you can go back to the simulator or the application on your mobile phones to see the changes.
Now, you will get a dedicated screen with a list of conversations. You can tap on each of the conversations to evaluate the things we have discussed above.
On all leading chatting applications, you will observe that a particular conversation comes at the top of the list as soon as it gets a new message.
In case of multiple your messages, the list is sorted by brining the conversation with the most recent messages at the top of the list.
Technically, each conversation is considered as an independent channel, and the conversation list is updated as soon as there is a new message from a channel.
Tool deal with all these States, we have a component called ChannelList that handles custom query and ordering.
Remember messaging someone for the first time, and their name is automatically added to the list? This is also done by ChannelList as it works as pagination and updates the conversation list as soon as a new channel is created.
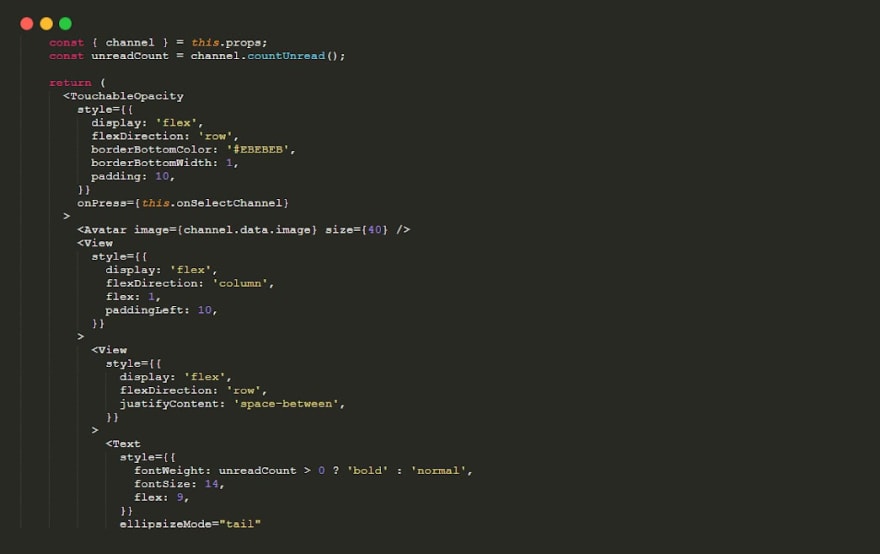
Step 4: Add Channel Preview
When you open chat application after some time, you would have more than one message from a single conversation.
Since we have already covered the list of the conversation in the above step, now we have to enable preview count to show how many messages have come has from a particular conversation.
To enable this, you will have to do a lot more manual coding on your native programming languages.
Since you are using React Native, you can manipulate code effortlessly and achieve this feature without doing a lot of manual programming.
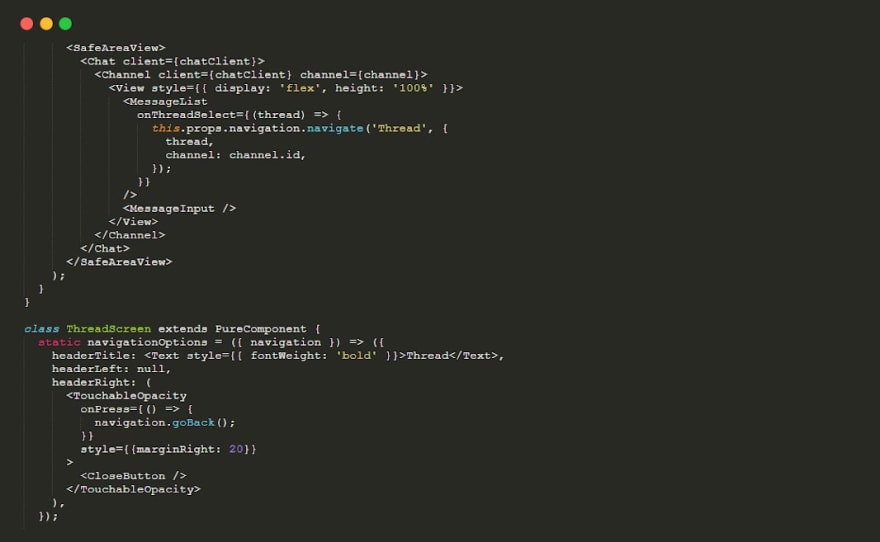
Step 5: Create Message Threads
Stream Chat supports multiple Threads under the same conversation to easily bifurcate your messages as per your comfort.
In technical language, you will be able to generate sub-conversations from a single channel without initiating different communication modes.
Stream Chat will enable thread component React Navigation in our mobile application to achieve this functionality.
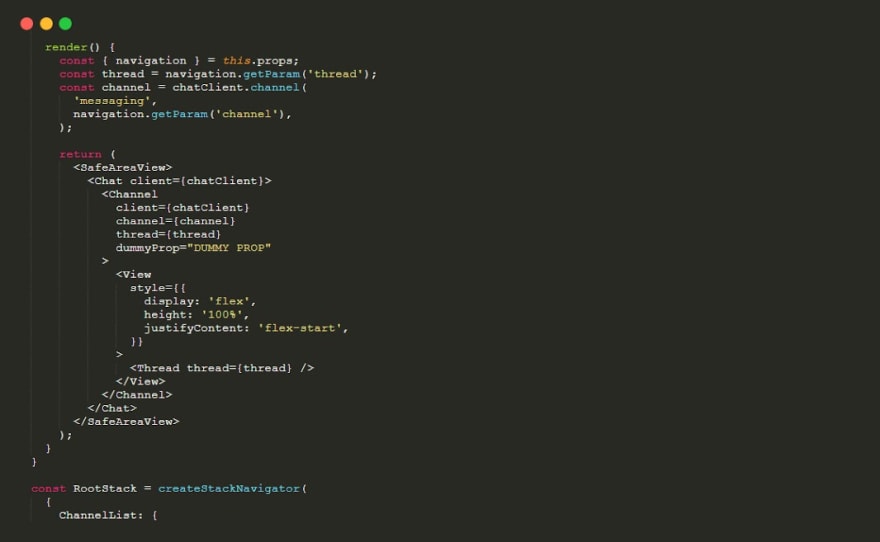
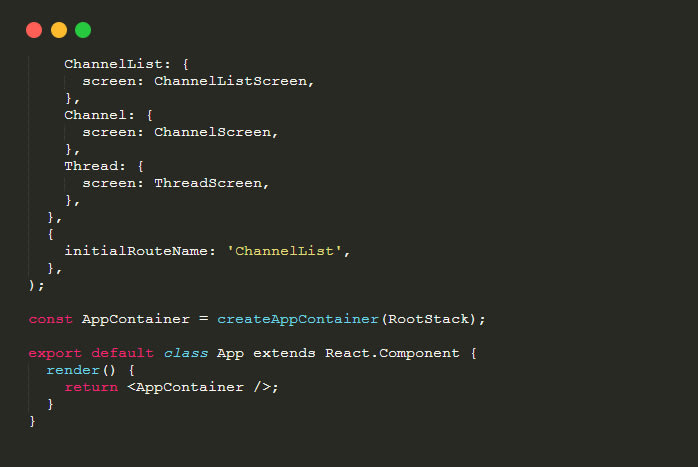
In the code below, we will create the ThreadScreen component. Then register the new chat screen to navigation.
For knowing more about it, you should contact & Hire React Native Developer from a reputed firm. He/She will be able to guide you on this subject.
We would be leveraging the onThreadSelect prop to navigate to ThreadScreen.
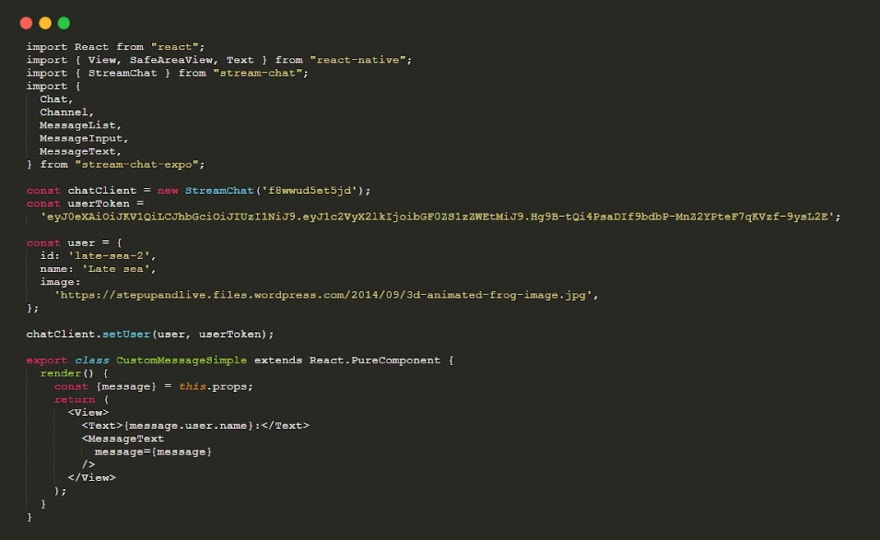
Step 6: Applying Custom Message
You must also take care of how the messages are rendered in your mobile application.
In the below code snippet, we have made a custom message component that uses the compact layout for messages.
Step 7: Integrate Custom Styles
Custom styling makes your mobile app’s layout more appealing and elegant to use. We are going to leverage the React Native platform for this without writing extended CSS and HTML code.
In Fact, this is one of the Top Reasons Why People Opt For React Native. SO, you should also start preparing for this technology, right now.!
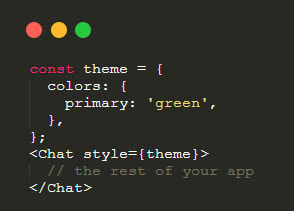
This code will update the default color to green.
Conclusion
I’m curious to know how do you find this detailed guide of creating a chat app with React Native. Please drop your comments below and let me know.
If you are using any other method or have added some additional features with the similar methods discussed above, don’t forget to mention your approach below to help other programmers grow.

Top comments (0)