
Ever wanted to build and distribute a tool on Docker Hub? Well, it's easy to automatically build an image. Let's get started!
Docker has become one of those ubiquitous technologies, that follows us everywhere. I myself use docker every single day without fail, building a lot of images on my machine for all sorts of utility tasks. However, what if we have a great idea and we want to share it with the world? That's where Docker Hub comes in. If we have a cool tool or idea we want to distribute using Docker, we only need to build a Dockerfile, connect our GitHub account to our Docker Hub account, and set up some configuration.
Before continuing, please make sure you have GitHub and Docker Hub Accounts. If you don't, they will only take a few minutes to create. You will also need Docker Desktop.
Setting up our Source Repository
Today, we're going to be setting up Docker Builds for my cool repository called "My Task List". This is a super simple app that displays my task list when I run it via Docker. If I want to update my task list, I just push an update to my GitHub repository and then voilà, my image will be updated on my next docker pull.
To get started, go to my-task-list. On the top right-hand corner, click the Fork button. A prompt will come up saying "Where should we work my-task list?". Click your GitHub username. Once you click your username, you will be taken to a new copy that has been created under your user name!

Connecting our GitHub Account to Docker Hub
Open up Docker Hub Linked Accounts. Click Connect on the GitHub line.

An authorisation page will come requesting access to your GitHub account. Review the settings, and when you're happy to proceed click Authorize docker. Enter in your GitHub password when prompted.

Once the authorisation process has been successful, you will be returned to Docker Hub. If everything has gone well, your Account name will be shown in the Linked Accounts section.

Setting up our Docker Builds
Sweet! Now we have a GitHub Repository and our Docker Hub account linked. Where to from here? We want to setup our own repository within Docker Hub; this is where all of our images will be deployed when they build. We configure these settings when we create the repository.
On Docker Hub, click on Repositories. You should see an empty list of repositories with your name in the right-hand corner of the page. Click Create Repository. Give your repository a name of "my-task-list", and select Private for the Visibility setting (this is our personal task list afterall).

We've got our settings for our repository all added, now we just need to setup our builds. Click on the GitHub logo under Build Settings (it should be labelled Connected). From the dropdown Select organisation dropdown select your GitHub username and select "my-task-list" from the Select repository dropdown. Click the + next to Build Rules, leaving the defaults.

That's it, let's click Create & Build.
Building and Running our Image
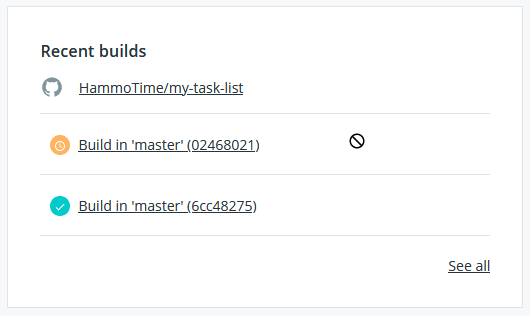
Now, we'll be taken to our repository's landing page. Well done, you've created a new Docker repository, and our image is building as we speak! We should see our new build on the Recent builds list; click on it.

The build should be running and should show as "Pending", wait until the build completes and it flags as "Successful". Once that is done, let's open up our Terminal and enter the following commands.
$ docker-login --username <docker_hub_username> --password <docker_hub_password>
WARNING: login credentials saved in /home/username/.docker/config.json
Login Succeeded

$ docker run --name task-list -p 8080:80 <docker_hub_username>/my-task-list:latest
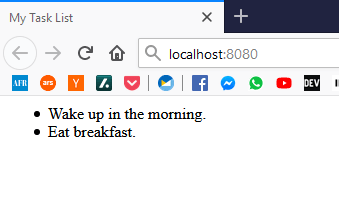
Once that's done, open up a browser and go to localhost:8080. You should see the current task list displayed. Behold, your first docker image running in all it's glory! Once you're done marvelling at your great work, hit CTRL-C on the terminal to kill the container.
Editing our Image
Let's update our task list to add a new item. To do this, we need to update our GitHub repository. Go back to GitHub, and open up the main repository screen for your fork of my-task-list. Click on the my-task-list.html file and when it opens, click the Pencil to edit the file. Add a new item to the list, and click Commit Changes down the bottom of the editor.
Let's head back to Docker Hub and view the repository. If our commit has been successful, we should see a new build pending which is tagged with a new commit hash. Wait for the build to complete like before.
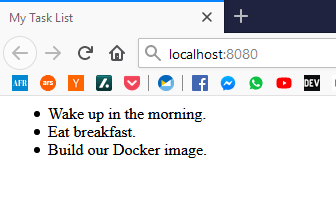
Now to test our final edits. Run the following on your local machine and then once it's running, browse to localhost:8080 again. If you're successful you should see the new item you added to the task list!
$ docker run --name task-list-v2 -p 8080:80 <docker_hub_username>/my-task-list:latest
Final Thoughts
Writing and building a Docker image via CI/CD using Docker Hub and GitHub is a great way to build and distribute tools. As you can see, it's super easy to get up and running within 15 minutes, and if you're pushing public images the it's all free. So, what are you waiting for? Write a Dockerfile and push a repo, what have you got to lose?
If you'd like to contact me, please send me a message on Twitter @stophammotime. Thanks for reading and thanks to EJ Yao on Unsplash for the header picture! Please also check out my blog at engi.fyi where I have a bunch of DevOps and Engineering related blog posts.


Top comments (0)