
Today’s security management systems are comprehensive, integrating various physical, digital, and operational security measures.
Because of the increasing concerns of cyberattacks, physical threats, and other security issues, the importance of security management systems in organizations and businesses has grown dramatically. As a result, more advanced security management frameworks and tools — such as threat intelligence, risk assessments, and incident response planning — have been developed, fueled by the need for organizations and businesses to protect themselves against a growing number of sophisticated and diversified security threats.
What we’ll build
This post discusses safeguarding sensitive user data using Appwrite’s out-of-the-box functionalities. The complete source code of this project is on GitHub. Fork it to get started quickly.
Prerequisites
To follow along with this article, the following are required:
- Docker Desktop installed on your computer; run the
docker -vcommand to verify that Docker is installed. If not, install it from the Get Docker documentation. - A basic understanding of JavaScript, React.js, and Next.js.
- An Appwrite instance; check out this article on how to set up an instance. Appwrite also supports one-click install on DigitalOcean or Gitpod.
- Node and its package manager,
npm. Run the commandnode -v && npm -vto verify that they are installed or install them from here.
Getting started
What is Appwrite and its importance in security management?
Appwrite is a development platform that provides a powerful API and management console for building backend servers for web and mobile applications. It includes authentication, database management, storage, and more features.
Abstracted security management is essential for every application, and Appwrite is no exception. In this way, developers can concentrate on designing the application's functionality while Appwrite manages the security architecture. This enables Appwrite to deliver security features like encryption, access control, and audit logging without forcing developers to implement them manually.
Furthermore, abstracted security management makes maintaining the application's security easier over time. Developers can ensure the platform is continuously updated to address new security threats even as the technology stack changes.
Project setup and installation
Let’s bootstrap a new Next.js project with the following command:
npx create-next-app <project-name>
The command above triggers a command-line interface (CLI) where we can create our Next.js application. The image below shows the configuration options the CLI provides:

After configuring the Next.js project, navigate into the project directory cd <project-name> and run npm run dev to start a development server at https://localhost:3000/ in our browser.
NOTE:
<project-name>above stands for the name of our app; we can call it any name we deem fit.
Setting up an Appwrite project
Installing Appwrite
To use Appwrite in our Next.js application, install the Appwrite client-side software development kit (SDK) for web applications.
npm install appwrite
Then, we’ll set up a new Appwrite project by starting an Appwrite instance and navigating to the specified hostname and port http://localhost:80.
NOTE: To set up an Appwrite instance, follow the steps in the article here.
Creating a new project
Next, we must log into our account or create an account if we don’t have one.
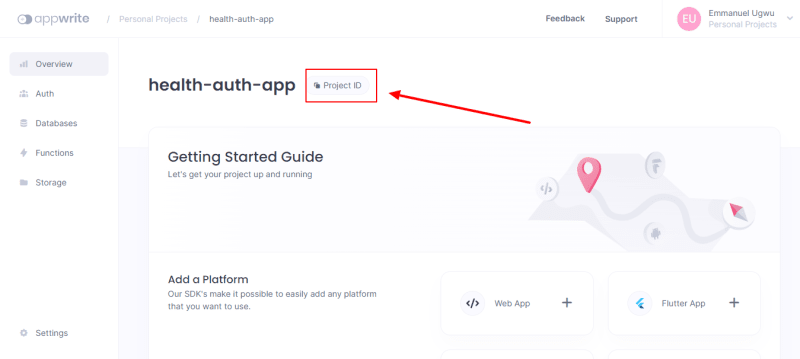
On Appwrite’s console, click the Create Project button, input health-auth-app as the project name, and click Create.

The project dashboard will appear on the console. Next, copy the Project ID; we’ll use this to set up our Next.js application.
Creating an Auth User
On the left side of the Appwrite Console dashboard, click on the Auth tab.

Click the Create User button to fill in the User form with the necessary information.

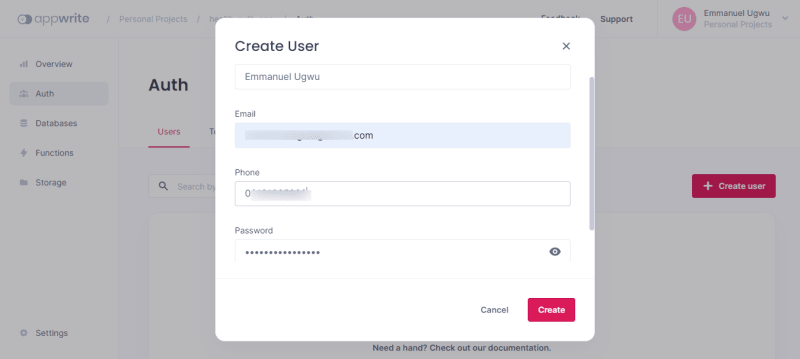
Next, we’ll create a User Preference to hold user data. It consists of a key and value. The User Preference will contain a user’s health data bio, including name, gender, blood group, email, and date of birth.

After applying the necessary configurations on Appwrite, we’ll start building our application.
Building the app component
Open the app/routes/index.jsx file and replace its default syntax with the code snippet below.
import Head from "next/head";
import styles from "../styles/Home.module.css";
import Link from "next/link";

export default function Home() {
  return (
     <main className={styles.main}>
       <h1>authentication service app</h1>
         <p>Choose a service to sign in with.</p>
           <div className={styles.description}>
             <Link href="/appwrite" className="btn appwrite">
                sign in with appwrite
              </Link>
              <Link href="/google" className="btn google">
                sign in with google
              </Link>
           </div>
     </main>
      );
    }
The code snippet above will serve as the homepage of our application, which houses two different authentication options: Appwrite and Google. It renders a default home page, and it will look like this:

Appwrite authentication
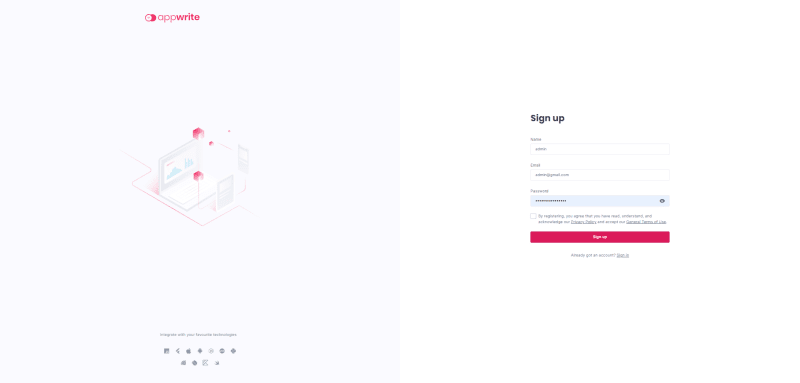
To handle the Appwrite authentication, we’ll create a component file called appwrite.js and link it to the “SIGN IN WITH APPWRITE” button in the index.js file. Once the button is clicked, it’ll redirect a user to Appwrite’s authentication page. This page contains a form to accept a user’s email and password.
import React from "react";
import styles from "../styles/Home.module.css";
import { Client, Account } from "appwrite";

const Appwrite = () => {
const handleChange = (e) => {
  e.preventDefault();
  setFormData({ ...formData, [e.target.name]:
  e.target.value });
 };
const handleSubmit = (e) => {
  e.preventDefault();
  setFormData({ name: "", message: "" });
  updateData();
 };
const client = new Client()
      .setEndpoint("http://localhost/v1") // Your API Endpoint
      .setProject("OUR_PROJECT_ID"); // Your project ID
const account = new Account(client);
const updateData = () => {
  const promise = account.createEmailSession(
          `${formData.email}`,
          `${formData.password}`
      );
  promise.then(
      function (response) {
      console.log(response); // Success
   }, function (error) {
      console.log(error); // Failure
   });}
 return (
  <div className={styles.AppwriteContainer}>
    <p>Please enter your user credentials to access your bio data.</p>
      <form onSubmit={handleSubmit}>
        <div className={styles.label}>
           <label>email</label>
   <input type="email" name="email" value={formData.email} onChange={handleChange} />
           <label>password</label>
   <input type="password" name="password" value={formData.password}onChange={handleChange} />
     <button type="submit" className="sub appwrite">
       Sign in
     </button>
   </div>
 </form>
</div>
)};
export default Appwrite;
The code snippet above does the following:
- Creates a form to accept a valid email and password combination
- Creates an email session for a user by sending a request to Appwrite’s servers with the email and password combination
- Logs a response of whether the request was successful or not
After applying the configurations, our application will look like this:

Get user preferences — key and value
We’ll also want to get the user preference (i.e., user bio-data) from Appwrite’s servers. We’ll send another request only if the current user session is valid. The request fetches the user preference we created in our Appwrite console earlier. Let’s use conditional rendering to display the fetched data only if the request is successful.
import React from "react";
import styles from "../styles/Home.module.css";
import { Client, Account } from "appwrite";

const Appwrite = () => {
const handleChange = (e) => {
 ...
  promise.then(
      function (response) {
        if (response.current == true) {
          setIsOpen(true);
          const account = account.getPrefs();
          account.then(
            function (res) {
              setFetchedData((prevData) => [...prevData, res]); //Success
            },
            function (error) {
              console.log(error); // Failure
            })}
        setIsOpen(false);
      },
      function (error) {
        console.log(error); //Failure
      })};
return (
    ...
)};
export default Appwrite;
Then, we’ll use a map() method to render the user preference we got from Appwrite.
<div>
  {isOpen ? (
     <main className="main-container">
       ...
        {fetchedData.map((value) => {
const { id, gender, group, weight, height, address, email } = value;
   return (
<main>
      <div key={id} className="data">
         <p>gender: {gender}</p>
         <p>blood group: {group}</p>
         <p>weight: {weight}</p>
         <p>height: {height}</p>
         <p>address: {address}</p>
         <p>email: {email}</p>
      </div>
      );
   })}
      <Link href="/" className="log-btn">
          Log out
       </Link>
  </main>
        ) : (
          ...
      )}
      </div>
      );
    };
Here’s a demo of how the Appwrite authentication will turn out after applying the necessary configurations:
Let’s also set up another form of authentication with an OAuth provider such as Google.
Setting up a Google authentication
OAuth is an open standard protocol used for authorization, enabling third-party applications to access a user's data without having access to their password. As a result, OAuth providers such as Google are responsible for protecting the security of their users' data and maintaining their user base's trust.
How OAuth providers like Google improve overall application UX
OAuth providers can considerably improve applications' overall user experience (UX) while simultaneously delivering high security. Here are a few benefits:
- Simplified sign-up and login: Using OAuth, users can sign up for and log in to an application with only a few clicks. Users can avoid remembering several login credentials by not having to create a new username and password for each application they use. This improves the UX by making the onboarding process faster and easier.
- Improved security: The application does not keep the user's password because OAuth uses a token-based authentication approach. Instead, the OAuth provider authenticates the user, and the application receives a unique token that authorizes the user to access the application.
- Improved performance: OAuth providers are frequently more efficient than traditional means of username and password authentication. This can lead to improved performance, faster load times, and an overall better UX.
Generating a Google Auth credential
Let’s create a Google Authentication project and obtain a Google client ID for our application.
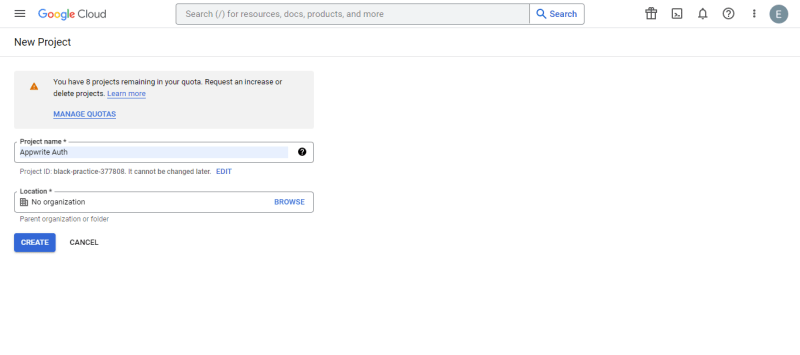
A client ID is an application-specific identifier that aids client and server OAuth 2.0 authentication. To get a client ID, head over to the Google Cloud Console. For this article, we’ll name the project “Appwrite Auth”.
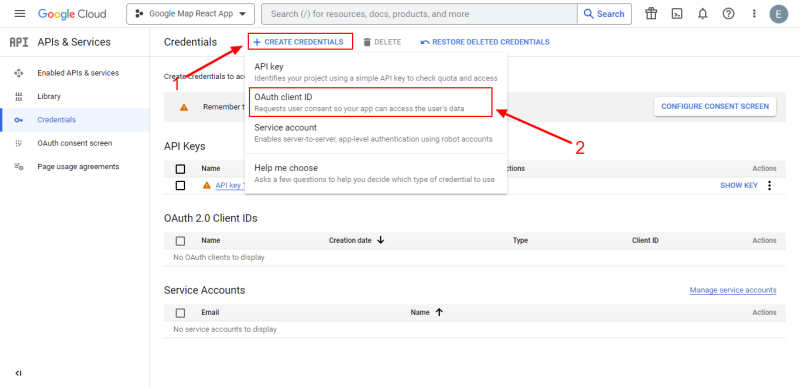
After creating the project, click on the project name to get a dashboard like the one below. On the left-hand menu, select the Credentials option to access the page where we can generate the Google client ID. On this screen, at the top, click CREATE CREDENTIALS, then select the OAuth client ID option:
As seen below, we‘ll be required to select an application type. Select Web application since we're utilizing the Google client ID for the web.
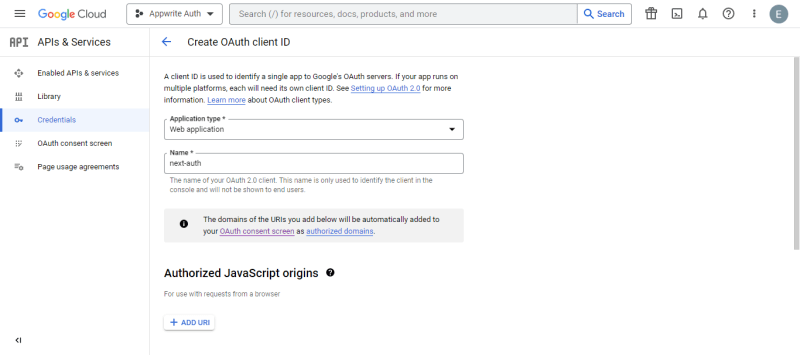
NOTE: When integrating it in a React Native, Flutter, or Swift project, choose between an Android or iOS for the two operating systems.
Next, we’ll choose a client ID name. The name identifies or defines the ID we’re creating. Our client ID name will be “next-auth”.

We'll also add two URI types: Authorized JavaScript origins and Authorized redirect URIs.
The Authorized JavaScript origins URI is the development server of our application. For React/ Next.js developers, this is localhost and localhost:3000, or a hosted URI if the application is hosted.
The Authorized redirect URI is the link to which Google will redirect a user after a successful login. We can redirect a user to another link or return the user to the original link. Either way, include the URL here.
Add the two localhost URIs — http://localhost:3000 and http://localhost — to the Authorized JavaScript origins and Authorized redirect URIs.

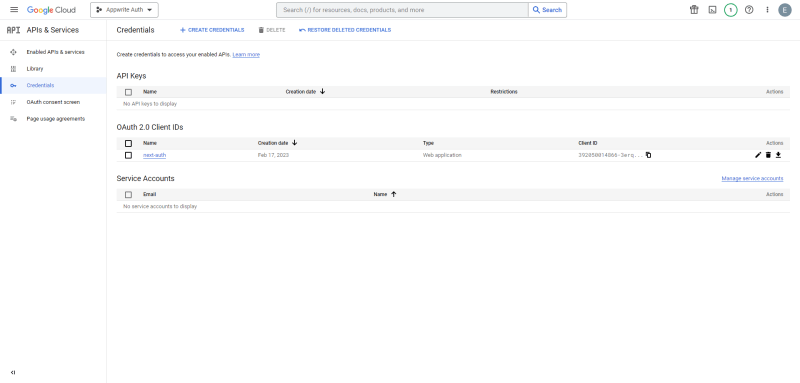
Finally, to generate the Google client ID, click the Create button. We'll be redirected to the homepage, where the newly created credentials will be visible. Copy the Google client ID; we'll use it later on.
NOTE: Don’t share your Google Client ID or Google Client Secret.
Integrating Google Authentication into our application
Let’s install and integrate Google Authentication into our Next.js application. To do so, we’ll use @react-oauth/google. Head to the terminal and install @react-oauth/google with the following command:
npm install @react-oauth/google@latest
After installation, we’ll wrap our application with GoogleOAuthProvider. This supplies a clientId prop to link our Google client ID to our application. Inside the _app.js file, we’ll wrap the application like so:
    import "../styles/globals.css";
    import { SessionProvider } from "next-auth/react";
    import { GoogleOAuthProvider } from '@react-oauth/google';
    function App({ Component, pageProps }) {
      return (
        <GoogleOAuthProvider clientId="GOOGLE_CLIENT_ID">
          <Component {...pageProps} />
        </GoogleOAuthProvider>
      );
    }
    export default App
Next, we’ll create a component file called google.js and link it to the “SIGN IN WITH GOOGLE” button in the index.js file. Once the button is clicked, it redirects a user to Google’s authentication page. Copy and paste the code sample below.
import React from "react";
import styles from "@/styles/Home.module.css";
import { FaJenkins } from "react-icons/fa";
const Google = () => {
return (
<main className="main-container">
<div className="title">
<FaJenkins />
<div className="header">
<h2>Bilbo Baggins</h2>
<h4>date of birth: 22 September T.A. 2890 (131)</h4>
</div>
</div>
<div className="data">
<p>gender: male</p>
<p>blood group: unknown</p>
<p>weight: about 25 kilos (55 pounds)</p>
<p>height: 4'1"</p>
<p>address: Bag End</p>
<p>email: bilbobags@gmail.com</p>
</div>
<button className="log-btn">
Log out
</button>
</main>
)};
export default Google;
The code sample contains the user bio-data we'll authenticate. Our application will look like this after applying the code snippet above.
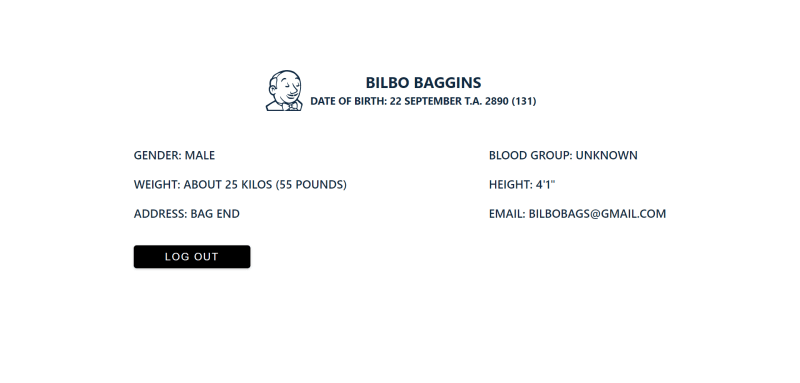
Next, we need to prevent unauthorized access to our user bio-data. To achieve this, we'll set up authentication using @react-oauth/google, where we'll use conditional rendering to access the user bio data only if the sign-in authentication request is successful.
import { googleLogout, useGoogleLogin } from "@react-oauth/google";
import axios from "axios";

const Google = () => {
 const [user, setUser] = useState(false);
 const googleLogin = useGoogleLogin({
     flow: "auth-code",
     onSuccess: async (codeResponse) => {
       const tokens = await axios.post("http://localhost:3000/google", {
            code: codeResponse.code,
          });
          setUser(true);
        },
        onError: (errorResponse) => console.log(errorResponse),
      });
 return (
   <div className="section">
      {user ? (
         <main className="main-container">
              ...
         </main>
          ) : (
       <div>
         <h1 className="login">sign in to access your bio data.</h1>
         <button className="log-btn" onClick={() => googleLogin()}>
            Sign in with Google 🚀{" "}
         </button>
       </div>
      )}
 </div>
)};
export default Google;
Here’s a demo of how the Google authentication will turn out after applying the necessary configurations:
Conclusion
This article discussed using Appwrite's security management system and protocol to safeguard sensitive user data integrated into web applications.

Top comments (0)