
E-commerce stores, as we all know, have a high demand in current times. From my observation on freelancing platforms, more than 50% of developers have had a gig to build an e-commerce storefront at least once. As such, developers need a fast and straightforward approach to creating e-commerce websites without compromising security and performance.
In this article, we will look at a quick method of building a performant e-commerce storefront using the following tools:
- Xata — a serverless database that saves the time and effort of handling the servers ourselves.
- Cloudinary Product gallery — a Cloudinary widget handles product image displays with already-styled components.
- FingerprintJS — a fingerprinting library that assigns a unique id to site visitors based on their browser attributes.
- Next.js — a React framework that offers serverside rendering and a fast build time.
Prerequisite
This article requires knowledge of Next.js and its API routes for a smooth flow. Also, we will need to create a Xata account, a Cloudinary account and FingerprintJS keys. They are all free-tier accounts.
We also assume to have a Next.js boilerplate with TailwindCSS configured and opened in our text editor.
What is Xata
Xata is a serverless database built on Next.js. It offers a variety of data types that includes:
- String: a short text
- Link: a connection between data tables
- Email: an email address
- Date
- Integer: all whole numbers
- Long text: a lengthy text; as seen in a description
- decimals: all fractions of numbers
It also supports a variety of languages, such as Typescript and Python.
What is Cloudinary
Cloudinary is a SaaS solution for managing web and application media assets
. It helps developers serve optimised web assets while modifying them on the fly.
Cloudinary offers a variety of other services asides from media hosting and management. Some of this includes; the product gallery widget, which will be used in this article.
Setup Development Environment
Install the following dependencies in your Next.js boilerplate:
yarn add fingerprintjs/fingerprint-pro-react axios @xata.io/client
App Demo
The app demo can be found here, and the code here.
Dropbox - Screen Recording 2022-11-08 at 05.55.25.mov - Simplify your life
Shared with Dropbox
Getting Started with Xata
Here we will talk about how to integrate Xata into our applications seamlessly.
Setting up a database
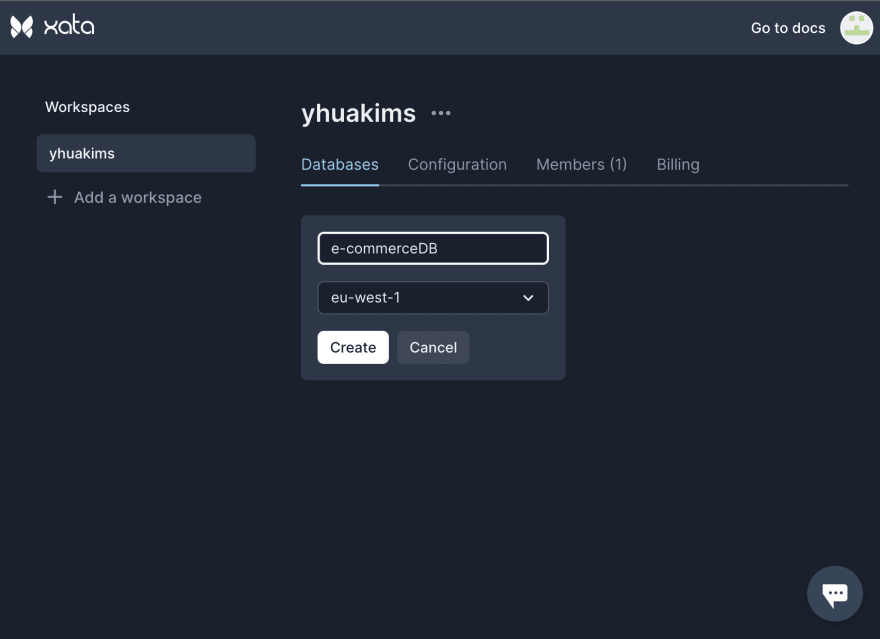
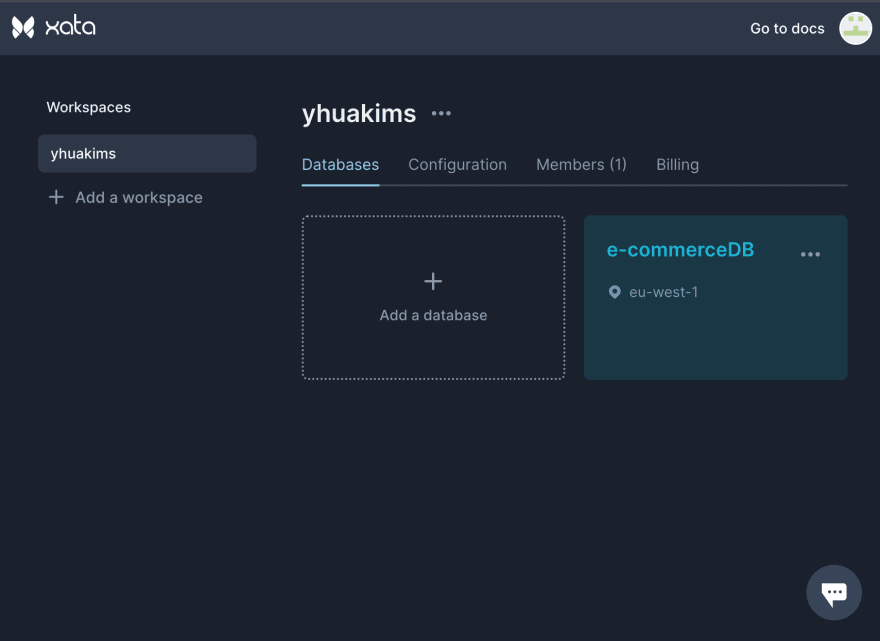
To use Xata, we will create a workspace in our free tier account. The image below shows steps for creating a database in Xata;

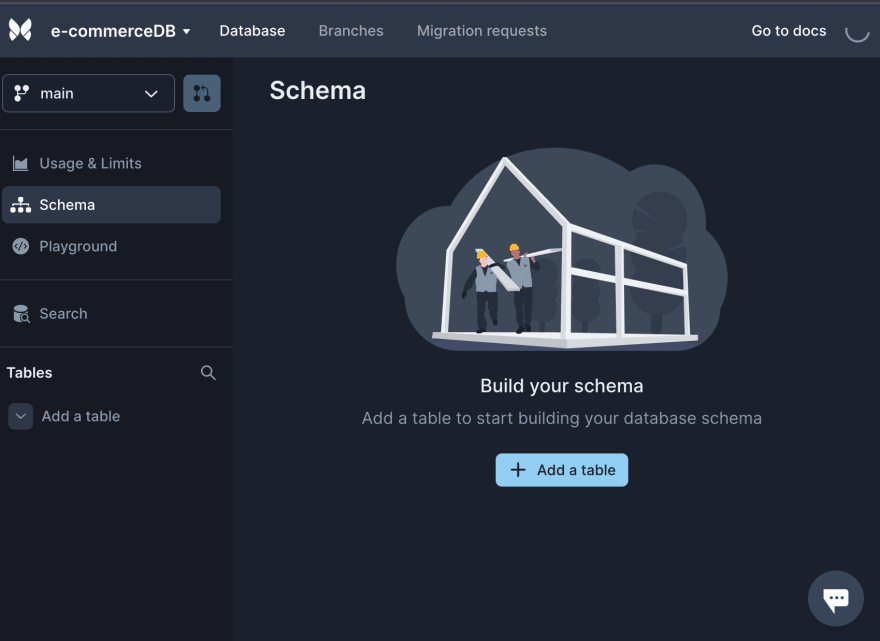
Next, navigate to the e-commerceDB and click on the Schema navigation on the menu bar. Now, the screen below comes into view;
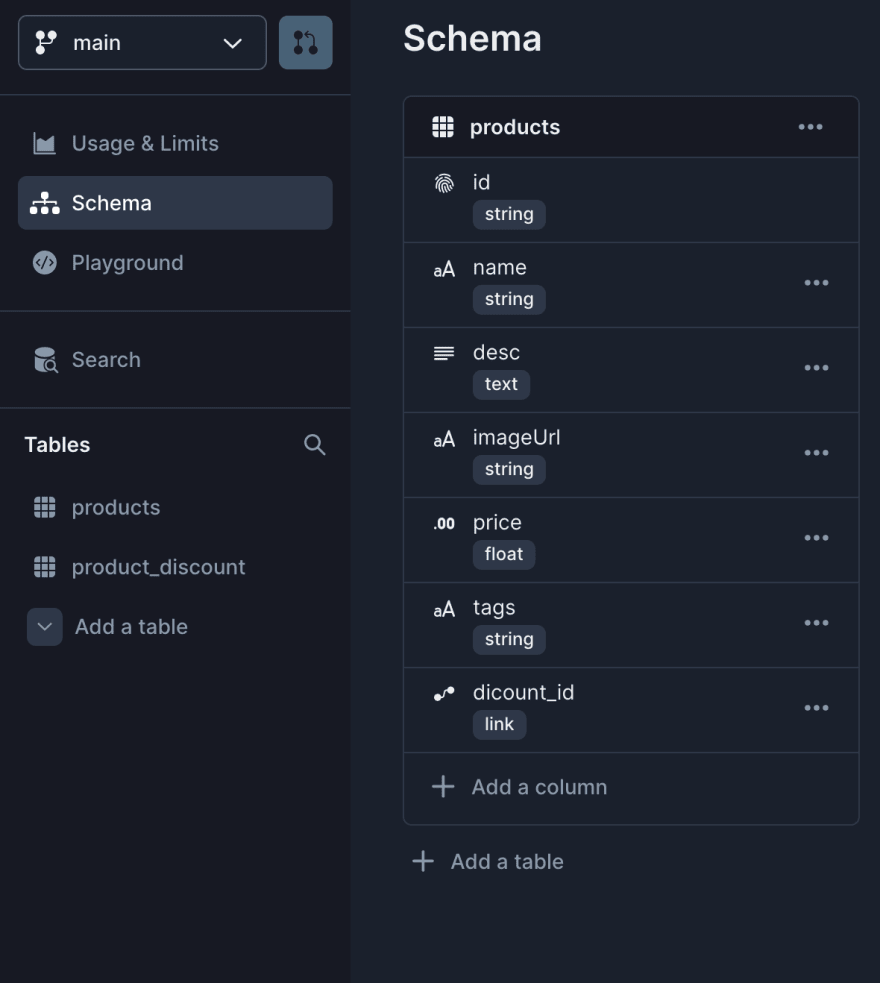
At this point, let's create our database schema for the demo store. Every store has products it sells; thus, let's create a products table for our store. The products table will consist of the following columns:
- name: a type of string. Stores the name of each product
- desc: a type of long-text. Holds the description of each product
- imageUrl: a type of string. Stores the image URL served from Cloudinary for each product
- price: a decimal type. Stores each product's price
- tags: a type of string. Stores the tags for each product
-
discount_id: a link that is a reference to the product_discount table.

The product_discount table consists of
- name: a string type that stores the discount's name, such as "ECOMMERCE20."
- isActive: a boolean type that holds the validity of the discount
- discount_percent: a decimal type that stores the percentage decrease in the product price.
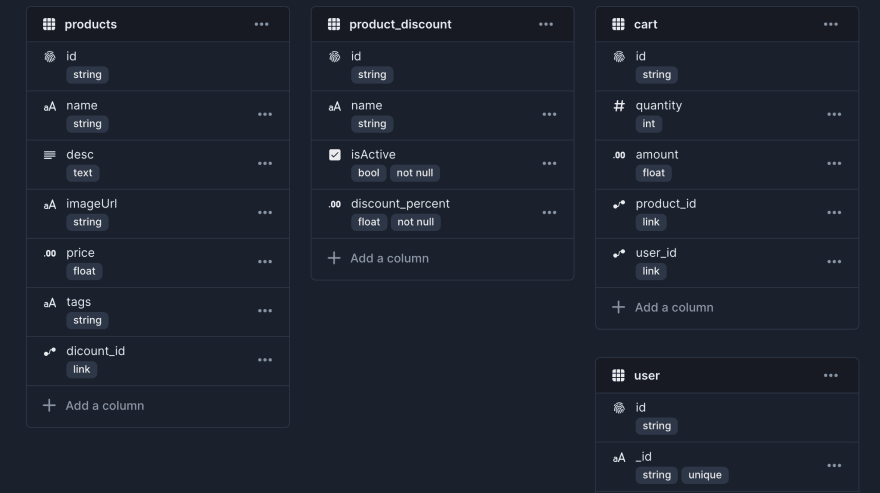
Next, let's create a user table that will store the id generated by FingerprintJS. After this, let's create a cart table that stores each user's selected products. This table will consist of the following column:
- product_id: a reference to the properties of the desired product
- user_id: a reference to the user who picked the product(s)
- quantity: the total quantity per product selected by the user
- amount: the total price per product picked by the user
Once we have successfully created these tables, it's time to populate them with some dummy data.
First, let's download and host our product images on Cloudinary. To do this, we will upload our desired product images to Cloudinary while adding a unique tag to each. Then, Cloudinary generates a URL for each image we will use in the imageUrl column of each product. The image below shows a sample record created.

Fetching Products from Xata Database
Open up the Next.js boilerplate and navigate to the pages/index.js directory. In the file add the following snippet
// pages/index.js
import { BaseClient } from '@xata.io/client';
    import Products from '../components/Products';

    export default function Home({ products }) {
      return (
        <div className="">
          <main>
            <div id='products' className="">
              <h1 className="text-3xl font-semibold text-center py-10">Products</h1>
              <Products products={products} />
            </div>
          </main>
        </div>
      )
    }
    export async function getServerSideProps() {
      const xata = new BaseClient({
        branch: 'main',
        apiKey: process.env.API_KEY,
        databaseUrl: process.env.XATA_DATABASE_URL
        //fetch: fetchImplementation // Required if your runtime doesn't provide a global `fetch` function.
      });
      const page = await xata.db.products
        .select(["*", "discount_id.*"])
        .getAll()
      return {
        props: {
          products: page,
        }
      }
    }
The snippet above handles fetching our products from the database. To achieve this,
- First, import
BaseClientfrom@xata.io/client, andaxiosfromaxios - Next, export a
Homepage function with a prop ofproducts - Then, create an asynchronous
getServerSideProps()function, that initialises the Xata client. To initialise our Xata client we need to have gotten our API keys from Xata and added them to a.envfile
Our API keys and database URL, can be found as shown in the image below

- Next, our products will be fetched using the Xata method;
xata.db.productsand selecting all products using"*". While appending each linked(referenced) table to the results. This will return a response as shown below;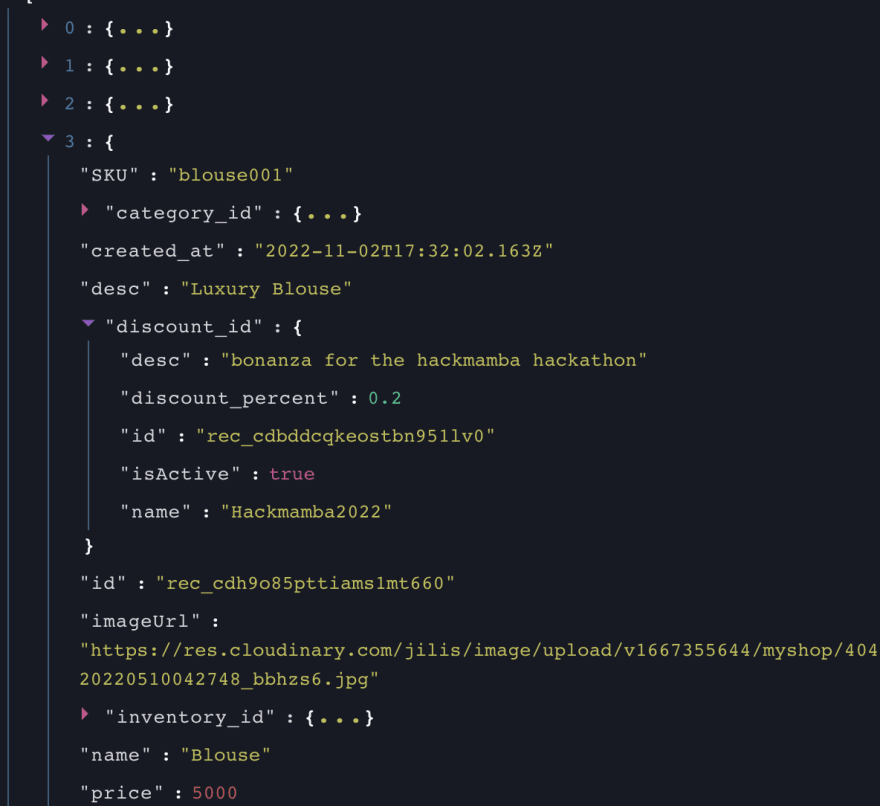
Since the products are now available as props on our Homepage, let’s display them. To achieve this, let’s create a components directory and a Products.jsx file. Inside this file add the following snippet:
    //components/Products.jsx
    import Link from "next/link"
    const Products = ({ products }) => {
        return (
            <div className="grid grid-cols-2 md:grid-cols-2 lg:grid-cols-3 justify-items-center">
                {
                    products && products.map((prod, index) => (
                        <div className="relative w-36 md:w-52 bg-white rounded-md border border-gray-200 shadow-md m-3" key={index}>
                            <small>
                                <b className={`${!prod.discount_id ? 'none' : 'absolute top-2 right-2 text-xs text-red-300 bg-red-100 p-1'}`}>{prod.discount_id && prod.discount_id.isActive ? `${prod.discount_id.discount_percent * 100}%` : ''}</b>
                            </small>
                            <div className="">
                                <Link href={`/product/${prod.id}`} className="">
                                    <img className='object-cover w-36 md:w-52 h-48' src={prod.imageUrl} alt="" />
                                </Link>
                            </div>
                            <div className="card-info py-2 px-2">
                                <Link href={`/product/${prod.id}`}>
                                    <h3>{prod.name}</h3>
                                    <p>
                                        <b>₦{prod.discount_id && prod.discount_id.isActive ? (prod.price - (prod.price * prod.discount_id.discount_percent)) : prod.price}</b> <br />
                                        <small><s className={`${!prod.discount_id ? 'hidden' : 'text-gray-500 decoration-gray-500'}`}>₦{prod.discount_id && prod.discount_id.isActive ? prod.price : ''}</s></small>
                                    </p>
                                </Link>
                            </div>
                        </div>
                    ))
                }
            </div>
        )
    }
    export default Products
The above component is then imported into our pages/index.js file. Where the fetched products are passed as props to it. Then, it maps through these products and displays them as shown below:

Creating User Identification using FingerprintJS
An e-commerce store must be aware of its visitors to track their activities. One of the essential activities to follow is the "what" product the user is adding to their cart.
However, we wouldn't want to bug your user with a login form constantly. To eliminate this, the app will silently create an ID unique to every user using a fingerprinting library. Now, let's walk through the code. Navigate to /pages/_app.jsx and add the following snippet.
// pages/_app.jsx
import { FpjsProvider } from '@fingerprintjs/fingerprintjs-pro-react'
    import NavBar from '../components/NavBar'
    import '../styles/globals.css'
    function MyApp({ Component, pageProps }) {
      return (
        <FpjsProvider
          loadOptions={{
            apiKey: process.env.FPJS_KEY
          }}
        >
          <NavBar />
          <Component {...pageProps} />
        </FpjsProvider>
      )
    }
    export default MyApp
In the snippet above, FingerprintJS is tied to our application using a provider from @fingerprinjs/fingerprintjs-pro-react and initialised with the API Keys.
Next, let’s create a server logic in our API route. This logic will receive our user’s id and search for instances in the database. Then create a new user record if there is no instance of the user. To achieve this, we will add a file to /pages/api called assignuser.js. Then we add the following snippet:
// pages/api/assignuser.js
import { BaseClient } from '@xata.io/client';
    export default async function handler(req, res) {
      const { visitorID } = req.body
      const xata = new BaseClient({
        branch: 'main',
        apiKey: process.env.API_KEY,
        databaseURL: process.env.XATA_DATABASE_URL
        //fetch: fetchImplementation // Required if your runtime doesn't provide a global `fetch` function.
      });
      try {
        //Fetch all users and find a match for the visitorID
        const records = await xata.db.anon_user.select(["*"]).filter("id", visitorID).getAll()
        //if a match is not found, create a user with the visitorID
        if (records.length === 0) {
          await xata.db.user.create(visitorID, {
            _id: visitorID
          })
        }
        res.status(200)
      } catch (err) {
        console.error(err)
      }
    }
In the above snippet, we will:
- import
BaseClientfrom our@xata.io/clientand initialise a client with our valid credentials - create a handler function where we fetch users from Xata and filter them by the
visitorIdreceived from our clientside - check if a User with the
visitorIDexists. If it doesn’t exist, we create a new record but if it does we will do nothing
Next, let’s create a client side logic to post the user’s id to our API route /api/assignuser. Navigate to /pages/index.jsx and add the following snippet:
    // pages/index.jsx
    import { useVisitorData } from '@fingerprintjs/fingerprintjs-pro-react'
    import { useEffect } from 'react'
    import axios from 'axios'
    export default function Home({ products }) {
      const { isLoading, data } = useVisitorData({ immediate: true })
      useEffect(() => {
        const registerAnon = async () => {
          if (!isLoading) {
            const visitorID = data?.visitorId
            await axios.post('/api/assignuser', { visitorID })
          }
        }
        registerAnon()
      }, [isLoading, data])
      return (
        <div className="">
          ...
        </div>
      )
    }
    export async function getServerSideProps() {
      ...
    }
In the above snippet, we will:
- import
useVisitorDatafrom@fingerprintjs/fingerprintjs-pro-react - destructure the values of
isLoadinganddatafromuseVisitorData - initiate a
useEffecthook and create aregisterAnonfunction. Here we will, pull the value ofvisitorIdfromdata. Next, we will make apostrequest to the API route/api/assignuserwith the generatedvisitorIDas the body
With this, we have successfully assigned an ID to the visitor and stored it in our database.
Creating a Single Product Page
Here we will leverage Next.js dynamic routing features to create a page for a single product gallery display.
Creating Dynamic Routing
First, create a product directory in the pages folder. Then we will create a dynamic file named [id].jsx. In this file add the following snippet:
   // pages/product/[id].jsx
    import { BaseClient } from '@xata.io/client';

    const Product = ({ product }) => {
        return (
        ...
        )
    export default Product;
    export async function getStaticPaths() {
        const xata = new BaseClient({
            branch: 'main',
            apiKey: process.env.API_KEY,
            databaseURL: process.env.XATA_DATABASE_URL
            //fetch: fetchImplementation // Required if your runtime doesn't provide a global `fetch` function.
        });

        const page = await xata.db.products
            .select(["*", "category_id.*", "inventory_id.*", "discount_id.*", "tag_id.*"])
            .getAll()
        const products = page
        const paths =
            products &&
            products.map((prod) => ({
                params: { id: prod.id }
            }));
        return {
            paths: paths,
            fallback: false
        };
    }
In the above snippet, we will:
- create a
Productpage component and importBaseClientfrom@xata.io/client - create a
getStaticPathsasynchronous function. Here we will fetch all our productsidfrom Xata and assign them aspaths
Next, we will filter these paths and return only the user-requested product. To do this add the following snippet:
    // pages/product/[id].jsx

    // this line is below getStaticPaths()
    export async function getStaticProps({ params }) {
        const xata = new BaseClient({
            branch: 'main',
            apiKey: process.env.API_KEY,
            databaseURL: process.env.XATA_DATABASE_URL
            //fetch: fetchImplementation // Required if your runtime doesn't provide a global `fetch` function.
        });

        const page = await xata.db.products
            .select(["*", "category_id.*", "inventory_id.*", "discount_id.*", "tag_id.*"])
            .getAll()
        const products = page
        const product =
            products && products.filter((prod) => params.id === prod.id);
        return {
            props: {
                product
            }
        };
    }
In the above snippet, we have also returned our filtered product as a page props.
Now, we need to display this requested product to the user by adding the following snippet to pages/product/[id].jsx:
    // pages/product/[id].jsx

    import { useState } from "react";
    const Product = ({ product }) => {
          return (
            <div className='relative mx-auto'>
                <div className="flex flex-col md:w-6/6 p-8 md:flex-row">
                    <div className="price md:w-2/6">
                        <h3 className='text-3xl font-semibold'>{product[0].name}</h3>
                        <p className='text-lg'>
                            {product[0].desc} <br />
                            Lorem ipsum dolor sit amet consectetur adipisicing elit. Laudantium eaque totam aperiam temporibus asperiores, soluta eligendi architecto magni tempora. Perspiciatis a sequi id ut qui eligendi illo non unde vero!
                            Numquam quia maxime laudantium, provident libero fuga, voluptatem animi eveniet aliquid beatae mollitia odit laborum amet dolores. Id adipisci quidem nostrum alias dolorem ea, commodi rem repellendus repellat nihil molestias.
                        </p>
                        <p>
                            <b>₦{product[0].discount_id && product[0].discount_id.isActive ? (product[0].price - (product[0].price * product[0].discount_id.discount_percent)) : product[0].price}</b> <br />
                            <small><s className={`${!product[0].discount_id ? 'hidden' : 'text-gray-500 decoration-gray-500'}`}>₦{product[0].discount_id && product[0].discount_id.isActive ? product[0].price : ''}</s></small>
                        </p>
                    </div>
                </div>
            </div>
        );
    }
The snippet above renders our product title, price and description.
Next, we will display the images for each product. To achieve this, we will use Cloudinary’s product gallery widget feature.
Setup for Clouding Product Gallery Widget
Cloudinary gallery widget retrieves images (or videos) with specified tags based on the Client-side asset lists feature. To learn more about cloudinary product gallery see here.
Ensure that the Resource list option is enabled on your Cloudinary account to use this feature. By default, the list delivery type is restricted. In your console, navigate to Security settings and clear the Restricted media types item under the Resource list.


Next, add the following snippet to /pages/_document.js
    // pages/_document.js
    import Document, { Html, Head, Main, NextScript } from "next/document";
    class MyDocument extends Document {
        render() {
            return (
                <Html>
                    <Head />
                    <body>
                        <Main />
                        <NextScript />
    //script for cloudinary product gallery
                        <script
                            src="https://product-gallery.cloudinary.com/all.js"
                            type="text/javascript"
                            strategy="beforeInteractive"
                        ></script>
                    </body>
                </Html>
            );
        }
    }
    export default MyDocument;
The script marked above fetches the product widget before the page becomes interactive.
Next, to render this in our product page, we will add the following snippet:
    // pages/product/[id].jsx'

    import { useState, useEffect } from "react";
    import axios from 'axios';
    const Product = ({ product }) => {
        useEffect(() => {
            const productGallery = cloudinary.galleryWidget(
                {
                    container: "#gallery",
                    cloudName: "jilis",
                    mediaAssets: [{ tag: `${product[0].tag_id.tagname}`, mediaType: "image" }]
                },
                []
            );
            productGallery.render();
        });
          return (
            <div className='relative mx-auto'>
                <div className="flex flex-col md:w-6/6 p-8 md:flex-row">
                    //the line below renders the product gallery
                    <div className="md:w-4/6 md:h-96 px-5">
                        <div className='' id="gallery"></div>
                    </div>
                  ...
                </div>
            </div>
        );
    }
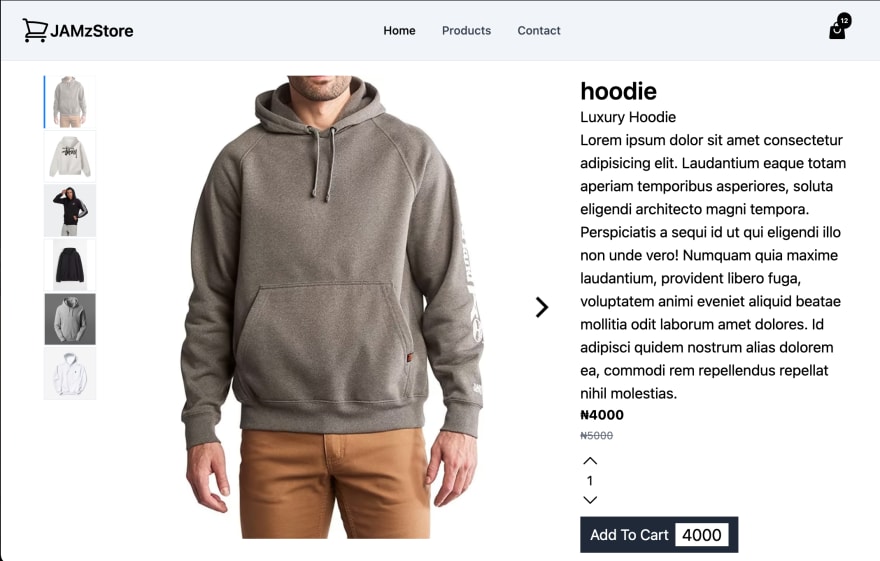
In the above snippet, we are using the useEffect hook to fetch and render the Gallery widget into an element with an id of gallery. The images to be rendered are hosted on cloudinary and have same tagname with the user-requested product. Below is how the UI will appear:
Conclusion
Building with the Xata database was a swift experience. I enjoyed working out my code on their Playground interface before going into my editor. Also, integrating the Cloudinary gallery widget was seamless, not to mention how fast my images were delivered since it was hosted on Cloudinary. These tools are amazing and I believe every developer will be excited to jump on them too to create awesomeness.
Resources
Cloudinary Gallery Widget
Xata Documentation
FingerprintJs Docs

Latest comments (0)