
When checking out an app or service, it is exhilarating, but it can also be deflating when asked to sign up to access significant parts of that service. We can attribute this sudden change in emotions to the tedious steps associated with the user sign-up process.
Though tedious, most sign-up procedures are necessary as they ensure the safety of the user's personal information. Let's face it; no one likes knowing their personal information is easily accessible to others, right? But come to think of it, what if there is an option where we don't have to provide much information while maintaining user information security? We like that option much better!
With Appwrite, developers can integrate several authentication features into their applications with its diverse APIs and features. One feature that catches the eye is phone authentication, which uses Appwrite's Account API to create user sessions with phone numbers. This feature's authentication flow involves sending a secret code (one-time password) via an SMS provider such as Twilio, TextMagic, Telesign, MSG91, or Vonage. This article will use Twilio as our primary SMS provider and show how to set it up in Appwrite.
This article requires the reader to have a Twilio account, iOS Simulator, Android Studio, or Chrome web browser to test their application, and an Appwrite instance running on Docker, DigitalOcean droplet, or Gitpod.
Note: Check out this article to learn how to set up an Appwrite instance.
Setting up Twilio in Appwrite
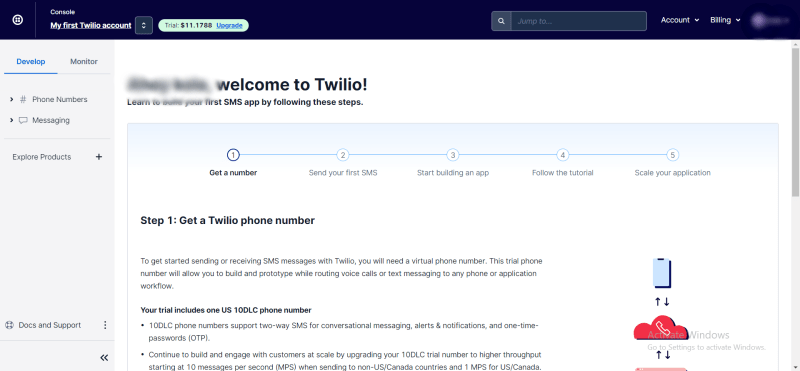
Getting Twilio account information
The purpose of creating a Twilio account is to allow us to have three things:
- Account SID
- Auth Token
- Twilio Phone Number
After logging in, we will need to follow the welcome steps, which guide us on how to get a custom Twilio number. In the first step, we will click on Get Twilio Phone Number, then scroll down to copy the information.
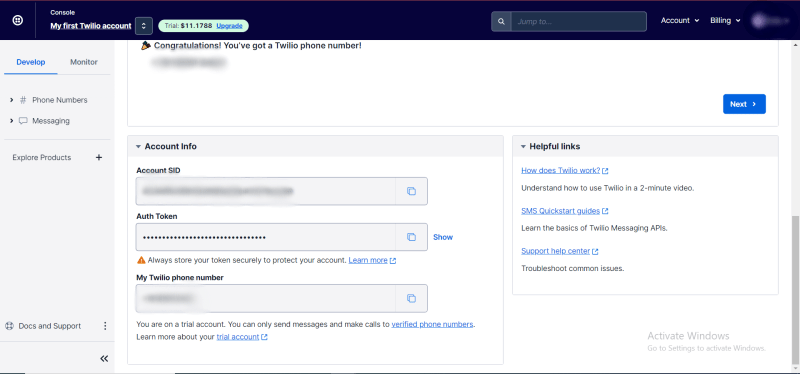
After copying the account information, we must update Appwrite's .env file with the data.
Updating Appwrite's environmental variables
We will head to our PC's Appwrite directory and update the .env file by giving the _APP_SMS_PROVIDER and _APP_SMS_FROM variables the values sms://[ACCOUNT SID]:[AUTH TOKEN]@twilio and [TWILIO PHONE NUMBER] respectively.

After that, it is important to restart the Appwrite server after updating the .env file. This allows us to use the environmental variables added to the file, and we can do this using the command docker compose up -d --force-recreate in a terminal. The command recreates every image within the Appwrite container running on docker.
Note: The docker service must be running, and make sure to run the command terminal within the directory of the
.envfile.
We are now ready to utilize Twilio to create our phone authentication. Thus, in the next section, we will create a Flutter application that routes to the homepage after authenticating a user's phone number. But first, we need to create an Appwrite project; Thus, head to the browser and enter the IP address or hostname specified when creating the Appwrite instance. Next, we must create a new project by clicking Create Project and filling in the project name and ID (optional).

Creating a Flutter project
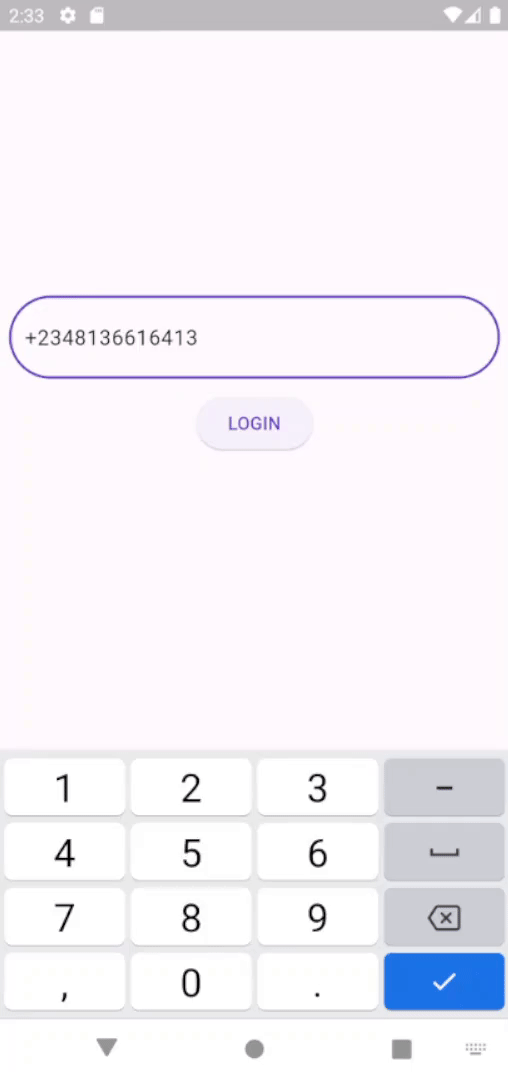
In this article, we will use a Flutter template consisting of a login page with input fields, a submit button, and a homepage to route to after authentication. Therefore, run the command below in a terminal to clone the Flutter project from GitHub.
git clone https://github.com/muyiwexy/main_twilio_auths.git
Note: Check out the official GitHub docs to learn about cloning a repository.
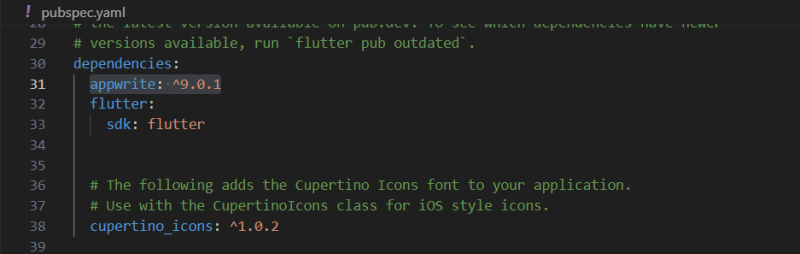
After cloning the UI, we must obtain all the dependencies in the pubspec.yaml file, or there will be "some" errors. So, we can do that with the command flutter pub get.
The project already has the appwrite: ^9.0.1 dependency, though, for a new project, we need to head to the pubspec.yaml file and add the appwrite: ^9.0.1 to the dependencies section. Then run the flutter pub get command or save the file, and the command runs automatically (depending on the code editor).
To run the project, we can use the command:
Flutter run
After that, our template should look like the image below:

This template is a husk, but it will come to life in the next section as we work on adding some functionality to the application and connecting it to Appwrite.
Creating phone authentication logic
In the appwrite_auth.dart file, we will create a class AppwriteAuth, and within it, we need to initialize the Client instance from Appwrite.
import 'package:appwrite/appwrite.dart';

class AppwriteAuth {
  final Client _client;
  AppwriteAuth()
      : _client = Client()
          ..setEndpoint("[endpoint or hostname]")
          ..setProject("[projectID]");
}
Next, we will create a Future function of type Token called phoneLogin. The function uses Appwrite's account API to create a session using a user's phone number by providing a phone number and ID.
import 'package:appwrite/appwrite.dart';
import 'package:appwrite/models.dart' as models;

class AppwriteAuth {
  final Client _client;
  AppwriteAuth()
      : _client = Client()
          ..setEndpoint("[endpoint or hostname]")
          ..setProject("[projectID]");

  Future<models.Token> phoneLogin(String phoneNumber) async {
    final account = Account(_client);
    try {
      final response = await account.createPhoneSession(
        userId: ID.unique(),
        phone: phoneNumber,
      );
      return response;
    } catch (e) {
      rethrow;
    }
  }
}
The function above only creates a user session, which triggers sending the secret token but doesn't verify the user. To verify the user, we will create another Future function of type Session called verifyPhoneOTP. The Future also utilizes Appwrite's account API to update a session rather than create one. This means we must provide the user's ID to check whether such a user exists and the secret token sent to verify the user. This completes our authentication flow.
import 'package:appwrite/appwrite.dart';
import 'package:appwrite/models.dart' as models;

class AppwriteAuth {
  final Client _client;
  AppwriteAuth()
      : _client = Client()
          ..setEndpoint("[endpoint or hostname]")
          ..setProject("[projectID]");

  Future<models.Token> phoneLogin(String phoneNumber) async {
    // do something
  }

  Future<models.Session> verifyPhoneOTP({
    required String userID,
    required String otp,
  }) async {
    final account = Account(_client);
    try {
      final session = await account.updatePhoneSession(
        userId: userID,
        secret: otp,
      );
      return session;
    } catch (e) {
      rethrow;
    }
  }
}
To use this function, head to the user_registraton.dart file and update the _createUserSession with the code below:
    import 'package:appwrite/models.dart';
    import 'package:flutter/material.dart';
    import 'package:main_twilio_auth/auth/appwrite_auth.dart';
    import 'package:main_twilio_auth/pages/home.dart';
    import 'package:main_twilio_auth/widgets/button.dart';
    import 'package:main_twilio_auth/widgets/input_form_field.dart';

    class UserLogIn extends StatefulWidget {
      const UserLogIn({Key? key}) : super(key: key);
      @override
      State<UserLogIn> createState() => _UserLogInState();
    }
    class _UserLogInState extends State<UserLogIn> {
      final TextEditingController _phoneController = TextEditingController();
      final TextEditingController _otpTokenController = TextEditingController();
      final GlobalKey<FormState> _formKey = GlobalKey<FormState>();
      bool _isVisible = false;
      bool _isButtonDisabled = true;
      Token? _response;

      void _createUserSession() async {
        if (_formKey.currentState!.validate()) {
          _response = await AppwriteAuth().phoneLogin(_phoneController.text);
          setState(() {
            _isVisible = true;
          });
          await Future.delayed(const Duration(seconds: 5));
          setState(() {
            _isButtonDisabled = !_isButtonDisabled;
          });
        }
      }
       @override
      Widget build(BuildContext context) {
        return Placeholder();
      }
    }
In the code above, we added a Token instance _response from the Appwrite's models package. This allows us to map the JSON response received from its associated value to a model class, and that's shown when we call the phoneLogin function in the code above.
Next, we will update the _updateUserSession with the code below:
import 'package:appwrite/models.dart';
import 'package:flutter/material.dart';
import 'package:main_twilio_auth/auth/appwrite_auth.dart';
import 'package:main_twilio_auth/pages/home.dart';
import 'package:main_twilio_auth/widgets/button.dart';
import 'package:main_twilio_auth/widgets/input_form_field.dart';

class UserLogIn extends StatefulWidget {
  const UserLogIn({Key? key}) : super(key: key);
  @override
  State<UserLogIn> createState() => _UserLogInState();
}
class _UserLogInState extends State<UserLogIn> {
  final TextEditingController _phoneController = TextEditingController();
  final TextEditingController _otpTokenController = TextEditingController();
  final GlobalKey<FormState> _formKey = GlobalKey<FormState>();
  bool _isVisible = false;
  bool _isButtonDisabled = true;
  Token? _response;

  void _createUserSession() async {
    // do something
  }

  void _updateUserSession() async {
    if (_formKey.currentState!.validate()) {
      await AppwriteAuth().verifyPhoneOTP(
          userID: _response!.userId, otp: _otpTokenController.text);
      if (!mounted) return;
      await Navigator.of(context).pushReplacement(MaterialPageRoute(
        builder: (context) => const HomePage(),
      ));
      _phoneController.clear();
      _otpTokenController.clear();
    }
  }
   @override
  Widget build(BuildContext context) {
    return Placeholder();
  }
}
This function calls the verifyPhoneOTP from the AppwriteAuth class, checks if the current widget is still mounted, then routes by replacing the UserLogIn widget with the HomePage widget on the widget tree.
When we don't get the secret token due to some factors, the "send otp" button triggers a function reSendOtp which recalls the phoneLogin function.
void _sendOtp() async {
  setState(() {
    _isButtonDisabled = true;
  });
  await AppwriteAuth().phoneLogin(_phoneController.text);
  Future.delayed(const Duration(seconds: 5), () {
    setState(() {
      _isButtonDisabled = !_isButtonDisabled;
    });
  });
}
Creating an Appwrite platform and connecting Flutter to Appwrite
After creating an Appwrite project, we will register our application by creating a new Flutter platform within the Appwrite instance. So, we will click Flutter App, select our desired operating system (in this case, Android), and fill in the Name and Package Name.
The app's package name can be found in the app-level
build.gradlefile


iOS
First, obtain the bundle ID by navigating to the project.pbxproj file (ios > Runner.xcodeproj > project.pbxproj) and searching for the PRODUCT_BUNDLE_IDENTIFIER.
Next, head to the Runner.xcworkspace folder in the application's iOS folder in the project directory on Xcode. To select the runner target, choose the Runner project in the Xcode project navigator and find the Runner target. Next, select General and IOS 11.0 as the targeting of the deployment info section.

Android
For Android, copy the XML script below and paste it below the activity tag in the Androidmanifest.xml file (to find this file, head to android > app > src > main).
Note: change [PROJECT-ID] to the ID you used when creating the Appwrite project.
Finally, running the application should have our result like the gif below:
Conclusion
This tutorial has shown how to create a phone authentication in Flutter using Appwrite as the backend service and Twilio as an SMS provider. Authentication is a focal point in app development, and innovations to simplify the process are always happening. Appwrite has simplified this process by cutting the extra work of creating an SMTP flow or token, which is just cumbersome to a simple copy-and-paste job while ensuring user data security data.

Top comments (0)