
Modern applications demand a balance of scalability, speed, and security to meet users’ ever-growing needs. Ensuring authentication and a robust database management system is crucial at the foundation of this triad. In this article, we’ll talk about the combination of Auth0 and Neon Postgres when you need to accommodate these two needs.
Auth0 is an identity platform that simplifies authentication and authorization functionalities across web, mobile, and native applications.
Neon is fully managed serverless Postgres that provides separate storage and computing to offer autoscaling, branching, and bottomless storage. Neon is open source under the Apache 2.0 licenses; you can check out the neondatabase GitHub repo.
This guide provides a comprehensive walk-through of setting up Auth0 with a Postgres database like Neon by building a login page that routes to a profile page while implementing Neon Postgres as the data store for user information. This application uses the Next.js React framework with App Router and Tailwind for styling.
Here is the link to the GitHub repository containing all the code
Prerequisites
To successfully complete this guide, you’ll need a few things:
- Proficiency with JavaScript frameworks such as Next.js (recommended), React, etc.
- A Neon account
- An Auth0 account
- Node 18 or later versions
Setting up a Neon Postgres project
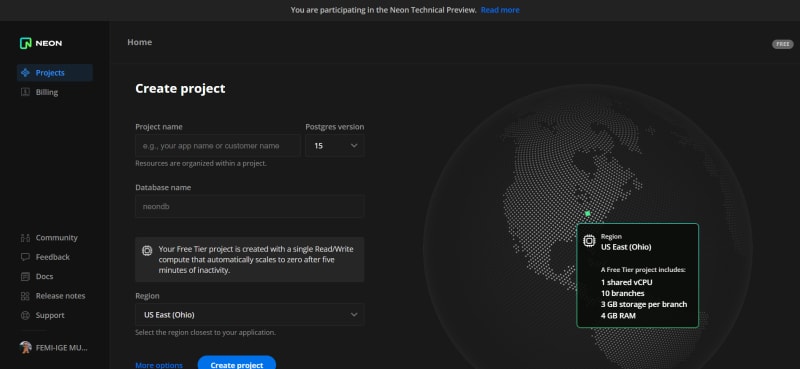
After signing up, you’ll note Neon's streamlined project setup; you’ll just need to provide three things:
- Project name
- Postgres version
- Database name
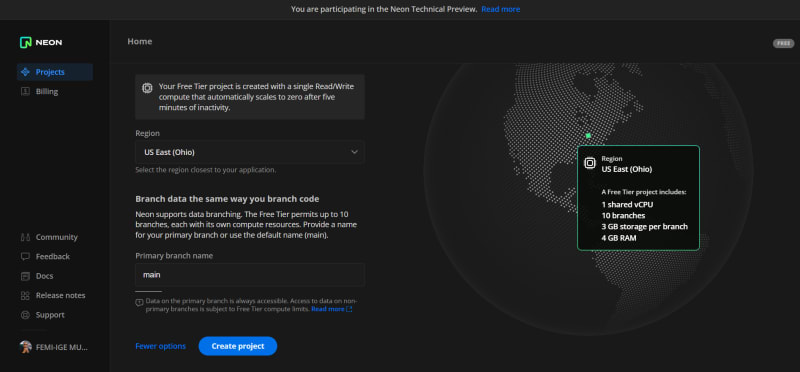
On the project setup page, there are more options to explore; for example, you can change the branch name to any other name, but we recommend leaving it as main for now. Next, click Create project.

On the homepage, you'll find a popup containing all the connection details required to connect your application(s) to a Neon database. Copy these details to a safe file, such as a JSON file.

Creating a Next.js application and installing dependencies
To create a Next.js application, open your terminal in any folder of your choice and type the command below:
npx create-next-app@latest <folder-name> --ts
This command creates a Next.js application with TypeScript as the preferred programming language.
Next, we need to install some dependencies. These include an Auth0 dependency and dotenv to store sensitive credentials in a .env file. To do this, run the command below:
npm install @auth0/nextjs-auth0 dotenv
Configuring Auth0 application settings
After signing into the Auth0 account you created earlier, click Create Application in the Auth0 dashboard, select Regular Web Applications, and fill in the app name to create traditional web applications that use redirects.

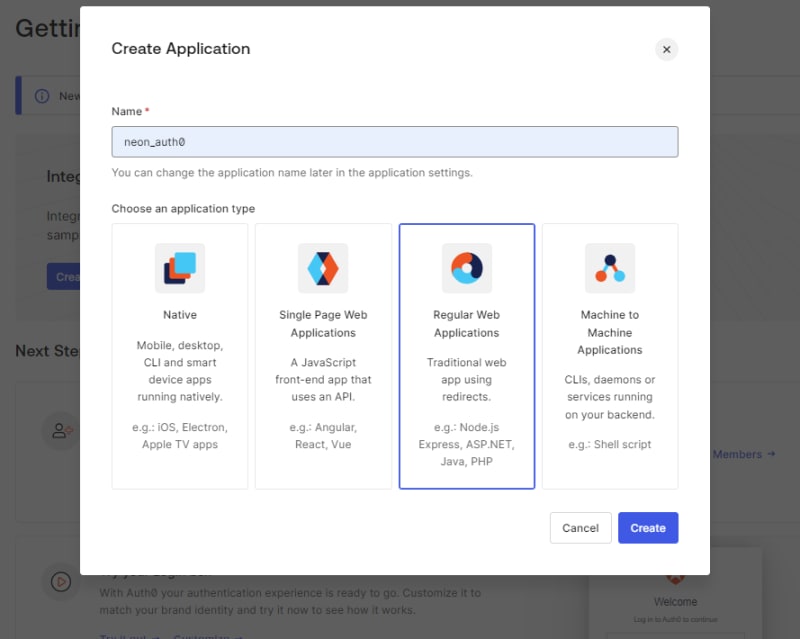
The following prompt asks what technology is being used for the project; we’ll select Next.js out of all the presented options for this project.

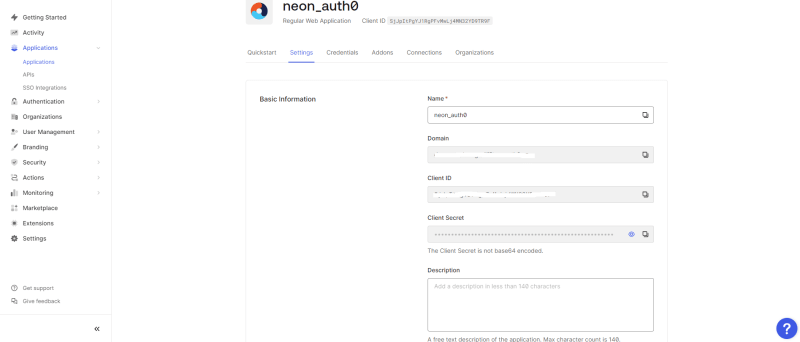
Over at your just-created Regular Web Applications, you’ll need to configure the URLs for your app under the application URI. To do this, head to Settings > Allowed Callback URLs and type in the URL below within the input field:
http://localhost:3000/api/auth/callback
Here, we use port 3000 as the port our application runs on, so make sure to select the port your application is running on.
Note: you can add multiple URLs by separating them with a comma ","
The URL above completes the web application's authentication flow by triggering the callback route after successful authentication. The callback route api/auth/callback is integrated by Auth0 into the @auth0/nextjs-auth0 package installed earlier, which will handle the callback flow.
Next, we’ll add the following URL in the Allowed Logout URLs input field:
http://localhost:3000
Setting this allows a redirect back to our web application after logging out, and you can use a personal URL if your project requires it.

Once you're done with that, save the changes and head to the top page of the Settings section. Make sure to note the Domain, Client ID, and Secret, as they will come in handy in the coming sections.
Connecting NextJs to Auth0
To initiate a connection between Auth0 and Next.js, head back to the Next.js application we created and create a .env.local file in the root folder to store the Domain, Client ID, and Secret from Auth0. Then, paste the following variables into the file below:
AUTH0_SECRET= use [openssl rand -hex 32] to generate a 32 bytes value
AUTH0_BASE_URL= http://localhost:3000
AUTH0_ISSUER_BASE_URL= https://AUTH0-DOMAIN
AUTH0_CLIENT_ID= AUTH0-CLIENT-ID
AUTH0_CLIENT_SECRET= AUTH0-CLIENT-SECRET
Note: You can get these pages from Auth0's Nextjs documentation and replace the values with those of your Auth0 regular web app's values.mk
We will need to generate a 32-byte random value for the AUTH0_SECRET, and this can be done using Node's crypto module. The crypto module generates an arbitrary hexadecimal string of length 32. Thus, head to your terminal and type the command below to use the module:
node -e "console.log(crypto.randomBytes(32).toString('hex'))"
Creating an API route for Auth0
Next, we'll need to add the dynamic API route; we’ll do so by creating a /api directory within the /app directory. Within the now /app/api directory, create an /auth directory to handle all the authentication-related things within this project (create this directory instead if you already have an /api).
Within the /auth directory, create a new unique directory called /[auth0] and create a file route.tsx within the folder. Using a directory in this manner, /[auth0] indicates that the directory name auth is a dynamic segment.
In the route.tsx file, we will use the handleAuth method from the @auth0/nextjs-auth0 to handle the authentication flow of our web application. The handleAuth creates multiple route handlers under the hood — this means that when we log initially into Auth0, the routes followed are api-auth-login. So, the handleAuth function will handle all the login flow based on that and log out the callback URLs set earlier.
So, let’s add the code below to the route.tsx to implement what we just explained above:
import { handleAuth } from "@auth0/nextjs-auth0";
export const GET = handleAuth();
Next, we need to wrap our application in an Auth0 UserProvider. In the layout.tsx file from the base /app directory, we’ll import UserProvider from @auth0/nextjs-auth0/client, and then we'll wrap the body tag in a UserProvider.
So here is the updated layout.tsx file below:
import type { Metadata } from "next";
import { Inter } from "next/font/google";
import "./globals.css";
import { UserProvider } from "@auth0/nextjs-auth0/client";
const inter = Inter({ subsets: ["latin"] });
export const metadata: Metadata = {
  title: "Auth0 and Neon Postgres",
  description: "Generated by create next app",
};
export default function RootLayout({
  children,
}: {
  children: React.ReactNode,
}) {
  return (
    <html lang="en">
      <UserProvider>
        <body className={inter.className}>{children}</body>
      </UserProvider>
    </html>
  );
}
We perform this operation using an Auth0 platform to create and authenticate users. Therefore, we will have to wrap our entire application in Auth0. At the moment, these are all the configurations needed for our web application. In the coming sections, we will create pages for logging in and a profile page to display certain user information.
Building the pages and routes using Next.js and Auth0
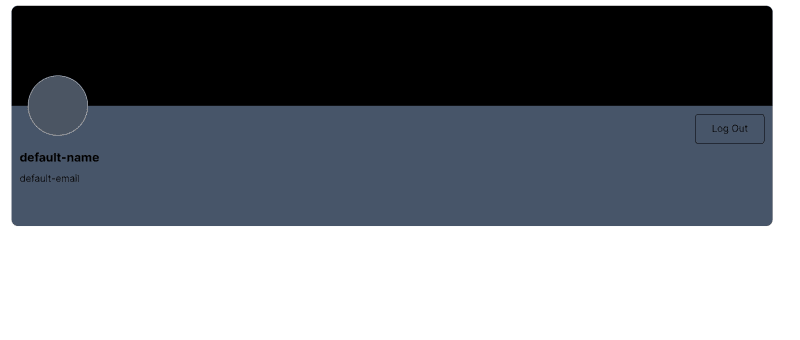
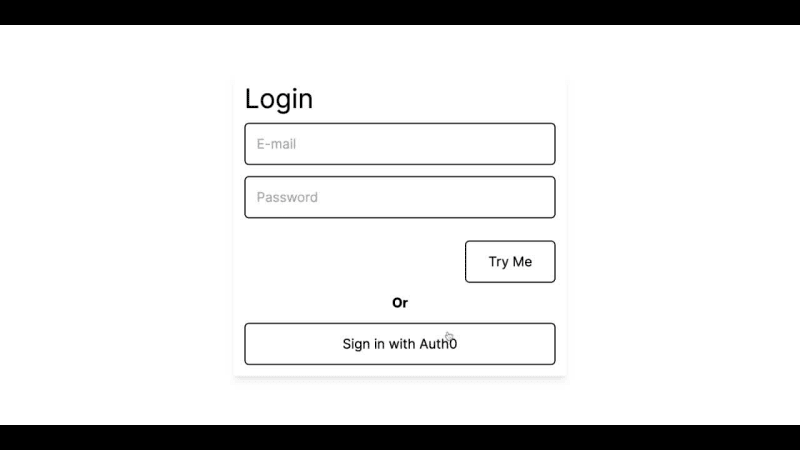
This project will use the initial page (/app/page.tsx) and profile routes. The initial page route will be a form with email, password input, and a submit button. Also, there will be a button that triggers a connection to Auth0. For the profile area, a simple card will show the user's profile image, name, and email. The card will also contain a logout button that triggers a logout action from Auth0.
The idea is to give a clearer picture of how the App Router operates after successful authentication with Auth0. Earlier, we enabled App Router when we created our project — thus, route by creating another folder in the /app directory, let's call it profile. Within this profile directory, create a file called page.tsx. With that, you've successfully created a route with App Router.
Head back to the /app/page.tsx file, clear out the initial template, and replace it with the one below:
export default function Login() {
  return (
    <main className="flex min-h-screen items-center justify-center">
      <div className="w-[300px] md:w-[600px] shadow-lg p-5">
        <p className="text-5xl">Login</p>
        <div className="h-[20px]" />
        <form>
          <input
            type="email"
            placeholder="E-mail"
            className="border-2 border-black w-full p-5 text-2xl rounded-lg focus:outline-blue-400"
            name="email"
          />
          <div className="h-[20px]" />
          <input
            type="password"
            placeholder="Password"
            className="border-2 border-black w-full p-5 text-2xl rounded-lg focus:outline-blue-400"
            name="password"
          />
          <div className="h-[40px]" />
          <div className="flex justify-end">
            <button className="border-2 border-black p-5 px-10 text-2xl rounded-lg">
              Try Me
            </button>
          </div>
        </form>
        <div className="h-[20px]" />
        <p className="flex justify-center font-bold text-2xl">Or</p>
        <div className="h-[20px]" />
        <button className="border-2 w-full border-black p-5 px-10 text-2xl rounded-lg">
          Sign in with Auth0
        </button>
      </div>
    </main>
  );
}
The code above is the login UI template mentioned earlier, and when we run the code, our application will look like the image below:

Still within the /app/pages.tsx file, import useUser function from @auth0/nextjs-auth0/client. Then return user, error, isLoading from the useUser function in the Login function. The user object allows us to display user information after a successful login. In this case, where we experience any errors during signups or login, the error object will display the error message. isLoading is a Boolean parameter that lets us know when data is being loaded.
Also, we will use Next.js navigation to handle navigation using the useRouter function. To do this, we’ll import the useRouter function from next/navigation, then return push.
With this, we can use a condition to check if there is a user object, and if it is true, push it to the /profile route created earlier. Also, we will use the useRouter function to create a login link that will allow us to sign up and log in to our Auth0 application.
First, create a function that pushes to the route api/auth/login and set an onClick event to the function in the Sign in with Auth0 button from our template code.
Below is the updated code for the page.tsx:
"use client";
import { useRouter } from "next/navigation";
import { useUser } from "@auth0/nextjs-auth0/client";
export default function Login() {
  const { push } = useRouter();
  const { user, error, isLoading } = useUser();
  if (user) {
    push("/profile");
  }
  if (isLoading) {
    return <div>...loading</div>;
  }
  if (error) {
    return <div>{error.message}</div>;
  }
  const handleLogin = () => push("api/auth/login");
  return (
    <main className="flex min-h-screen items-center justify-center">
      <div className="w-[300px] md:w-[600px] shadow-lg p-5">
        <p className="text-5xl">Login</p>
        <div className="h-[20px]" />
        <form>
          <input
            type="email"
            placeholder="E-mail"
            className="border-2 border-black w-full p-5 text-2xl rounded-lg focus:outline-blue-400"
            name="email"
          />
          <div className="h-[20px]" />
          <input
            type="password"
            placeholder="Password"
            className="border-2 border-black w-full p-5 text-2xl rounded-lg focus:outline-blue-400"
            name="password"
          />
          <div className="h-[40px]" />
          <div className="flex justify-end">
            <button className="border-2 border-black p-5 px-10 text-2xl rounded-lg">
              Try Me
            </button>
          </div>
        </form>
        <div className="h-[20px]" />
        <p className="flex justify-center font-bold text-2xl">Or</p>
        <div className="h-[20px]" />
        <button
          onClick={handleLogin}
          className="border-2 w-full border-black p-5 px-10 text-2xl rounded-lg"
        >
          Sign in with Auth0
        </button>
      </div>
    </main>
  );
}
When you click the button above, an Auth0 login will be created successfully, but the objective is incomplete as there is currently nothing to display in the /profile/page.tsx. So, we’ll add a UI template code that contains a user image area, name, email, and a logout button.
Thus, head to the /profile/page.tsx file and paste the template code below to it:
export default function Profile() {
  return (
    <main className="max-w-[1900px] flex flex-col mx-auto mt-5 rounded-2xl overflow-hidden">
      <div className="h-[250px] bg-black relative">
        <div className="h-[150px] w-[150px] rounded-full border-2 bg-gray-600 absolute -bottom-[75px] z-50 left-10 overflow-hidden">
          <img
            src={user?.picture ?? "default-image-url"}
            alt=""
            className="object-cover h-full, w-full"
          />
        </div>
      </div>
      <div className="h-[300px] relative transl bg-slate-600 p-5 flex justify-between">
        <div>
          <p className="mt-[90px] text-3xl font-bold">
            {user?.name ?? "default-name"}
          </p>
          <p className="mt-[20px] text-2xl">{user?.email ?? "default-email"}</p>
        </div>
        <div>
          <button className="border-2 border-black p-5 px-10 text-2xl rounded-lg cursor-pointer">
            Log Out
          </button>
        </div>
      </div>
    </main>
  );
}
When we run the code, the /profile route should look like the image below:
Still within the /app/profile/page.tsx file, we'll do similarly to what we did in the /app/pages.tsx file with a slight twist. Start by importing the useUser function and the withPageAuthRequired function from @auth0/nextjs-auth0/client. Then return user, error, isLoading from the useUser function in the Profile function.
Next, use the useRouter function to create a logout link to allow us to log out of our Auth0 application. To do this, create a function that pushes to the route api/auth/logout and set an onClick event to the function in the Log Out button from the /profile route template code.
The withPageAuthRequired is a higher-order component used to protect pages requiring authentication. So, we will need to wrap the Profile function with a map object that contains properties onRedirecting and onError that shows specific messages per the context.
Here is the updated code to the /app/profile/page.tsx file:
"use client";
import { useUser, withPageAuthRequired } from "@auth0/nextjs-auth0/client";
import { useRouter } from "next/navigation";
function Profile() {
  const { user, error, isLoading } = useUser();
  const { push } = useRouter();
  // arrow function that routes to the logout api from the [handleAuth] method
  const handleLogout = () => push("api/auth/logout");
  // handle isLoading state from Auth0
  if (isLoading) {
    return <div>...loading</div>;
  }
  // handle error state from Auth0
  if (error) {
    return <div>{error.message}</div>;
  }
  console.log(user?.email);

  // main profile pagelayout
  return (
    <main className="max-w-[1900px] flex flex-col mx-auto mt-5 rounded-2xl overflow-hidden">
      <div className="h-[250px] bg-black relative">
        <div className="h-[150px] w-[150px] rounded-full border-2 bg-gray-600 absolute -bottom-[75px] z-50 left-10 overflow-hidden">
          <img
            src={user?.picture ?? "default-image-url"}
            alt=""
            className="object-cover h-full, w-full"
          />
        </div>
      </div>
      <div className="h-[300px] relative transl bg-slate-600 p-5 flex justify-between">
        <div>
          <p className="mt-[90px] text-3xl font-bold">{user?.name}</p>
          <p className="mt-[20px] text-2xl">{user?.email}</p>
        </div>
        <div>
          <button
            onClick={handleLogout}
            className="border-2 border-black p-5 px-10 text-2xl rounded-lg cursor-pointer"
          >
            Log Out
          </button>
        </div>
      </div>
    </main>
  );
}
export default withPageAuthRequired(Profile, {
  onRedirecting: () => <div>Redirecting to Login ....</div>,
  onError: (error) => <div>{error.message}</div>,
});
With this, we have reached a milestone, as when we run our application with the command npm run dev, we can authenticate our application using Auth0.
You’re likely wondering where this data is stored after logging in or signing up. Auth0 utilizes its database to store the data, but we'd like to change that by implementing Auth0 with a custom database — in this case, Neon Postgres. This process ensures user data is available in the primary data store (Neon) for other application development purposes.
The next section demonstrates how to use Neon as a custom database and sets up some database action scripts for direct communication between Auth0 and Neon Postgres. Let’s jump in!
Setting up Neon as a custom database on Auth0
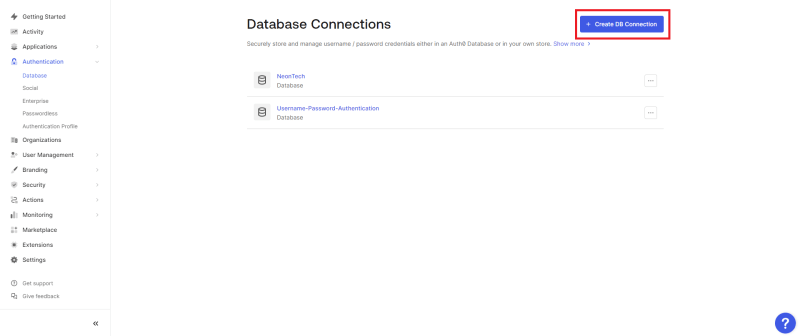
Head back to your Auth0 dashboard, and from there, select Authentication → Database.

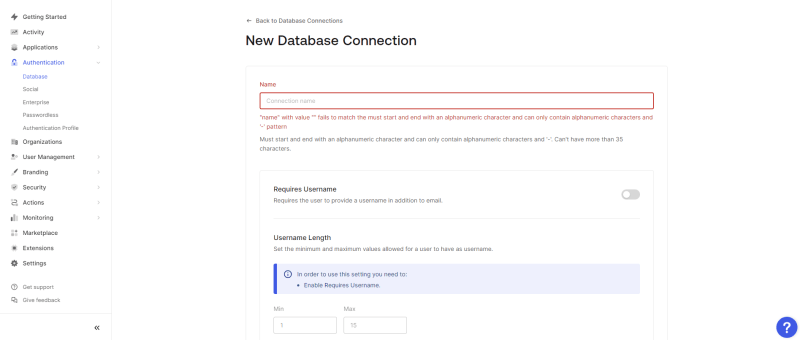
In the Database section, create a database connection by clicking Create DB Connection, fill in your desired Connection name, and click Create.
In your newly created connection, head to the Custom Database section, where all the actions will take place. Toggle the Use my own database option and scroll to the Database Action Scripts area.
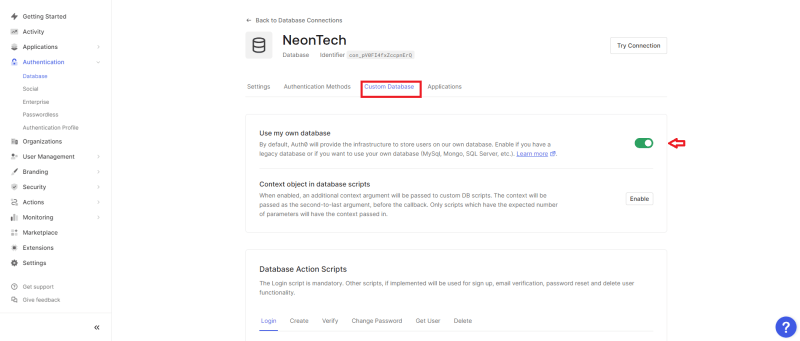

In the Database Action Scripts section, we can create custom serverless scripts that perform specific actions on our database. The Login script is mandatory; you can set the others as you please. For this tutorial, we will create templates for the six scripts in the image above, and here is their code below in succession:
Login script
This script is executed during each login to validate the user's authenticity.
function login(email, password, callback) {
  const { Pool } = require("pg");
  const bcrypt = require("bcrypt");

  const pool = new Pool({
    connectionString: configuration.POSTGRES_URL,
  });

  const query =
    "SELECT id, nickname, email, password FROM users WHERE email = $1";
  pool.query(query, [email], function (err, result) {
    if (err || result.rows.length === 0)
      return callback(err || new WrongUsernameOrPasswordError(email));

    const user = result.rows[0];

    bcrypt.compare(password, user.password, function (err, isValid) {
      if (err || !isValid)
        return callback(err || new WrongUsernameOrPasswordError(email));

      return callback(null, {
        user_id: user.id,
        nickname: user.nickname,
        email: user.email,
      });
    });
  });
}
Create script
This script is executed after a user signs up. A database table row is created for the user with the information filled in during the signup process.
function create(user, callback) {
  const { Pool } = require("pg");
  const bcrypt = require("bcrypt");

  const pool = new Pool({
    connectionString: configuration.POSTGRES_URL,
  });

  bcrypt.hash(user.password, 10, function (err, hashedPassword) {
    if (err) return callback(err);

    const query =
      "INSERT INTO users(nickname, email, password) VALUES ($1, $2, $3)";
    pool.query(
      query,
      [user.username, user.email, hashedPassword],
      function (err, result) {
        if (err) return callback(err);

        return callback(null);
      }
    );
  });
}
Verify script
This script verifies the email verification status of a user.
function verify(email, callback) {
  const { Pool } = require("pg");
  const pool = new Pool({
    connectionString: configuration.POSTGRES_URL,
  });

  const query =
    "UPDATE users SET email_verified = true WHERE email_verified = false AND email = $1";
  pool.query(query, [email], function (err, result) {
    if (err) return callback(err);

    return callback(null, result && result.rowCount > 0);
  });
}
Change password script
This script changes the user's encrypted password on the database after following the change password during a password reset process.
function changePassword(email, newPassword, callback) {
  const { Pool } = require("pg");
  const bcrypt = require("bcrypt");

  const pool = new Pool({
    connectionString: configuration.POSTGRES_URL,
  });

  bcrypt.hash(newPassword, 10, function (err, hash) {
    if (err) return callback(err);

    const query = "UPDATE users SET password = $1 WHERE email = $2";
    pool.query(query, [hash, email], function (err, result) {
      if (err) return callback(err);

      return callback(err, result && result.rowCount > 0);
    });
  });
}
Get user script
This script tests if a user exists in a database. For example, a scenario in which the user wants to change their password.
function loginByEmail(email, callback) {
  const { Pool } = require("pg");

  const pool = new Pool({
    connectionString: configuration.POSTGRES_URL,
  });

  const query = "SELECT id, nickname, email FROM users WHERE email = $1";
  pool.query(query, [email], function (err, result) {
    if (err || result.rows.length === 0) return callback(err);

    const user = result.rows[0];

    return callback(null, {
      user_id: user.id,
      nickname: user.nickname,
      email: user.email,
    });
  });
}
Delete script
This Script is activated when the user is deleted from Auth0 — thus, the user data is subsequently removed from the database.
function remove(id, callback) {
  const { Pool } = require("pg");

  const pool = new Pool({
    connectionString: configuration.POSTGRES_URL,
  });

  const query = "DELETE FROM users WHERE id = $1";
  pool.query(query, [id], function (err) {
    if (err) return callback(err);

    return callback(null);
  });
}
Note: With Neon, you can manage your database using a few options, such as a Command Line Interface (CLI), the Neon API, or a Structured Query Language (SQL) tool.
After updating the Database Action Scripts, update your Database settings with some sensitive information you used to validate the scripts. For this tutorial, we used the Neon Postgres pooled connection URL.
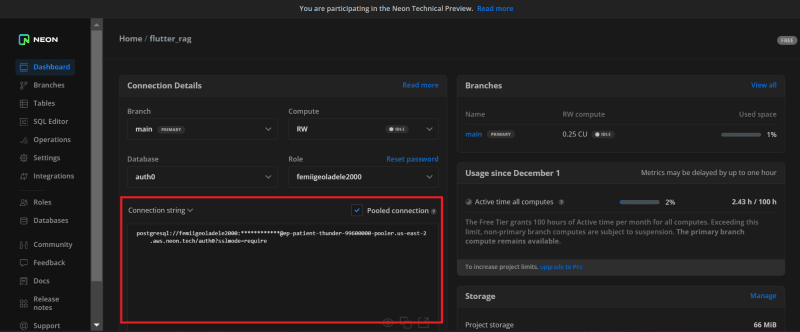
To get this URL, head back to your Neon dashboard and copy out the Connection String from the connection detail area. Ensure to mark Pooled Connection as true before copying the details.
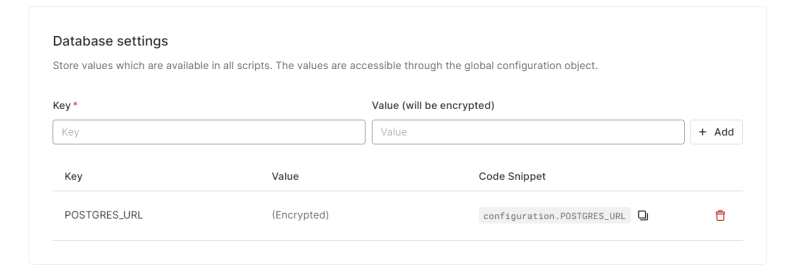
Back in Auth0's Database settings area, create a key with the name POSTGRES_URL and value with the Pooled Connection string copied from Neon Postgres.
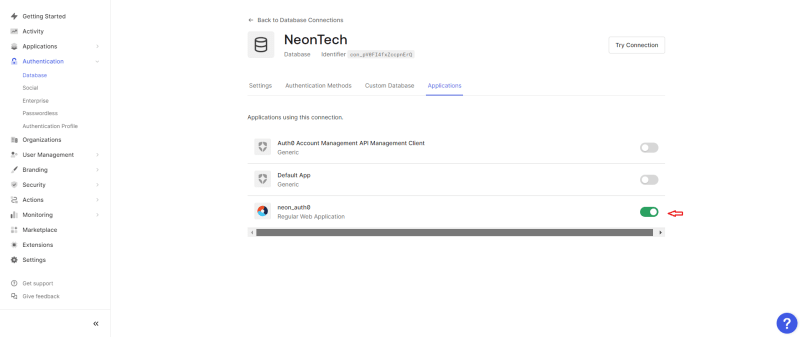
Still within your Auth0 Database Connection, head to Applications and toggle on the Regular Web Applications. We have successfully set Neon Postgres as a custom database for our Auth0 application.
Creating users database table on Neon
With the project all but done, there is one tiny thing to add: creating the table for the user store. When creating the Database Action Script, we specified that we are querying a table called users, so let’s make that our table name.
For our table, we will create five fields: id, nickname, email, password, and email_verified. So, head to the SQL Editor in Neon's console and run the query below:
CREATE EXTENSION IF NOT EXISTS "uuid-ossp";
CREATE TABLE users(
    id UUID DEFAULT uuid_generate_v4(),
    nickname VARCHAR(255),
    email VARCHAR(255) NOT NULL UNIQUE,
    password VARCHAR(255) NOT NULL,
    email_Verified BOOLEAN DEFAULT FALSE
);
The query above creates a UUID column with a default value generated by uuid_generate_v4() function. It is followed by creating a nickname column — a variable character (varchar) column with a maximum length of 255 characters.
Also, it creates an email and password column, a non-null varchar column with a maximum length of 255 characters, and a unique constraint.
Finally, it creates an email_Verified column, a Boolean column with a default value of false.
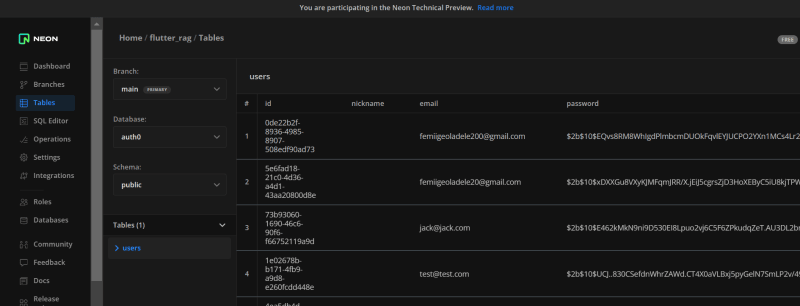
When we initialize a signup flow with Auth0, here’s the result on the Neon Postgres database table:
Conclusion
This tutorial taught us how to leverage security and database management by integrating Auth0 with Neon Postgres as a custom database. Pairing Auth0 and Neon Postgres represents a pivotal leap toward fortifying modern applications with scalability, speed, and security. By adopting this strategic combination, developers can ensure a seamless and secure authentication process through Auth0 while leveraging the robust database management capabilities of Neon Postgres.

Top comments (0)