Essential for driving growth in any business is communicating effectively with customers. Intercom is a software company specializing in business messaging, providing businesses with an easy way to chat with their customers.
This article is the first in a two-part series covering how to build a lite version of Intercom using Appwrite, an open-source backend server, and Nuxt.js, a hybrid Vue framework.
Repository
https://github.com/folucode/intercom-clone-nuxtjs-part1
Prerequisites
- Basic understanding of CSS, JavaScript, and Nuxt.js.
- Docker Desktop installed on our computer (run the
docker -vcommand to verify the installation); if not, install it from here. - An Appwrite instance running on our computer. Check out the this post to create a local Appwrite instance. It can also be installed using digital ocean or gitpod.
Setting up the application
To set up the application, we’ll clone this repository:
$ git clone https://github.com/folucode/intercom-clone-template-part1
Next, run the command below in the project directory:
$ npm i
This repository contains all the initial setups we'll need for our app, helping us focus on our app's main functionality.
Note: We will run into some errors if the app is run as is, but we fix it later in the article as we add the missing pieces.
Setting up the Appwrite database
Follow the instructions below to create the database:
- Go to the Appwrite Console.
- Click on Create Project and give our project a name.
- On the left side of the dashboard, click on Database and create a database.
- Click on the Add Collection button. This action redirects us to a Permissions page.
- We'll create two databases named
chat_sessionandconversation, respectively.
- We'll create two databases named
-
We'll also assign Read and Write Access to both collections.

- Go to the
attributestab to create the properties for each collection. - For the
chat_sessioncollection, see the image below:
- Go to the
Building the application
Open index.vue, which is located in the pages folder. In the scripts tag, paste the code below to initialize the Appwrite modules:
    <script>
    import { Client, Account, Databases, Query } from 'appwrite';
    import { randomStr } from '../utils';

    const client = new Client();
    client
      .setEndpoint('http://localhost/v1') // Our Appwrite Endpoint
      .setProject('[PROJECT-ID]');

    const account = new Account(client);
    const database = new Databases(client);

    account.createAnonymousSession().then(
      (response) => {
        console.log(response);
      },
      (error) => {
        console.log(error);
      }
    );

    const sessionID = randomStr();

    ...
Only signed-in users can interact with the Appwrite database, so we created an anonymous session as a workaround with the code above. After that, we generated a unique sessionID.
Note: The PROJECT_ID resides in the Appwrite console.
Setting up a real-time connection
To set up a real-time connection with Appwrite in our app, we’ll check to ensure an active user session in the mounted lifecycle method. If so, we set up a real-time connection with Appwrite by subscribing to the documents channel.
Subscribing to the documents channel means we listen for changes in the documents in our Database. The documents are the individual data we store in our database.
    ...

    export default {
      data() {
        return {
          messages: [],
          text: ''
        };
      },
      mounted() {
        if (account.get !== null) {
          try {
            client.subscribe('documents', (response) => {

            });
          } catch (error) {
            console.log(error, 'error');
          }
        }
      },
    };
    </script>
Opening a chat session
We want to open a new chat session every time our app is visited—that is, for every page load, we open a new session.
    <script>
    ...
      methods: {
        async openChatSession() {
          await database.createDocument(
            '[DATABASE-ID]',
            '[CHAT-SESSION-COLLECTION-ID]',
            'unique()',
            {
              sessionID,
            }
          );
          const conversation = await database.createDocument(
            '[DATABASE-ID]',
            '[CONVERSATION-COLLECTION-ID]',
            'unique()',
            {
              sessionID,
              message: 'Hello, how can we help you?',
              sender: 'admin',
            }
          );
          this.messages.push(conversation);
        },
    ...
In the code above, we create a new method called openChatSession and create a new record in the chat_session collection using the randomly generated sessionID.
Also, in the conversations collection, once a new chat session opens, we add a new record to simulate an initial message from the admin.
Now we call openChatSession in the mounted method like so:
    ...
    mounted() {
        this.openChatSession();

        if (account.get !== null) {
          try {
            client.subscribe('documents', (response) => {

            });
          } catch (error) {
            console.log(error, 'error');
          }
        }
      },
    ...
Fetching the chats
To be able to see that what we've done so far is working, we need to create a function to fetch all the chats.
In the methods object, create a new method called getChat.
    ...
    async getChat(sessionID) {
          let response = await database.listDocuments(
            '[DATABASE-ID]',
            '[CONVERSATIONS-COLLECTION-ID]',
            [Query.equal('sessionID', sessionID)]
          );
          this.messages = response.documents;
        },
    ...
This function fetches all the chats in the conversations collection with the associated sessionID.
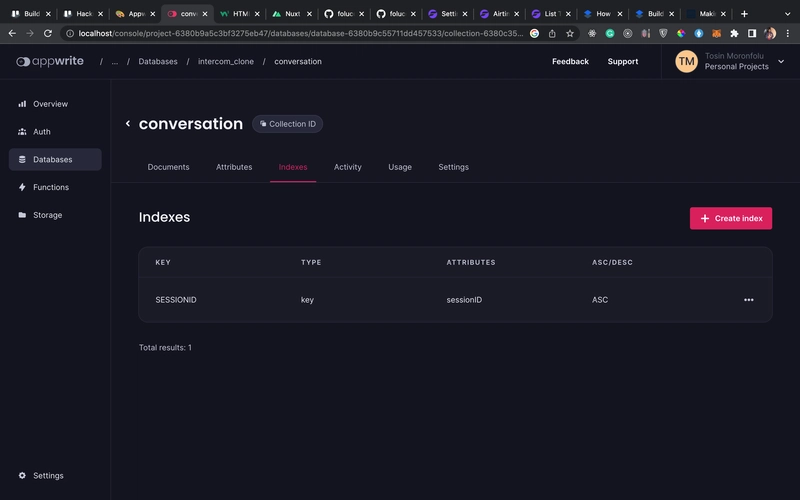
Also, we need to index the sessionID attribute in the conversations collection for us to be able to use Appwrite Query. We do that by going to the indexes tab and adding sessionID.
In the mounted method, call getChat in the subscribe callback function, like so:
    ...
    mounted() {
        this.openChatSession();

        if (account.get !== null) {
          try {
            client.subscribe('documents', (response) => {
              this.getChat(sessionID)
            });
          } catch (error) {
            console.log(error, 'error');
          }
        }
      },
    ...
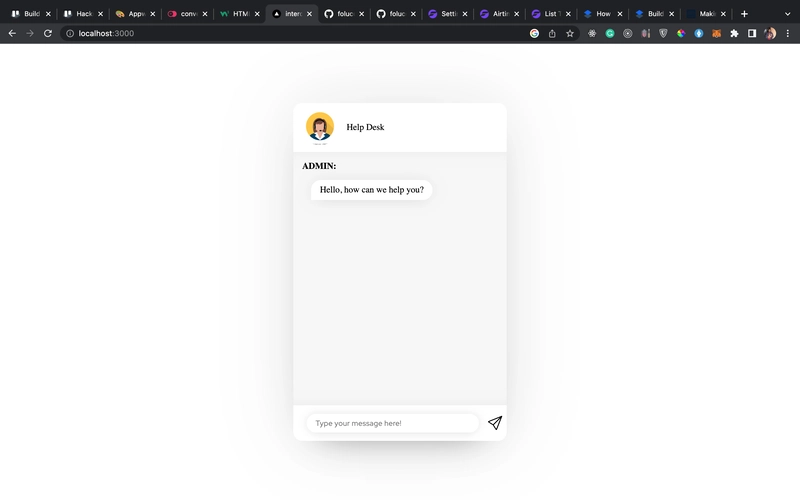
When we start up our app, we should see something like this:
Sending a message
For us to be able to send a message, we’ll add a new method called sendMessage in the methods object.
    ...
    async sendMessage() {
          await database.createDocument(
            '[DATABASE-ID]',
            '[CONVERSATIONS-COLLECTION-ID]',
            'unique()',
            {
              sessionID,
              message: this.text,
              sender: 'user',
            }
          );

          this.text = '';
        }
    ...
The sendMessage method adds a new record to the conversations collection. This time, the sender is user, so we can differentiate who is sending a message.
After that, we clear the input field. Then, to see our message, we need to add getChat
Our app should now look like this:
Conclusion
In this article, we learned how to create a simple clone of Intercom leveraging Appwrite's real-time features. In a follow-up post, we'll look at how we can reply to messages from an admin app and see other open chats.


Top comments (2)
I think it's essential to use technology to make our lives better on a daily basis. Such an environment must be produced. Which option is ideal for both you and those around you? You may update your routine by installing built-in speakers or wall-mount speakers to play music through your current audio system or surround sound system with one of the many home intercom system that is available. With the use of this technology, you may live more easily at home and deter burglars.
is there anyway i can use the code snippet provided by intercom inside my nuxt 2 application? Any example or help would be appreciated!