
Data visualization is an essential aspect of analytics. Most of the available data representation tools use static data (non-changing). Appwrite’s real-time API allows you to create a data visualization dashboard in Flutter that updates a line graph in real time as new data are populated.
By the end of this tutorial, you will have a fully functional real-time data visualization dashboard that you can customize and expand on.
Here is the GitHub repository containing all the code.
Prerequisites
This tutorial requires the reader to satisfy the following:
- Xcode (with developer account for Mac users).
- To run the application, use iOS Simulator, Android Studio, or Chrome web browsers.
- An Appwrite instance running on either Docker, DigitalOcean droplet, or Gitpod. Check out this article for the setup.
Setting up the Appwrite project
In this section, you will need to set up your Appwrite project, create a platform and populate your database with sample data. Let’s start by doing the following:
- Open your browser and enter the
IP address or hostname. Choose
Create Projectoption and fill in theproject name and ID. (ID can be automatically generated.)


Next, head to the databases section, select the
Create Databaseoption, and fill in your desired database name and ID.

-
Next, you will need to create two collections within the database. The first collection will hold the data you want to visualize, which is the number of orders and transactions. Thus, create two
floatattributes within the first collection and toggle onrequired.On the other hand, the second collection will hold the number of products available. Thus, you will need a single attribute with the
integer attribute.

collection1
| ordernumber | transactionumber |
|---|---|
| 5 | 1 |
| 20 | 19 |
| 10 | 3 |
| 15 | 15 |
| 25 | 17 |
| 30 | 26 |
| 35 | 32 |
| 32 | 23 |
| 14 | 14 |
| 50 | 37 |
collection2
| Number of Products |
|---|
| 10 |
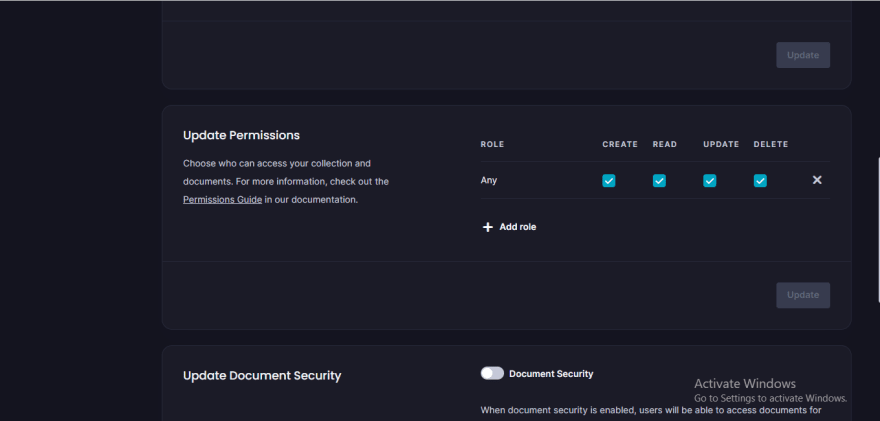
- Finally, set the collection level
CRUDpermission for both collections toAnyand select all the options.
Getting started
In this section, you will clone a Flutter UI template, connect your Flutter app to Apwrite, and build the functionality for your project.
Clone the UI template
This section uses a UI template containing user registration and login code. Let’s clone the repository specified in the prerequisites. Check out the official GitHub docs to learn more about cloning a repository.


After cloning the UI to your local storage, open it in your preferred code editor and run the command below:
flutter pub get
This command obtains all the dependencies listed in the pubspec.yaml file in the current working directory and their transitive dependencies. Next, run the command flutter run, and your application should look like the image below:
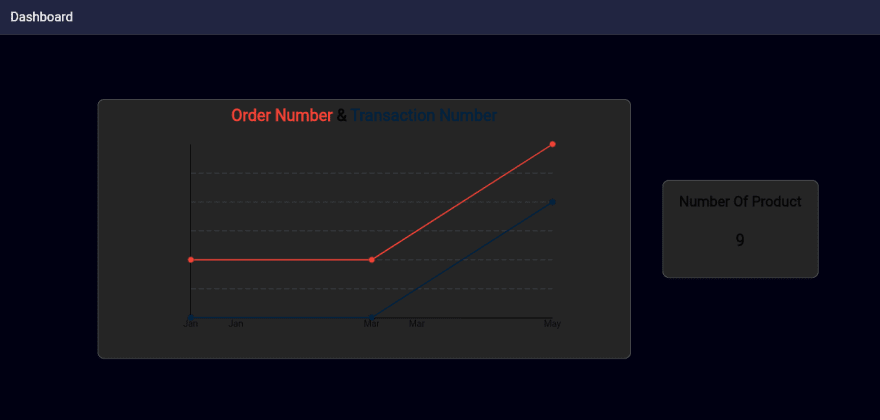
The image above is the UI of a static data visualization dashboard displaying our data: Order Number, Transaction Number, and Number of Products.
In the following sections, you will connect Appwrite to your Flutter application and seed data from the Appwrite database collection.
Installing and connecting Appwrite to Flutter
Next, you will need to install the Appwrite and the Provider package for state management into your app. You can add them to the dependencies section of your pubspec.yaml file, like the image below:

Alternatively, you can use the terminal by typing the command below:
flutter pub add appwrite

# and

flutter pub add Provider
Here’s how to connect a Flutter project to Appwrite for Android and iOS devices.
iOS
First, obtain the bundle ID by going to the project.pbxproj file (ios > Runner.xcodeproj > project.pbxproj) and searching for the PRODUCT_BUNDLE_IDENTIFIER.
Now, head to the Runner.xcworkspace folder in the application’s iOS folder in the project directory on Xcode. To select the runner target, choose the Runner project in the Xcode project navigator and find the Runner target. Next, select General and IOS 11.0 in the deployment info section as the target.
Android
For Android, copy the XML script below and paste it below the activity tag in the Androidmanifest.xml file (to find this file, head to android > app > src > main).
Note: change [PROJECT-ID] to the ID you used when creating the Appwrite project.
You will also need to set up a platform within the Appwrite console. Follow the steps below to do that:
- Within the Appwrite console, select
Create Platformand chooseFlutterfor the platform type. - Specify the operating system: in this case, Android.
- Finally, provide the application and package names (found in the app-level
build.gradlefile).


Listing and seeding data from database collection
Earlier, you created two collections and added data to them. Start by creating two files, docmodel1.dart and docmodel2.dart, for the model classes, DocModel1 and DocModel2 respectively. These classes will handle the structure of your JSON response so you can use it in your UI. Here is how they look:
Next, create an app_constants.dart file to store important constants like your projectID, database and collection ID etc. within a class.
class Appconstants {
    static const String projectid = "<projectID>";
    static const String endpoint = "<Hostname or IP address>";
    static const String dbID = "<database ID>";
    static const String collectionID = "<collection ID 1>";
    static const String collectionID2 = "<Collection ID 2>";
}
Next, create a file called authstate.dart and use the provider package to create an AuthProvider class that extends ChangeNotifier. ChangeNotifier is a class in Flutter that allows objects to notify other objects when they have changed.
Next, use the AuthProvider class to call the Client class from the appwrite package, thus creating an instance of the client. Then use the client instance to create instances of Account and Databases, which are also from the appwrite package. Also, create the realtime and realtimeSubscription objects using the Realtime class from appwrite.
Next, create two fields — _item1 and _item2 and their getters — itemone, itemtwo. They are lists of the DocModel1 and DocModel2 classes, respectively. Next, create the AuthProvider constructor that initializes the client, creates the Account and Databases objects, and calls the _initialize function.
In the _initialize function, use the account.get ****method to get the user's account, list the documents in the specified database collections, map each document to an instance of either DocModel1 or DocModel2, and call the _subscribe method.
With the code above, you can obtain the list of documents from the Appwrite database collections. Thus, to use it in your project, use the Provider package to extend the ChangeNotifier class to your Flutter UI by wrapping the MaterialApp widget in a ChangeNotifierProvider widget.
To seed the listed data to your chart, head to Home.dart file, and create two classes, NumOrder and Transactions, with two required variables, x and y, respectively.
Next, return a list of NumOrder and Transaction objects. The functions start by using the Provider.of method to obtain an instance of the AuthProvider class. The listen: false argument specifies that this List<NumOrder> should not be re-computed whenever the AuthProvider changes.
Next, create a final variable called randomNumbers that obtains a list of documents from the AuthProvider's itemone property, a list of DocModel1 objects. Then map the list of documents to a list of ordernumber and transactionnumber values using the .asMap().entries.map and .mapIndexed methods.
Finally, the function returns the list of NumOrder and Transactions objects constructed from the ordernumber and transactionnumber values, respectively. Each NumOrder and Transactions object has two properties — x and y — where x is the index of the ordernumber or transactionnumber values in the list, and y is the ordernumber or transactionnumber value itself.
Wrap the build widget’s scaffold in a Consumer widget and replace the LineChartWidget() and Text widget for the Number of Transaction with the code below:
LineChartWidget(numOrders, transactions)
Text("${state.itemtwo![0].productnumber}")
After populating the LineChartWidget with the parameters numOrders and transactions, head to the linechartwidget.dart file and create the required property for the parameters.
Finally, map the required properties to the spot, and you should have your data passed to the linechartwidget.dart file. Here is the updated code for the linechartwidget.dart file:
Real-time subscription
To create a real-time subscription, head back to the Authstate.dart file and use the **_subscribe** method to create a real-time subscription to the specified database collections and listen for events. In this case, you will listen to the create and delete event in the first and update events in the second collection.
The class also includes a dispose method that closes the real-time subscription when the object is no longer in use.
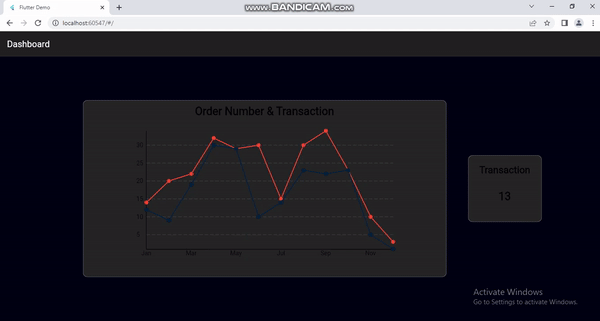
When you run the code, you should have the result below:
Conclusion
Building a real-time data visualization dashboard using Appwrite and Flutter is a powerful and efficient solution for displaying dynamic data in a visually appealing way. Following the steps outlined in this tutorial, you have created a backend with Appwrite to store and retrieve data and a frontend with Flutter to display the data in real-time.
This tutorial provides a solid foundation for expanding and creating even more advanced dashboards. With the combined power of Appwrite and Flutter, the possibilities for data visualization are endless.
Check out these resources to assist you in furthering your learning process:

Latest comments (0)