
In today's marketing environment, providing excellent customer service has become vital to ensure customer satisfaction and loyalty. Businesses frequently use ticketing systems to manage customer inquiries, complaints, and requests. These solutions not only consolidate customer support interactions but also allow for fast issue tracking and resolution.
Appwrite, an extensive open-source backend server, and API suite, provides developers with a robust framework for developing a variety of applications. Because of its vast feature set and ease of integration, it is an excellent choice for developing a customer support ticketing app that improves service delivery and overall customer experience.
In this article, we’ll build a customer support ticketing app using Appwrite Cloud to provide real-time updates, store and render data, and an open-source design system — Pink Design, to style the application.
Github
The complete source code for this project is located here. Clone and fork it to get started.
Prerequisite
To follow along with this tutorial, the following are required:
- A basic understanding of JavaScript, Vue.js, and Nuxt.js
- Node and its package manager,
npm(install them from here) - Access to an Appwrite Cloud account (submit a request for Appwrite Cloud here)
Getting started
Project setup and installation
Run the following command in the terminal to create a new Nuxt.js application:
npx nuxi init <project-name>
Navigate to the project directory and install the required dependencies.
cd <project-name>
npm install
Run npm run dev to start a development server at https://localhost:3000/ in our browser.
NOTE:
<project-name>above stands for the name of our app; feel free to call it whatever you like.
Installing Appwrite and Pink Design
What is Appwrite?
Appwrite is a development platform that provides a powerful API and management console for building backend servers for web and mobile applications.
What is Pink Design?
Pink Design is Appwrite's open-source design system for creating consistent and reusable user interfaces. Pink Design aims to emphasize collaboration, developer experience, and accessibility.
To use Appwrite in our Nuxt.js application, install Appwrite’s client-side SDK (Software Development Kit) and Pink Design for web applications.
npm install appwrite
npm install @appwrite.io/pink
Setting up Appwrite Cloud
Log in to Appwrite Cloud and create a new project.

The new project will appear on the console. Next, copy the Project ID. We’ll use this to set up our Nuxt.js application.
Create a database, collection, attributes, and add sample data
Navigate to the Database tab and click the Create database button to create a new database.

Next, we’ll create a collection in our database by clicking the Create collection button. Give it a suitable name and then click Create.

Go to the Update Permissions section on the Settings page. We want to assign a CRU access (create, read, update) with a role: any value for the Collections we created. We can customize these roles later to specify who has access to read or write to our database.

Navigate to the Attributes tab and create a set of attributes for our collection as shown below:
| Attribute Key | Attribute Type | Size | Element | Required |
|---|---|---|---|---|
| NULL | NIL | No | ||
| request | String | 2000 | NIL | Yes |
| name | String | 256 | NIL | Yes |
| status | String | 256 | NIL | No |

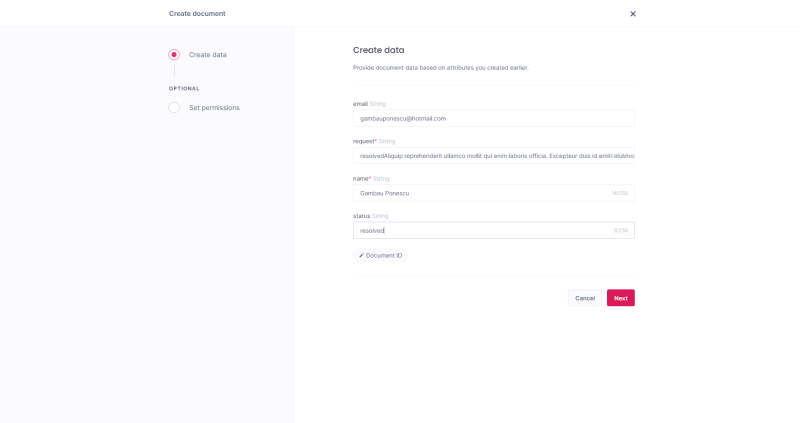
We need to add sample data for our application. To do this, head to the Documents section and click on Create document, then add the model to the collection as shown below:

Integrating Appwrite with Nuxt.js
Let’s create a form to accept customer support requests. To do this, create a pages/index.vue file in the root folder of the project and add the following syntax below:
// pages/index.vue
<template>
  <div>
   <nav class="u-flex u-cross-center u-main-space-between u-padding-32">
    <h2 class="logo u-padding-16 eyebrow-heading-1 u-color-text-pink">
     <NuxtLink to="/">PINK CUSTOMER SUPPORT</NuxtLink>
    </h2>
  <NuxtLink to="/requests">
     <span class="button"> SUPPORT REQUESTS</span>
  </NuxtLink>
 </nav>
 <form @submit.prevent="submitForm">
   <h2 class="eyebrow-heading-1 u-text-center u-padding-64">
     write a request
   </h2>
 <div class="u-grid u-cross-center u-main-center u-padding-16">
   <label for="email">Full Name:</label>
    <input placeholder="Full Name" type="text" id="name" v-model="name" required />
  <label for="email">Email:</label>
    <input placeholder="Email" type="email" id="email" v-model="email" required />
  <label for="request">Request:</label>
    <textarea class="input-text" placeholder="Request" type="text" id="request" v-model="request" required />
  <button class="button" type="submit">
    <span class="text">Submit</span>
  </button>
  </div>
 </form>
</div>
</template>
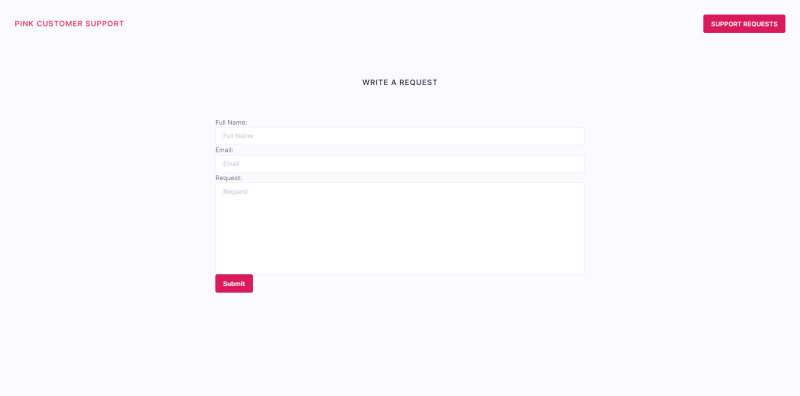
The image below shows what our application will look like after applying the configurations above.
In the pages/index.vue file, we’ll create a new document in Appwrite’s database for each customer support request we submit. Copy and paste the code snippet below:
// pages/index.vue
<script>
import { Client, Databases, ID } from "appwrite";
 export default {
  data() {
    return {
      name: "",
      email: "",
      request: "",
    };
  },
  methods: {
    async submitForm() {
      const client = new Client();
      const databases = new Databases(client);
      client
            .setEndpoint("OUR_API_ENDPOINT") // Your API Endpoint
            .setProject("OUR_PROJECT_ID"); // Your project ID
      try {
        const response = await databases.createDocument(
          "OUR_DATABASE_ID",
          "OUR_COLLECTION_ID",
          ID.unique(),
          {
            name: this.name,
            email: this.email,
            request: this.request,
            status: "open",
          }
        );
        console.log(response);
        this.name = "";
        this.email = "";
        this.request = "";
      } catch (error) {
        console.error(error);
      }
    },
  },
};
</script>
The code snippet above does the following:
- Gets the data values from the form inputs
- Initializes an instance to create a new document in Appwrite’s database whenever we submit the form
- Resets the form to its default state
Fetching customer support requests
We’ll also need to show the customer support requests we submitted earlier on. For this, create a components/FetchDocuments.js file in the root folder of the project with the following syntax:
// components/FetchDocuments.js
<script setup>
import { Client, Databases } from "appwrite";
const client = new Client();
const databases = new Databases(client);
  client
    .setEndpoint("OUR_API_ENDPOINT") // Your API Endpoint
    .setProject("OUR_PROJECT_ID"); // Your project ID
export const FetchDocuments = databases.listDocuments( "OUR_DATABASE_ID", "OUR_COLLECTION_ID");
Let’s break down the code snippet above:
- Imports the required module — Client and Databases
- Creates a new instance for the modules
NOTE: Get the
API Endpoint,Project ID,[DATABASE_ID], and
[COLLECTION_ID]from Appwrite’s console.
Then, create a pages/request.vue file, import the instance named FetchDocuments, which interacts with Appwrite services by fetching the requests whenever the component is mounted. We must also render only requests with a customer email from Appwrite’s database.
// pages/request.vue
<script>
import { FetchDocuments } from "@/components/FetchDocuments.js";
export default {
  data() {
    return {
      docs: [],
    };
  },
  async mounted() {
    const response = await FetchDocuments;
    const data = response.documents.slice().reverse();
    // Filter the data array and push values that serve as the beginning of a support request to the docs variable
    data.filter((item) => {
      if (item.email !== null) {
        this.docs.push(item);
      }
    });
  },
};
</script>
The rendered requests in the pages/request.vue file will also be in descending order where the most recent requests are at the top.
//pages/request.vue
<template>
  <main>
    <nav>
      ...   // nav bar
    </nav>
 <div class="container">
  <h2 class="eyebrow-heading-1 u-text-center u-padding-64">support requests</h2>
      <ul class="list">
        <li class="box" v-for="doc in docs" :key="doc.$id">
          <div class="u-flex u-cross-center u-main-space-between">
            <div class="u-grid">
              <div class="u-flex u-cross-center u-main-space-between">
                <span class="text eyebrow-heading-1"> {{ doc.name }} </span>
                <div class="tag">
                  <span class="icon-check-circle" aria-hidden="true"></span>
                  <span class="text">{{ doc.status }}</span>
                </div>
              </div>
              <span class="text">{{ doc.request.slice(0, 200) }}</span>
            </div>
            <NuxtLink :to="`/request/${doc.$id}`">
              <span class="button icon-cheveron-right" aria-hidden="true"></span>
            </NuxtLink>
          </div>
        </li>
      </ul>
    </div>
  </main>
</template>
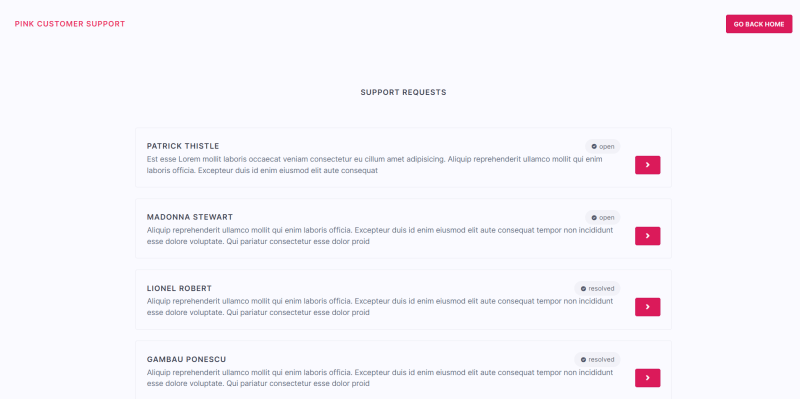
The application will look like this after applying the configurations above:
Accessing a single customer support request
Here, in order to view a single request and its content, create a pages/request/[id].vue file and add the following syntax:
//pages/request/[id].vue
<template>
 <div class="u-flex u-cross-center u-main-space-between u-padding-32">
   <h2 class="eyebrow-heading-1 u-text-left u-padding-32">
     CUSTOMER: {{ customer.name }}
   </h2>
 </div>
   <div class="u-grid">
     <h2 class="u-x-small u-bold u-text-right u-margin-inline-start-32">
        {{ new Date(customer.$createdAt) }}
     </h2>
     <p class="text u-normal u-text-right u-padding-32">
        {{ customer.request }}
     </p>
   </div>
</template>
<script>
import { useRouter, useRoute } from "vue-router";
import { Client, Databases, ID } from "appwrite";
import { FetchDocuments } from "@/components/FetchDocuments";
export default {
  data() {
    const router = useRouter();
    const isIdMatch = router.currentRoute.value.params.id;
    return {
      requestId: isIdMatch,
      request: "",
      docs: [],
      customer: [],
    };
  },
  async mounted() {
    const client = new Client();
    const databases = new Databases(client);
    client
    .setEndpoint("OUR_API_ENDPOINT") // Your API Endpoint
    .setProject("OUR_PROJECT_ID"); // Your project ID
// Instance to fetch a customer's name
    const singleDocument = await databases.getDocument(
      "OUR_DATABASE_ID",
      "OUR_COLLECTION_ID",
      `${this.requestId}`
    );
    this.customer = singleDocument;
  },
</script>
The code syntax above does the following:
- Gets the current page route id
- Initializes an instance to fetch a customer’s name using the existing route id whenever the component is mounted
Adding comments
In the pages/request/[id].vue file, we need to fetch a single request content and create an impression where a customer can comment on a request he/she had tendered earlier. For the comment functionality, let’s create a form to submit comments. We also want to change the status of a request in case it has been resolved.
//pages/request/[id].vue
<template>
  <div>
//  customer name
  <form @submit.prevent="updateForm">
    <div class="u-grid u-cross-center u-main-center u-padding-32">
       <span style="font-size: 20px" class="u-color-text-pink">
          Has this issue been resolved?
       </span>
         <div class="checkbox">
           <label for="status1">Yes:
            <input type="radio" v-model="status" id="checkbox1" value="resolved"/>
           </label>
           <label for="status2">No:
            <input type="radio" v-model="status" id="checkbox2" value="open" />
           </label>
         </div>
           <label for="request" style="font-size: 20px" class="u-color-text-pink">
            If not, state what the current issue is:
           </label>
 <textarea class="input-text" placeholder="Comment" type="text" id="request" v-model="request" required />
      <button class="button" type="submit">
         <span class="text">Add Comment</span>
      </button>
    </div>
   </form>
  </div>
</template>
<script>
 export default {
   data() {
     return {
       request: "",
       status: "",
       docs: [],
     };
   },
 // ... Fetch customer's name
methods: {
    async updateForm() {
      const client = new Client();
      const databases = new Databases(client);
      client
        .setEndpoint("OUR_API_ENDPOINT") // Your API Endpoint
        .setProject("OUR_PROJECT_ID"); // Your project ID
      try {
        const response = await databases.createDocument(
        "OUR_DATABASE_ID",
        "OUR_COLLECTION_ID",
         ID.unique(),
          {
            request: this.request,
            status: this.status,
            email: null,
            name: this.requestId,
          }
        );
        this.docs.push(response);
        this.request = "";
      } catch (error) {
        console.error(error);
      }
    },
  },
}
The code syntax above does the following:
- Posts a new document that serves as a comment to Appwrite’s database
- Creates an option to change the status of a request to
openorresolved - The document also has its name as the current route id to access it.
- Pushes the new document to the data variable —
docs; the new document is then rendered as a comment to give an impression of a real-time update - Resets the form
Then, we’ll initialize an instance in the pages/request/[id].vue file to fetch the customer’s request and comments. We also want to render a customer’s request and comments only if the comment name or request id matches the current route.
//pages/request/[id].vue
<template>
  <div>
// customer's request and previous comments
     <ul class="list">
        <li v-for="doc in docs" :key="doc.$id">
          <div class="u-flex u-cross-center u-main-space-between">
           <h2 class="u-x-small u-bold u-text-right u-margin-inline-start-32">
              {{ new Date(doc.$createdAt) }}
            </h2>
          </div>
          <div class="u-grid">
           <p class="text u-normal u-text-right u-padding-32">{{ doc.request }}</p>
          </div>
        </li>
      </ul>
</div>
</template>
<script>
  async mounted() {
// ... Fetch customer's name
// Instance to fetch a customer's request and comments
    const comments = await FetchDocuments;
    const MatchComments= comments.documents;
    MatchComments.filter((item) => {
      if (item.name === this.requestId || item.$id === this.requestId) {
        this.docs.push(item);
      }
    });
   }
</script>
Here’s a demo of what the application will look like, after applying the configurations above:
Conclusion
This post demonstrates Appwrite Cloud's real-time functionality to store and update data and style customer support ticketing apps with an open-source design system — Pink Design. Integrating user authentication in an application is also one of Appwrite’s functionalities, which serves as a tool to help identify and validate the identity of users accessing the application.
Resources
These resources may also be helpful:

Top comments (0)