This project is created with React.js and uses Auth0 for authentication. So in this article, we will discuss on how to use the application.
Challenges
Before we talk about the project, let me briefly highlight the challenge I encountered. This is actually not a complete project, in that I plan on adding a Generate link button so users can either download the banner or generate a link instead. This is where Cloudinary comes in.
In using cloudinary, the traditional way of uploading media to their server is via a form. But for this project, form is not used, rather an NPM package (html2canvas) is used to generate the banner image. If you know a way I can upload canvas image to cloudinary without using the form, please leave a comment.
We won't cover the entirety of the project, just the important part, so I will try to make this article as brief as possible. You can clone the source code to your device. Now let's dive right in!
After cloning the project to your device, open the project on your IDE (e.g visual studio) to start.
Registering on Auth0
First off, you will need to create an account on Auth0. Visit Auth0 to register your account.
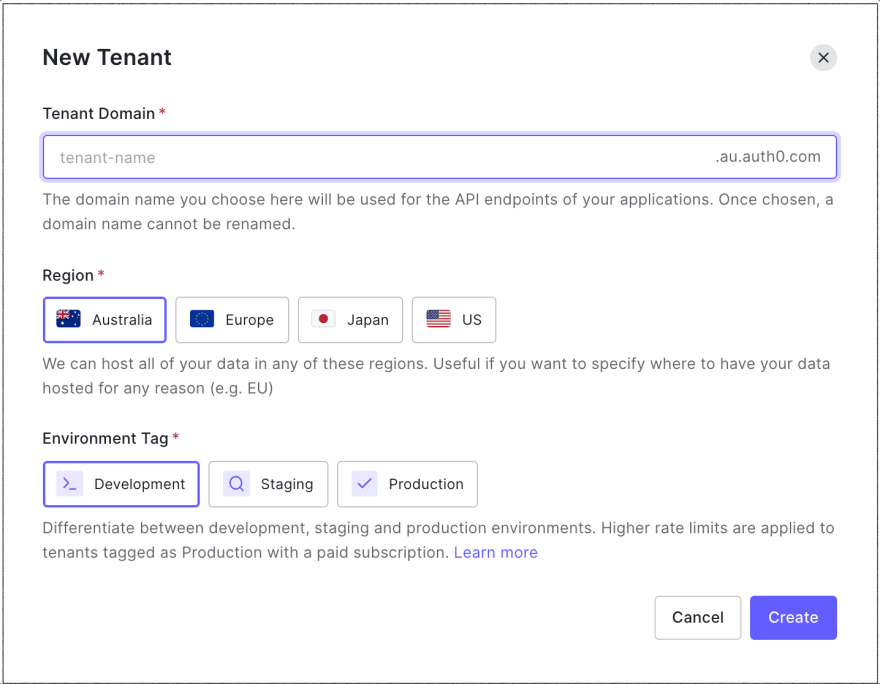
Creating a tenant
You will create a tenant after successfully signing up. The tenant is where you configure your Auth0 usage and where Auth0 assets like applications, connections, and user profiles are defined, managed, and stored. It is immutable.
Creating an application
From your dashboard, click on applications > applications. Then click on create application. A box will appear as seen below, where will be required to enter your application name and select your application type.
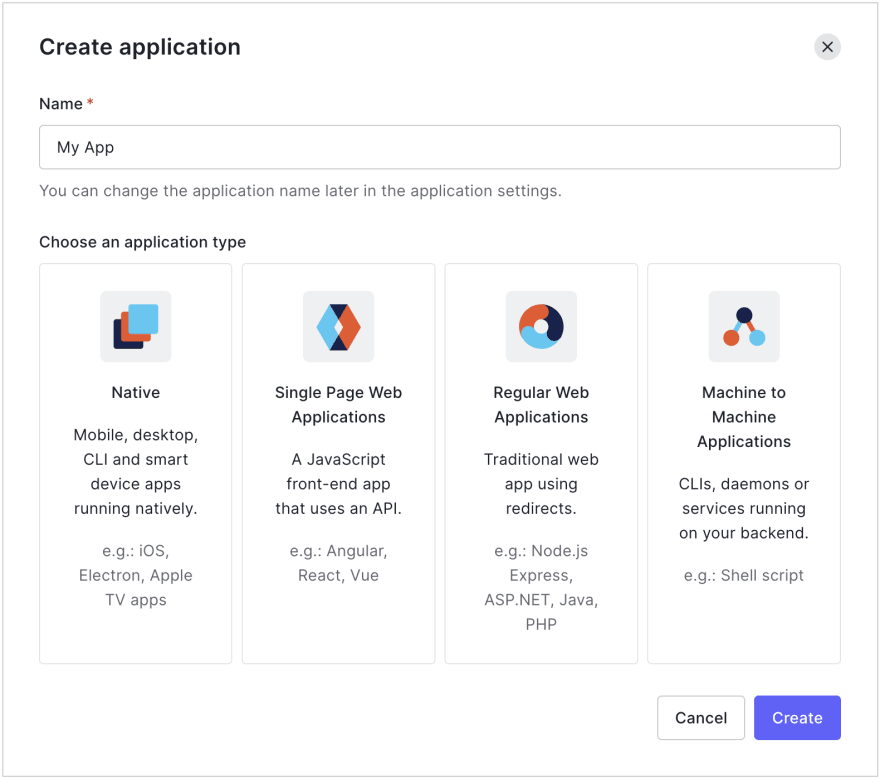
Auth0 will assign you an immutable client ID which you will use in your code to call the Auth0 API. To get your client ID, select your application, and go to settings.
Environmental Variable
On the root folder of your project, create a .env file
    REACT_APP_AUTH0_DOMAIN= /* domain */
    REACT_APP_AUTH0_CLIENT_ID= /* client id */
Copy your Domain and Client ID values from your application settings and paste them in your .env file.
Run the following command in your terminal to install dependencies
npm install
Your dependencies can be found in the package.json file.
Using Auth0
Auth0 is platform that creates an easy to implement, adaptable authentication and authorization for your application. In this section, I will explain how the Auth0 authentication is used in different components of the application.
Integrating Auth0
To integrate Auth0 to your react application, you will use the Auth0 React SDK @auth0/auth0-react.
Run the command
npm install --save @auth0/auth0-react
auth-history.js
Go to /src/auth/auth-history.js
    import React from "react";
    import { useHistory } from "react-router-dom";
    import { Auth0Provider } from "@auth0/auth0-react";
    const AuthHistory = ({ children }) => {
      const domain = process.env.REACT_APP_AUTH0_DOMAIN;
      const clientId = process.env.REACT_APP_AUTH0_CLIENT_ID;
      const history = useHistory();
      const onRedirectCallback = (appState) => {
        history.push(appState?.returnTo || window.location.pathname);
      };
      return (
        <Auth0Provider
          domain={domain}
          clientId={clientId}
          redirectUri={window.location.origin}
          onRedirectCallback={onRedirectCallback}
        >
          {children}
        </Auth0Provider>
      );
    };
    export default AuthHistory;
To process authentication, the Auth0 React SDK connects to the Auth0 Application. The Auth0Provider must be configured with an Auth0 Domain and Client ID.
The onRedirectCallback() method is called when Auth0 redirects users from the Auth0 Universal Login page to the application. The useHistory() hook is used to retrieve the React Router's history object. The history.push() method will then redirect users to the route they intended to visit prior to authentication.
index.js
Go to src/index.js
    import React from 'react';
    import ReactDOM from 'react-dom';
    import './index.css';
    import App from './App';
    import {BrowserRouter as Router} from 'react-router-dom'
    import AuthHistory from './auth/auth-history'


    ReactDOM.render(
      <Router>
        <AuthHistory>
          <App />
        </AuthHistory>
      </Router>,
      document.getElementById("root")
    );
The App component is wrapped with the AuthHistory component so that the entire application will have access to the AuthContext. The BrowserRouter component from React Router must be the parent of the AuthHistory.
LoginButton.js
Go to /src/components/buttons/loginbutton.js
    import React from "react";
    import { useAuth0 } from "@auth0/auth0-react";
    const LoginButton = () => {
      const { loginWithRedirect } = useAuth0();
      return <button className="btn btn-primary btn-block" onClick={() => loginWithRedirect()}>Log In</button>;
    };
    export default LoginButton;
When loginWithRedirect() method is called, a user is asked to authenticate and give permission for the application to access specific data on their behalf. This means that the application redirects the user to the Auth0 Universal Login page to complete the authentication process.
SignupButton.js
Go to /src/components/buttons/signupbutton.js
    import React from "react";
    import { useAuth0 } from "@auth0/auth0-react";
    const SignupButton = () => {
      const { loginWithRedirect } = useAuth0();
      return (
        <button
          className="btn btn-primary btn-block m-2"
          onClick={() =>
            loginWithRedirect({
              screen_hint: "signup",
            })
          }
        >
          Sign Up
        </button>
      );
    };
    export default SignupButton;
In the signup component, an option is passed to redirect users to an Auth0 Universal Login page optimized for signing up for the application. This is done by specifying the screen_hint=signup property in the configuration object of loginWithRedirect()
LogoutButton.js
Go to /src/components/buttons/logoutbutton.js
    import React from "react";
    import { useAuth0 } from "@auth0/auth0-react";
    const LogoutButton = () => {
      const { logout } = useAuth0();
      return (
        <button
          className="btn btn-danger btn-block"
          onClick={() =>
            logout({
              returnTo: window.location.origin,
            })
          }
        >
          Log Out
        </button>
      );
    };
    export default LogoutButton;
Auth0Context's logout() method clears the application session and redirects to the Auth0 /v2/logout endpoint to clear the Auth0 session. logout(), like the login method, accepts an object argument to define parameters for the /v2/logout call. The returnTo option specifies the URL to which Auth0 should redirect users after they logout.
AuthenticateButton.js
Go to /src/components/buttons/authenticatebutton.js
    import React from "react";
    import LoginButton from "./LoginButton";
    import LogoutButton from "./LogoutButton";
    import SignupButton from './SignupButton'
    import { useAuth0 } from "@auth0/auth0-react";
    const AuthenticationButton = () => {
      const { isAuthenticated } = useAuth0();
      return isAuthenticated ? <LogoutButton /> : (
        <div>
          <SignupButton className="mr-5 " />
          <LoginButton />
        </div>
      );
    };
    export default AuthenticationButton;
The isAuthenticated is used to check if a user is logged in. It returns a boolean true is logged in. If a user is authenticated, it displays the logout button, if not authenticated, the signup and login buttons are displayed.
BannerWrapper
Go to src/components/bannerwrapper/index.js
    ...
    const { isAuthenticated } = useAuth0();
      return (
        <>
          <div className="wrapper">
            <div>
              <Output values={values} />
            </div>
            <div className="actionWrapper">
              <InputWrapper values={values} setters={setters} />
              { isAuthenticated ? (
                <>
                  <button className="btn btn-success mb-5 mt-3" id="download-button" download="banner.png" href={imgURL}>
                    <a download="banner.png" href={imgURL}>DOWNLOAD BANNER</a>
                  </button>
                </>
              ) : (
                <h5 className="mb-5 mt-3" style={{color: "red"}}>Login to download your banner</h5>
              )}
            </div>
          </div>
        </>
      )
    }
In this part of the bannerWrapper component, the isAuthenticated is used once more to check if user is logged in. If authenticated, the download button will be displayed. If not authenticated, a red-colored text is displayed requesting the user to login in order to download the banner.
That is how Auth0 is used in this project application.
Overview of the application
Now run the following command to start the project:
npm start
Your browser should display the following image

At the bottom of the page, your will see a red-colored sentence, requesting you to login before you can download your banner. Since your are a new user, you will have to signup instead. So click on the signup button to register.
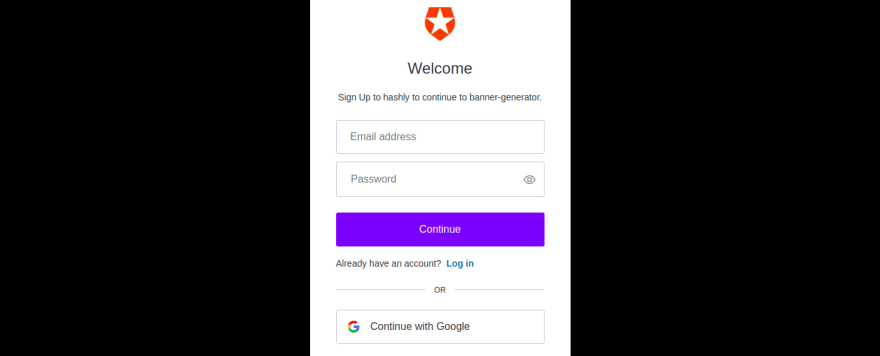
Fill in your email address and password to signup or your can simply signup with Google. When signed in, you will be presented access to the download button, so your can easily download your banner to your device.

Conclusion
With Auth0, we can easily implement an adaptable authentication and authorization for our application. While with Cloudinary, we can manage our cloud-based media services such as image and video. It enables users to upload, store, manage, manipulate, and deliver images and video for websites and apps.
These are robust technologies that can make our development easier and faster.
Here is a link to my live demo on codesandbox
Reference
https://auth0.com/docs/quickstart/spa/react
https://auth0.com/docs/get-started
https://auth0.com/blog/complete-guide-to-react-user-authentication/
Content created for the Hackmamba Jamstack Content Hackathon using Auth0 and Cloudinary


Top comments (0)