
WARNING: Parts of this article are now outdated due to progress into WSL2 and tools like VSCode and even third party tools supporting it. I'm considering making a second version of this article soon.
Lately I've seen a lot of articles about webdev in Windows 10, but all of them use WSL. I wanted to test if it was possible to manage a full web development environment (at least the stacks I needed) in my Windows PC using just the native versions of the required software, and I'm very impressed with the results.
Why though?
WSL is awesome and it makes a lot of previous complicated workflows (Ruby/Rails, for example). But for me it has these two disadvantages that I cannot work around.
- I/O it's not as fast as it should be on a native distro (not even as it should be on Windows, some times)
- WSL executables are hidden from Windows apps. For example, the
gitfrom your WSL installation is not visible for Visual Studio Code (not easily, at least)
Also, a lot of great programmers gave their time and effort to port some of these tools for us people that prefer Windows, so why not try them first? 😉
Let's start with the app that, in my opinion, makes all of this possible.
Chocolatey
This utility is awesome for us that grew accustomed to managing the system via the terminal. It's a package manager for Windows, and a very good one at that. After installing it (you need an administrator console) you can use it via PowerShell like choco install <package-name>. You can check more about the utility here and the list of packages available here.
We're going to use it. A lot.
Let's continue.
Terminal
The first pain point for every web developer that joins the Windows ranks. Until the revamped Windows Terminal gets officially released (though you can grab the preview from the Microsoft Store), I've found myself using Fluent Terminal by felixse. It's a terminal emulator based on UWP and web technologies, with a lot of features including tabs, themes and profiles. The easiest way to install it is via Chocolatey, but you can also install it by downloading the latest release and executing the included PowerShell script.
choco install -y fluent-terminal

The caveat with Fluent Terminal is that you can't get an elevated terminal (like, PowerShell as Administrator). For any command that requires administrative privileges (like installing stuff from Chocolatey) you'll need an elevated terminal.
Node.JS
We're starting this by installing the nvm utility, and yes, the name is similar but the tool is not the same as the *nix counterpart. This is the work of Corey Butler and it is the recommended Node.JS version manager for Windows. We can install it following the instructions on the GitHub page or by using Chocolatey.
choco install -y nvm
After that, we can check the available Node.JS versions using nvm list available ,install the one we want using nvm install <version> and then enable it via nvm use <version> (this will prompt a UAC dialog).
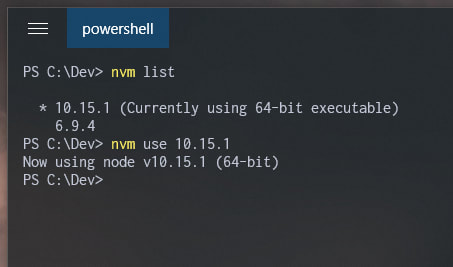
Congratulations! Now you have Node.JS native for Windows which works in a similar way to the *nix counterpart! Only caveats are that there's no support for .nvmrc files, so if you have to use different versions for different projects you'll have to change them manually using nvm use <version> instead of relying on that file. However, it's still less of a hassle than managing those envvars yourself!
You can now proceed as required with your Node.JS tools.
WAMP stack
This is a good one. We can actually use something like MAMP for Windows here and call it a day, but just for trying to do something similar to a *nix server in Windows, we're going to install everything manually using Chocolatey.
Apache
choco install -y apache-httpd --params "/port:80"
That command will install Apache for Windows provided by The Apache Haus. Notice that I've added a parameter for defining the port. That's defined by the package maintainer and will sent parameters to the installer for configuration purposes. In the case of Apache, for example, we can send where do we want it installed (for default it will go into %appdata% path), the port, the service name and whether we want the service or not. You can always check the package page for more info.

Once it's installed you can go to http://localhost:<port> and you'll see the default page. Nice!
MySQL
choco install -y mysql --version 5.7.18
That command will install MySQL for Windows, specifically version 5.7.18. Yeah, you can specify versions too. You can check the package page for more info/config options. By default it will be installed in C:\tools\mysql. The my.cnf config file should be in C:\tools\mysql\current.my.cnf.
The installation will create a MySQL user root without password, so you can then enter mysql -uroot to enter the terminal and changing whatever you want.
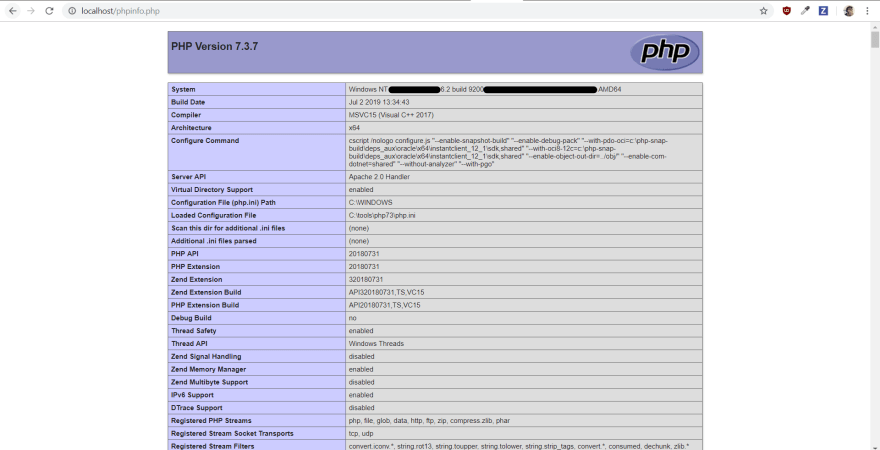
PHP
choco install -y php --params "/ThreadSafe"
That command will install PHP for Windows, specifically the thread safe version that's compatible with Apache. By default it will be installed in C:\tools\php<version>. That will also be the location of the php.ini config file.
You can check If there's an extension that you need and isn't included you can check PECL.
Making Apache and PHP work together
Now we need to tell Apache that PHP is installed. We open the httpd.conf configuration file (by default in %appdata%\Apache<version>\conf\httpd.conf) and we add the following at the end of the file (in my case, I'm using PHP 7.3 and Apache 2.4):
LoadModule php7_module "c:/tools/php73/php7apache2_4"
AddType application/x-httpd-php .php
PHPIniDir "C:\tools\php73"
And the we add index.php files as an option for the DirectoryIndex.
<IfModule dir_module>
    DirectoryIndex index.php index.html
</IfModule>
That's it! After restarting Apache we should now have PHP support! So...
Restarting services from WAMP stack
All of these that we've installed add a service to Windows unless told otherwise, so you can find all of them inside the Services app. But again, for the sake of using the terminal for everything, we'll do it from the terminal.
For starters, we can see all the services running executing the following in PowerShell:
Get-Service    //all services, or
Get-Service | Where {$_.status –eq 'running'}    //only running
There we can see the list of services by name, description and status. When we have the service we want, we can just run:
Restart-Service <service-name>    //restart a running service
Stop-Service <service-name>    //stop a running service
Start-service <service-name>    //start a stopped service
However, here's a caveat: for managing the services via PowerShell, we need to have administrator permissions, so all of those commands (except Get-Service) need to be executed from an elevated terminal.
Final words
This was a nice experiment. Even though it seemed like Windows was neglected all these years of the nice development tools present in other operating systems, there a tools that can help to manage a pretty decent environment.
There seem to be a lot of hoops to jump, though, so I don't blame anyone for being excited about WSL. Finally we can use the same tools as the others and follow examples easier. Also, being that popular, I'm pretty sure Microsoft will be making things easier for Windows apps to tap into WSL executables without much of a hassle.
I'm looking forward to WSL2 and I'm looking forward to what Microsoft does to continue to make the developers that choose their platform happy. Until then, I'm pretty confortable with WSL-less setup. Maybe I'll get back to WSL when I need to use Rails again.


Top comments (0)