My third article about the new features added to SwiftUI at WWDC21 is a mix between two of them I’ve already covered in my previous posts. This time my goal is to draw an analog clock with the new Canvas view. Since I’m building a clock I’ll need a way to refresh my SwiftUI view every second and WWDC21 brought us a new view for this purpose, the TimelineView.
My first post about WWDC21 was about that, and I decided to demonstrate its usage by drawing a simple clock in SwiftUI. I didn’t use Canvas back then, but some Path with rotation effect.
This time I want to achieve the same goal with Canvas.
As I told you at the beginning, I’ve already written something about Canvas, so if you want an introduction I suggest to read my previous post before continuing.
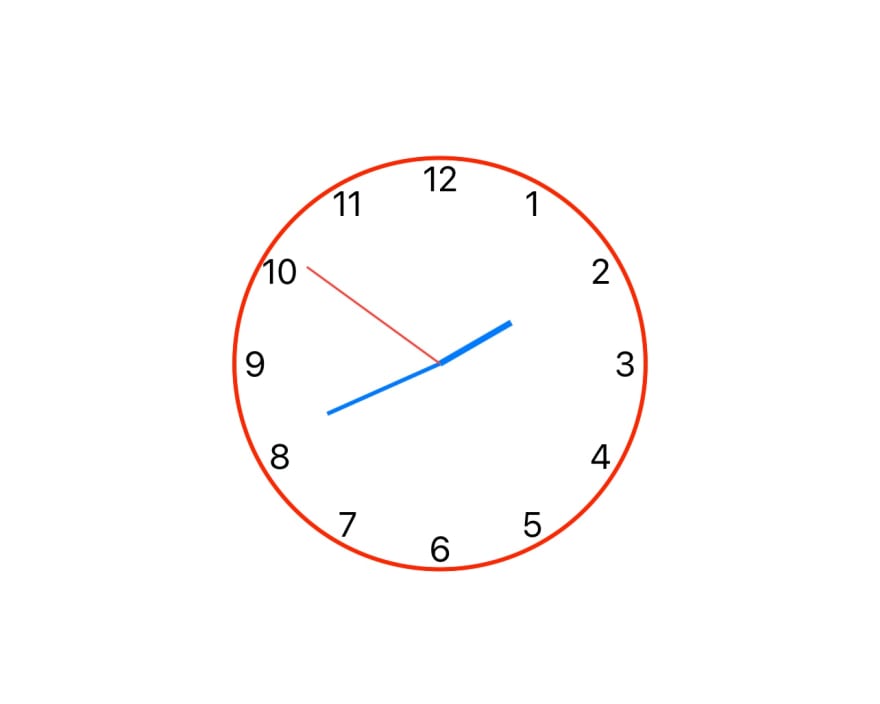
this image shows the result we want to achieve.
Let’s start diving into the code, you can find the implementation here
TimelineView(.periodic(from: .now, by: 1.0)) { timeContext in
    Canvas { context, size in
        let date = timeContext.date
        let textTime = Text(date.formatted(date: .omitted, time: .standard))
        context.draw(textTime, at: CGPoint(x: size.width / 2, y: 10))

        let clockFrame = CGRect(x: 0,
                                y: 0,
                                width: 100,
                                height: 100)

        var clockContext = context
        clockContext.translateBy(x: (size.width / 2) - 50, y: (size.height / 2) - 50)

        addLabels(toContext: clockContext, frame: clockFrame)

        drawClockHands(inContext: clockContext, frame: clockFrame, date: date)
    }
}
This is the SwiftUI view responsible to draw the clock. There is a TimelineView that refresh the inner content every second, and the date is stored inside timeContext.
Then we have the Canvas. Its closure has two parameters, the GraphicsContext and the size of the view itself.
First, I want to show the current time in a Text, but I’m drawing it inside the Canvas.
Remember the Canvas is not a usual SwiftUI view, the closure isn’t a ViewBuilder so we have to write imperative code here, not declarative. We need to specify the CGPoint each time we want to draw something on the screen, so if you’re used to building views in UIKit this should be familiar to you.
Note I copied context in the variable clockContext. This way I can apply a translation to the copied context without affecting the original one. I do it to center the clock inside the Canvas, so I can pass this context to the functions responsible to draw the clock hands and the marks.
private func addLabels(toContext context: GraphicsContext, frame: CGRect) {
    context.withCGContext { cgContext in
        let rect = CGRect(x: -frame.size.width / 2,
                      y: -frame.size.width / 2,
                      width: frame.size.width * 2,
                      height: frame.size.height * 2)
        cgContext.setStrokeColor(CGColor(red: 255, green: 0, blue: 0, alpha: 1.0))
        cgContext.setFillColor(CGColor(red: 255, green: 255, blue: 255, alpha: 1.0))
        cgContext.setLineWidth(2.0)
        cgContext.addEllipse(in: rect)
        cgContext.drawPath(using: .fillStroke)
    }
    // write the marks inside a smaller frame to avoid collision with the circle
    let innerFrame = getRect(fromRect: frame, ratio: 0.9)
    let radius = innerFrame.size.width
    let midX = innerFrame.size.width / 2 + (innerFrame.origin.x / 2)
    let midY = innerFrame.size.height / 2 + (innerFrame.origin.y / 2)
    let labels = [12, 1, 2, 3, 4, 5, 6, 7, 8, 9, 10, 11]
    for index in 0 .. < labels.count {
        let angle = CGFloat(index) * CGFloat.pi * 2 / 12 - (CGFloat.pi / 2)
        let x = round(cos(angle) * radius) + midX
        let y = round(sin(angle) * radius) + midY
        let text = Text("\(labels[index])")
        context.draw(text, at: CGPoint(x: x, y: y))
    }
}
This is the function to draw the marks. It starts with a CGContext, it isn't really necessary here but I put it to show how to integrate a CGContext inside a GraphicsContext. In this example I'm just drawing a circle, then I'll draw the hands with the new GraphicsContext API.
By using withCGContext you'll be able to reuse existing code in a Canvas. You may have some custom drawing made with CoreGraphics and this is the perfect way to bring it to SwiftUI by using Canvas, instead of wrapping a UIKit view inside UIViewRepresentable.
Let's move on. Now that we have a red circle, we want to write labels inside it. We can loop over the array of labels and with some trigonometry calculate where each of them will need to be drawn.
In order to avoid numbers to be drawn over the circle, I made a smaller CGRect and based all my calculation to its size instead of the original frame. Remember we need to specify the coordinates when we draw something in the GraphicsContext, so we need to be careful.
private func drawClockHands(inContext context: GraphicsContext, frame: CGRect, date: Date) {
    let hourPath = createPath(fromDate: date, type: .hour, frame: frame)
    context.stroke(hourPath, with: .color(Color.blue), lineWidth: 3.0)

    let minutePath = createPath(fromDate: date, type: .minute, frame: frame)
    context.stroke(minutePath, with: .color(Color.blue), lineWidth: 2.0)

    let secondPath = createPath(fromDate: date, type: .second, frame: frame)
    context.stroke(secondPath, with: .color(Color.red), lineWidth: 1.0)
}
This is the function responsible of drawing the clock hands. First we create a Path, then we can draw it in the context with the stroke function by specifying the Path, its color and the line width.
private func createPath(fromDate: Date, type: ClockHandType, frame: CGRect) -> Path {
    var timeDegree = 0.0
    var widthScale = 1.0
    let midX = frame.size.width / 2 + (frame.origin.x / 2)
    let midY = frame.size.height / 2 + (frame.origin.y / 2)

    let radius = frame.size.width

    let (degree, scale) = getDegreeAndScale(fromDate: fromDate, type: type)
    timeDegree = degree
    widthScale = scale

    timeDegree =  -timeDegree * CGFloat.pi * 2 / 60 - (CGFloat.pi)

    let startPoint = CGPoint(x: frame.size.width / 2, y: frame.size.height / 2)
    let endX = (widthScale * radius) * sin(timeDegree) + midX
    let endY = (widthScale * radius) * cos(timeDegree) + midY
    let endPoint = CGPoint(x: endX, y: endY)

    var path = Path()
    path.move(to: startPoint)
    path.addLine(to: endPoint)
    return path
}
The Path we need is just a line, and most of the function has to find out its origin and end points. The origin is the center of the frame, the end point depends on the time, we need to divide our circle in 60 points (60 seconds, 60 minutes, 12 hours so the hour is multiplied by 5). The radius you see here allow us to have clock hands of different sizes, the hours hand is shorter than the minutes and second.
That's it. If you compare this implementation to the one of my article about TimelineView you may find this one to be more complex, especially if you're more used to write SwiftUI views instead of UIKit.
What I like about Canvas is the freedom to draw every single pixel, pretty much what happened when overriding the draw method in a UIView. Canvas is indeed powerful, and allow you to recycle old code via CGContext. On the other hand, SwiftUI provide a declarative and simple way to draw views.
Personally, I'd use plain SwiftUI views whenever possible, but I'm glad Canvas is there to help us in some more complex scenario where we'd have an hard time achieving the result with SwiftUI.
As usual, it is better to use the right tool for the job.
Happy coding 🙂

Oldest comments (0)