
I wasn't much into testing until I put myself forward as QA lead in our student project during my coding bootcamp at Founders and Coders. Code coverage was one of the main takeaways I got from that experience.
Some things I learned:
- Code coverage will show you what parts of your code are not being tested when your tests run and it can be surprising when you were sure that test X would hit that line of code you wanted it to but it didn't.
- It will encourage and challenge you to learn more about testing and explore things you don't know.
- If you are not using TDD methodology (most part of the time we weren't, it is a long learning process!) it will push you to write code that can be tested which means better code.
- Working towards a high coverage is a great morale boost.
It is important to bear in mind that a test coverage...
- ...won't tell if you are testing for edge cases or critiquing well your own code.
- ...it also won't tell you if your tests are meaningful.
This tutorial is then for you who is using Tape as your test runner and wishes to get started with code coverage. In a nutshell, Codecov.io is a great tool that integrates code coverage reports. It is supported by lots of languages, Node.js included. The set up however also varies according to what test runner you are using. For that student project, Bechdel and Beyond, we decided to use Tape in the backend. Below I am sharing the steps we took to set up our backend repo with Codecov.io.
Codecov setup with Tape in Node.js
When using Tape as your test runner you will need some extra tools to implement test coverage as Codecov doesn't do all the job in this case, it only integrates reports. Codecov 'quick start' guide recommends Istanbul to generate coverage reports locally that then are sent to Codecov when your branch is pushed to the remote repo.
Generating reports
To track the lines of your code being used when your tests run, Codecov recommends installing Istanbul in your development dependencies. I tried following the instructions for Istanbul, but the package is now deprecated and the alternative is Istanbul's command line interface called nyc . To install it, run:
npm i nyc -D
In our project we already had a test script to run our tests using Tape (and tap-spec to make it pretty):
"test": "PGDATABASE=bbtest tape tests/*.test.js | tap-spec",
It is possible to add another script to run it with nyc:
"coverage": "nyc npm run test"
Alternatively , you just add nyc to your test script:
"test": "PGDATABASE=bbtest nyc tape tests/*.test.js | tap-spec",
Running npm run test (or npm run coverage) will then show a report like the one below alongside your tests and will generate a .nyc_output folders to cache information, all entirely locally.

(This Stackoverflow post explains how to interpret the report.)
By default, nyc will look only to the files that are being tested (which can give the illusion of high coverage). Ideally, you want to change this so it covers your entire project and gives you a real picture of what is not being tested. See here how to configure your nyc report.
Still according to Codecov instructions, add the script below to your package.json file. It specifies a reporter and saves all in coverage.lcov:
"report-test": "nyc report --reporter=text-lcov > coverage.lcov && codecov",
Uploading reports
Finally, the && codecov part is responsible for uploading the report to Codecov.io. For this to work, just install npm i codecov in development dependencies. Note that when you start at codecov.io it suggests you to use a bash command (- bash <(curl -s [https://codecov.io/bash](https://codecov.io/bash))). If you decide for codecov npm package (is it safer?), you won't need that.
To test if you can send a report to Codecov, register to codecov.io with the account where your repo lives and add the token provided at the end of the script above -t <token>
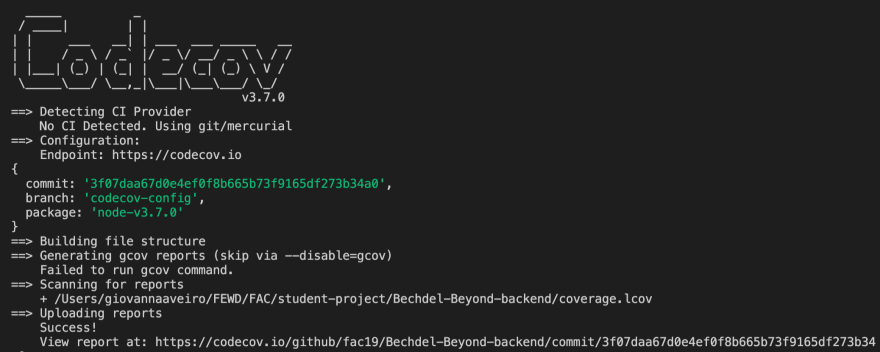
Run both scripts (assuming you have tests in your project), npm run test then npm run report-test. You should see the below in your terminal:
Important! The report will be uploaded to codecov.io only after pushing your branch to the remote.
Don't forget to include .lcov and .nyc_output in the .gitignore
coverage
*.lcov

# nyc test coverage
.nyc_output
Not using CI
If you are not using any CI yet, remove the token and -t from your package.json and save the token in a .env file. Push your branch to the remote and the report will be uploaded to your Codecov dashboard. It might take it some seconds to upload.
Using CI (Travis)
If using Travis in your project, remove the token and -t from your package.json and save the token provided in your project dashboard on Travis. Add both scripts to your .travis.yml:
script:
  - npm run test
  - npm run report-test
And that is it 😃
Extras
![]()
Now that you have done all of this, go to your project dashboard in codecov.io > settings > badge and add a coverage badge to share your amazing code coverage in your readme!
Resources
Good article by Vitali Zaidman about JavaScript testing frameworks (maintained): An Overview of JavaScript Testing in 2020.
This article by Erick Zhao can also be useful -
Adding Test Coverage to your NodeJS app with Istanbul, TravisCI, and Codecov
You can find more details on what is required for different test runners in NodeJS here.


Top comments (0)