At Epilocal, we are big believers in static site generators and in particular we use Gatsby. Although Gatsby plays pretty well together with AWS, there are some tricks to getting it set-up correctly.
I’ve put together a checklist that we use internally for all of our new set-ups that we wanted to share with anyone else who is deploying Gastby on AWS.
Tools used:
- Gatsby with gatsby-plugin-s3
- AWS S3
- AWS Cloudfront
- AWS Route 53
- AWS Certificate Manager
Steps:
Step 1: Set up S3 bucket for static hosting
Create a new S3 bucket with public access allowed for access point policies only. This means that you will only be blocking public access for access control lists.
Your set-up should look like this:

Go to properties and select: Static Website Hosting. Select the option “Use this bucket to host a website”.

You will also see the endpoint url for your bucket on this page, copy it for later. (you will use it in Step 5 to setup CloudFront)
Step 2: Give IAM User CLI permission to deploy to bucket by adding a new bucket policy
Navigate to bucket policies in S3 by going to Permissions > Bucket Policy and add the following:
{
    "Version": "2012-10-17",
    "Statement": [
        {
            "Sid": "AddPerm",
            "Effect": "Allow",
            "Principal": "*",
            "Action": "s3:GetObject",
            "Resource": "arn:aws:s3:::[YOUR BUCKET NAME HERE]/*"
        }
    ]
}
Step 3: Install and configure gatsby-plugin-s3 for your Gatsby build
Install gatsby-plugin-s3 with either NPM or Yarn.
In your gatsby-config.js file, you will need to add the following:
    {
      resolve: `gatsby-plugin-s3`,
      options: {
        protocol: "https",
        hostname: "[YOUR CANONICAL DOMAIN NAME HERE (example:  www.epilocal.com)]",
        bucketName: "[YOUR BUCKET NAME HERE]",
      },
    }
Step 4: Deploy Gatsby build to S3 bucket
From the command line run: gatsby deploy.
If you have multiple AWS profiles on your machine, you can prefix the id of the profile that you want to use by using this command instead: AWS_PROFILE=[YOUR PROFILE NAME HERE] npm run deploy.
Step 5: Connect Cloudfront to S3 bucket
Create a new Cloudfront distribution using all defaults except for changing the following options:
- Origin Domain Name: copy and paste the endpoint url from your S3 bucket here rather than picking the drop-downs. It should look something like this:
[YOUR BUCKET NAME].s3.amazonaws.com - Viewer Protocol Policy: Redirect HTTP to HTTPS
- CNAME:
www.[YOURDOMAINNAME].com - Customer SSL Certificate: follow the links to AWS Certificate Manager to enable SSL on your domain if you haven’t yet already. (if you are not using Route 53 for your domain name, you can import your SSL certificate here instead). Note: be sure that you specify your SSL certificate to cover *.com and your root domain.
Step 6: Create A and AAAA zones in Route 53 for your www domain and point it to your Cloudfront distribution
Define a new simple record in your Route 53 Hosted Zones.
Ensure that you type “www” in record name and select “Alias to CloudFront Distribution”. Then you should see your CloudFront region and distribution name and be able to select it from a drop-down. (where it says “Choose Distribution” in the image below).
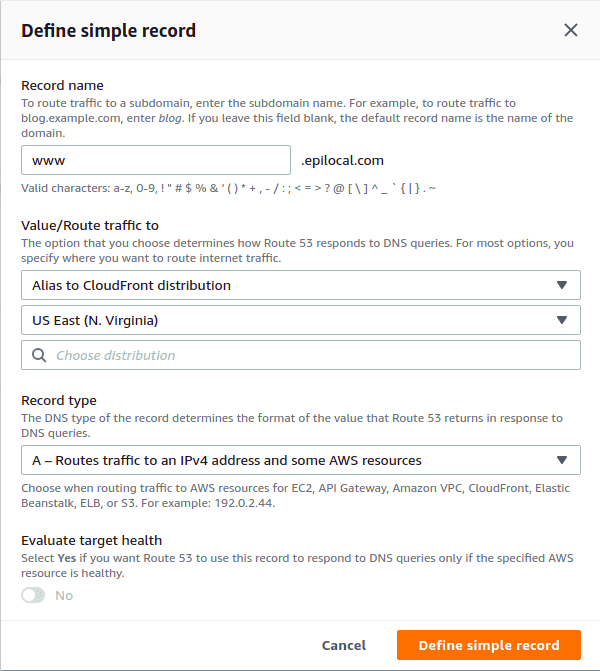
Repeat the same process and create a AAAA record instead of an A record.
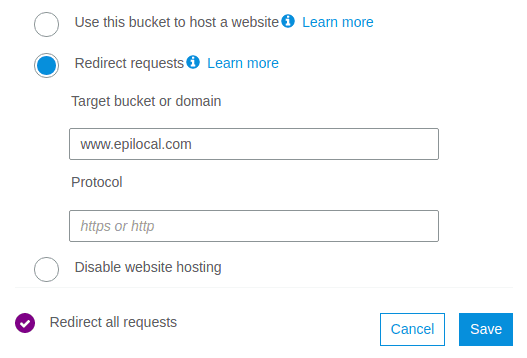
Step 7: Create a second S3 bucket to redirect root domain requests to www
Create a new S3 bucket, this time you don’t need to allow public access.
Go to properties and select: Static Website Hosting. Select the option “Redirect requests” and under “Target bucket or domain” enter your www domain name.
Step 8: Create second Cloudfront distribution for S3 redirect bucket
Create a new Cloudfront distribution using all defaults except for changing the following options:
- Origin Domain Name: copy and paste the url from your second S3 bucket here rather than picking the drop-downs. It should look something like this
[YOUR BUCKET NAME].s3.amazonaws.com - Viewer Protocol Policy: HTTP and HTTPS
- CNAME: [YOURDOMAINNAME].com
- Custom SSL Certificate: the same SSL certificate should also cover this distribution if you specified before that your SSL certificate would cover *.com and your root domain.
Step 9: Set-up A and AAAA zones for root domain pointed to second Cloudfront distribution
Define a new simple record in your Route 53 Hosted Zones.
This time leave the record name blank. Select “Alias to CloudFront Distribution” and this time you should see your second CloudFront region and distribution name and be able to select it from the drop-down.

Latest comments (0)