
What is Redis?
Using Redis caching is a simple way to improve the performance of your APIs. Redis (Remote Dictionary Server) is a fast, open-source, in-memory, key-value data store. It delivers sub-millisecond response times, enabling millions of requests per second for real-time applications.
Redis is a key-value-based NoSQL database that stores data in memory (in RAM).
Redis is often used for caching; geospatial storage; chat, messaging, and queues; and gaming leaderboards. It’s well-suited to these tasks because it is simple, fast, and easy-to-use; supports a variety of data structures; allows for storing key and value pairs as large as 512MB; and Redis Sentinel provides high availability for non-clustered Redis.
However, Redis requires huge amounts of RAM, depending on the type of application you’re running; failovers in master components cause all slave components to lose all of their data; and data can only be accessed via keys.
Setting up Redis
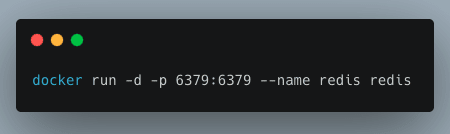
We will set up Redis using Docker.
Nowadays, there are some hosting providers, such as AWS, Redis, or Upstash, that provide Redis on the cloud.
There are many ways to connect to Redis. In our case, we will be using the Redis CLI. Since we have the Docker setup ready, let's connect.
Here is an example of using Redis CLI commands to set, get and delete a value from the Redis database:

Some other useful Redis CLI commands:
-
keys: find all keys -
FLUSHALL: delete all keys from all databases -
FLUSHDB: delete all keys from the currently selected database -
EXPIRE key 120: delete a key in 120 seconds
Caching APIs with Go and Redis
There are multiple clients available in Go for implementing Redis. However, in this article, we will be using go-redis. Let’s look into how this works with Redis caching.
Go-Redis
Go-Redis is a type-safe Go Redis client library. It’s a Redis client that is able to support a Redis cluster and is designed to store and update slot info automatically with a cluster change. It also supports features like Pub/Sub, Sentinel, and pipelining.
Create APIs using Gorilla Mux
We will be using Gorilla Mux to create the APIs locally. Gorilla Mux implements a request router and dispatcher to match the incoming requests.
Install it using the following command:

We will register the following endpoints:
-
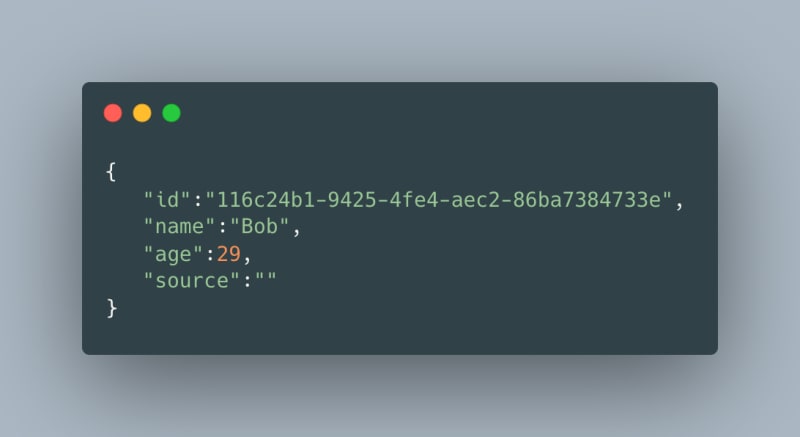
GET /users/:id— to get a user’s information based on their id. A response might look like this:
-
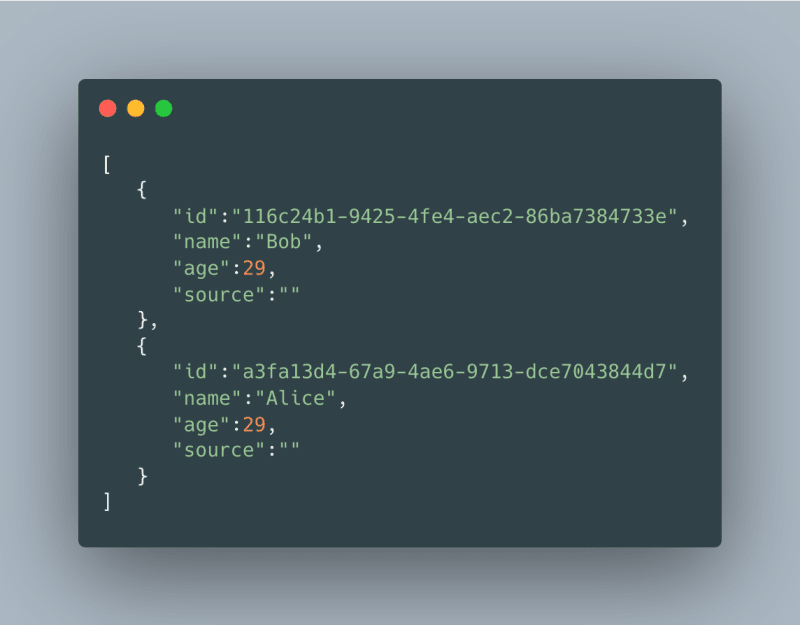
GET /users— returns the users present in the database. A response might look like this:
Next, we create the router instance using the mux.NewRouter() and assign the above-created routes to the respective handlers.
Each of the corresponding handlers is passed ResponseWriter and Request as parameters, which help in returning the desired response to the client.
We then specify the server details using http.Server to run an HTTP server.

-
Handler: This is the object that responds to the incoming HTTP requests that we created above. -
Addr: This specifies the TCP address for the server to listen on. By default, this is 80. -
WriteTimeout: The maximum duration before timing out the writes of the response. -
ReadTimeout: The maximum duration for reading the entire incoming request.
Finally, we run the server using ListenAndServe which listens to the network address specified in the Addr and serves the requests based on the Handler.
Setting up Postgres
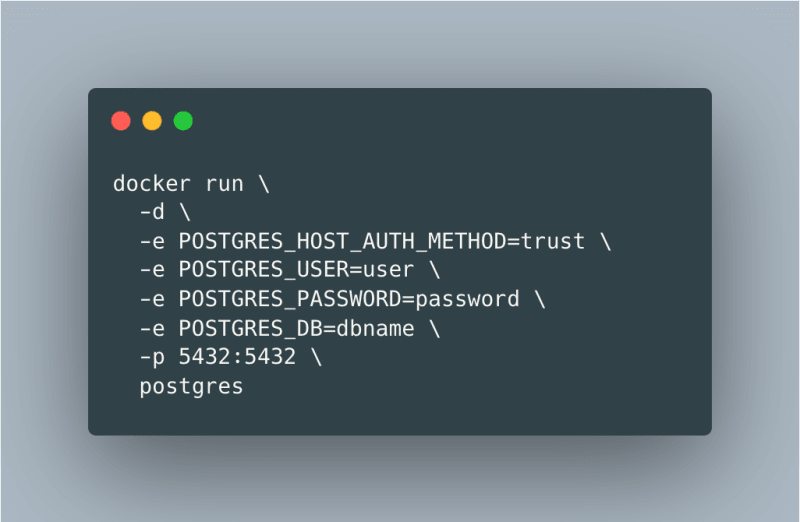
We will be using Postgres for our database. Install it using Docker by running the following:
Then, verify that the new container is created and running docker ps -a at 0.0.0.0:5432.
To the database from your browser, install pgAdmin and connect to it using the above credentials. If all is well, you should see this:

We will create a table called users which will have the following schema:

Let’s insert some dummy data using the following:

To connect to Postgres with Go, we’ll install this:

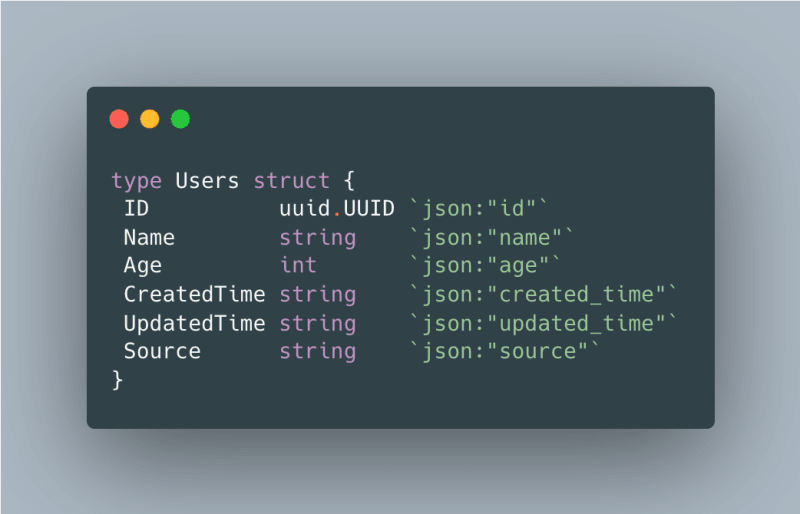
Here is the struct for the users:
Once the get users API and the get users by id API are created, we will use Gorilla Mux to create a localhost server and listen to the endpoints.
Redis Caching for APIs
To connect to Redis, we create a Redis Client using NewClient. We specify the address at which the Redis exists like so:

The configuration options are available through the redis.Options parameter.
-
Addr: The string of the host and the port address. Since we are hosting Redis locally, the value is127.0.0.1. By default, Redis runs on port6379. -
DB: The database which will be selected after connecting to the server. By choosing 0, we will use the default database. -
DialTimeout: This specifies the timeout for establishing a new connection if our connection to the Redis server breaks. -
ReadTimeout: This allows us to put a timeout for the socket reads. If any of the Redis server requests reach this timeout, the command calling it will fail instead of blocking the server.
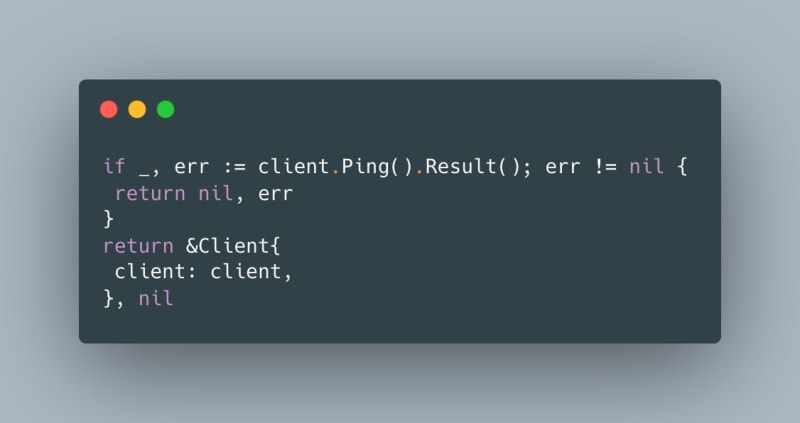
To check if we connected to the server, we call Ping using the client we created above. If there is no error, we are connected to the Redis server.
Finally, we return the Redis client, which internally may have zero or more connections.
Get and Set Keys
Whenever the front end asks for the details of a particular user, we fetch that user from the API and then cache it. Subsequent requests for the particular user will be served from the cache until the cache key expires (we set this expiration to 20 seconds). We will be making use of Set to set the value in the cache.
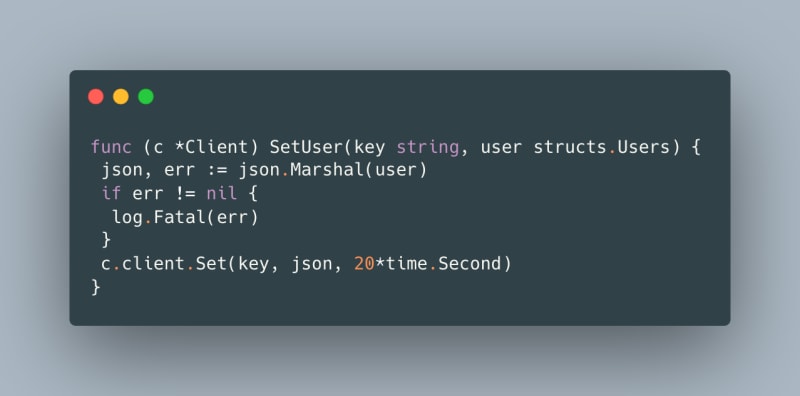
Note: Here we take the user struct as input. We then convert the Go struct into JSON (i.e., marshaling), as JSON is a language-independent data format.
We set the key pair with an optional expiration parameter of 20 seconds. This means the key will automatically expire in 20 seconds. If there is no expiration parameter, the key will not expire.
Get Keys
We will be making use of Get to retrieve the value of a key:

The response is in the form of a string. We convert this byte data into the original user struct (i.e., unmarshalling).
Inside this function, we add a Redis publisher (which we’ll discuss in the next section).
Calling APIs with Redis Caching
We have this API endpoint hosted locally—GET /users/:id — to get a user’s information based on the id. Once the client calls this endpoint, we first check if the value for this request can be served from the cache.
Note: If the data exists inside the cache, we set the source to "cache."
Logically, the first request will always hit the server, so the time to get the response will be longer.
Note: When getting the value from the server, we set the source to "API."

As we can see in the above snippet, we first invoke redis.GetUser to check the cache. This function checks for the id inside the cache; if the id is present, it returns the value. If the result fails, the function returns null and we proceed to invoke the API GetUserByID, which hits our Postgres database.

This is how it looks when the key is not present in Redis:
![]()
The result from the API uses Redis caching, so the subsequent requests are now served by the cache (for 20 seconds, until the key expires).

This is how it looks when the key is present in Redis:
![]()
Redis Subscription using Pub/Sub
In the field of software engineering, publish-subscribe is a pattern where senders (publishers) categorize the messages into channels without knowing if there are any subscribers.
On the other hand, subscribers show interest in one or more channels and only receive messages that are of interest without knowing if there are any publishers.
This decoupling of publishers and subscribers allows for greater scalability.
Redis Pub/Sub
We will be using Redis for pub/sub, however, there are various alternatives including Apache Kafka and Google cloud Pub/Sub.
In order to subscribe to channels, for example, foo and bar, the client uses SUBSCRIBE and provides the names of the channels:

Messages sent by other clients to these channels will be pushed by Redis to all of the subscribed clients.
Once we have a Redis client subscribed to a channel, that client can no longer execute any other operations besides unsubscribing from the current channel and subscribing to more channels.
Go-Redis Publisher
Go-redis allows users to publish messages and subscribe to channels. It also automatically re-connects to the Redis Server when there is a network error.
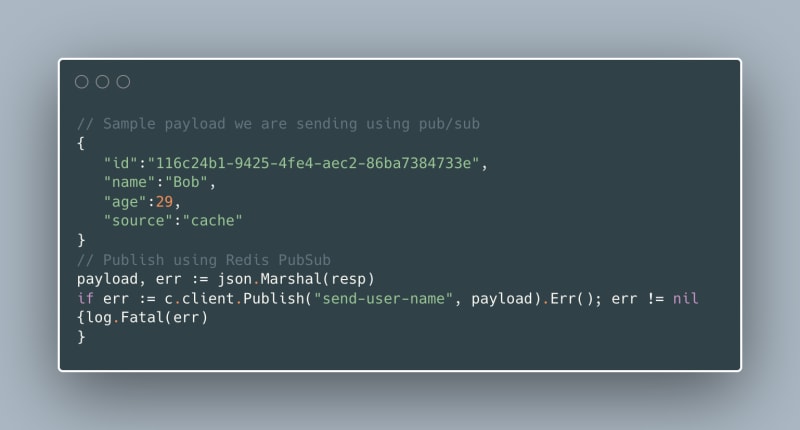
Inside our get user function, we will create a publisher using redis.Publish(). This function takes two arguments: the name of the channel to which we want to send the message and the message.
In our case, we set the channel name to send-user-name and the payload is the response from redis.GetUser (see above).
We are sending the marshaled payload to the channel using Publish because it allows us to transfer the data as []byte. Since we are using a User struct, it can be encoded into a []byte.
Go-Redis Subscriber
We create a subscriber using the redis.Subscribe() function.
We will have one argument: the channel we want to subscribe to. In our case, this is send-user-name.
Subscribe subscribes the client to the specified channels. Since this method does not wait for a response from Redis, the subscription may not be active immediately.
We create a new file that connects to the same Redis instance and calls the following:

The result of the subscribe is a Pub/Sub, and we extract the channel property out of this object.
This Channel returns a Go channel for concurrently receiving messages. If the channel is full for 30 seconds, then the message is dropped.
We loop over the channel and extract the data from it, which is of the type Message. Each message object comprises three arguments:
-
Channel: The channel name -
Payload: The marshaled data received in the channel -
Pattern: The pattern for the message
The data received inside the message can be fetched using msg.Payload. Since it is marshaled, we will unmarshal it using UnmarshalBinary and transform it back into a User struct.
Finally, we can access the struct properties and print inside the console. We can also print the message’s channel name just for fun!
![]()
Here, we get the message, “Received message from send-user-name” and the user details for Bob.
Calling APIs using React
In the above section, we created and hosted APIs locally using Gorilla Mux. We will now consume these APIs from the front end using React.
We’ll be using Axios to call the APIs for which we previously discussed Redis caching. Let’s install this dependency by running the following command:

Axios is a lightweight HTTP client which makes calling requests very intuitive. It is similar to the JavaScript Fetch API. It works well with JSON data and does the heavy lifting of setting the request headers. Axios handles errors well when accessing the response and integrates well with async-await syntax, plus it can be used on the server as well as the client.
Integrate with React
We will be using the hooks useEffect and useState. A React hook is a special function that lets you “hook into” React features.
useEffect
Using this hook, we can inform React that our components need to do something after rendering. By default, useEffect runs after each render of the component where it’s called. A common use of this hook is to fetch and display data.
React remembers the function you passed and invokes it after the DOM updates.
Note: We have an empty array at the end of the useEffect hook to make sure that the internal function inside renders only once.
If we want our effects to run less often, we provide the second argument (which is an array of values). These can be considered the dependencies for the effect, and if there are any changes since the last time the effect was run, the effect runs again.
useState
This is a way of adding a state to components and preserving some values between function calls. In general, variables “disappear” when the function exits, but state variables are preserved by React. This state can be an array, object, number, boolean, etc. The argument passed to useState() is the initial state.

To make a GET request using Axios, we use the .get() method. The response is returned as an object.
We use the .data property from the response to get the requested data and set it inside the hook using setFetchedData.
Request Responses
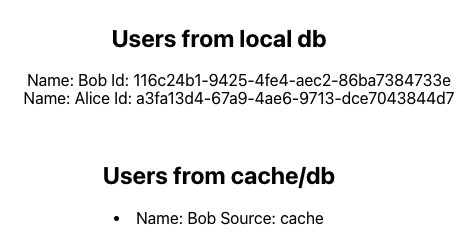
When the page loads for the first time, the API hits our backend. The resulting fetchedData is then displayed on the page.
Notice that the source is the API.

On the next request, the API hits our cache, displayed with source: cache
Conclusion
In this article, we used a postgres database to store users’ data. We created endpoints using Gorilla Mux, and on top of those endpoints, we integrated Redis caching into the API response from a React application. Remember that Redis is a powerful tool and what we covered is just the tip of the iceberg. For more information, consider reading the docs at redis.io. You can also follow along with this article by watching this YouTube tutorial.

Top comments (0)