
Did you know that Android holds 72.11% of the global market share making it the leading operating system worldwide?
With so many people using Android devices, your app must be relevant to them if you want to go global. The best way to do this is through Android localization of your app—the majority of the world doesn't speak English, so users prefer applications that display text, numbers, currency, etc. according to their region.
A lot of developer tools are available in Android Studio to implement app localization. But this can turn complex as you need to rack up in-house resources and teams capable of building and managing localization from scratch.
This tutorial shows you how to localize your Android app by using Transifex.
Transifex is a localization management tool that you can use to upload, manage, and translate all of your content. And you can do that with one of two ways:
- File-based
- Fileless with automatic push & pull requests
Here is how to do it with both methods!
What Is Android Localization?
Localization (l10n) is how your product or app translates and adapts itself to the specific needs of a locale.
Android localization deals with this process by adjusting various elements of your app including text strings, numbers, audio files, and image formats, to suit the user experience.
But before you step into localization, it is important to internationalize (il8n) your application elements. Ensure that your text resources are not hardcoded to remove any language dependencies, enabling smooth localization for different target audiences.
Android Localization: Getting Started
The first step is to create a Transifex account—sign up, which is free for 15 days, or free forever if you are using the open-source version.
After the account creation, you will be asked to create a project. Alternatively, you can also explore their demo project to get an overview of how the platform works.
On the next page, choose your project name and type. You can either opt for ‘File Based’ or ‘Native’ as your project type.
Choose the main language of your application and the target language that you will be translating the content to. Here, we are choosing English and French as references.
Once you are done, click on ‘Create Project’

File-Based Android Localization
This app localization method includes a pretty straight-forward approach:
- You upload the source files to Transifex.
- The files are translated according to the target language file.
- The translated files are downloaded and moved back to the project.
Android uses an XML-based file format for localization with three types of entries: strings, string-array, and plurals.
Upload A Source File
Once you are inside your project dashboard, select the project you want to create a translation for.
In case there aren’t any existing resources, drag and drop your file or click on ‘Upload a File’.

Select your file, edit the resource name, and choose the file format. Once done, hit on ‘Upload File’.

If your project already has resources, click on ‘Resources’ from the navigation menu. On the next page, select ‘Add Resources’ to upload the source file.
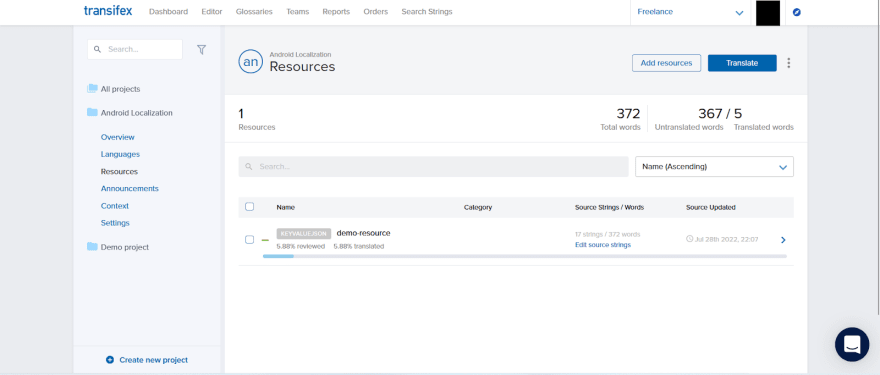
Drag and drop your file or click on ‘Select Resources’ to import it.

Change the name of the resource and choose the file format. Once done, click on ‘Upload File’.

Upload A Translation File
If you already have translations done outside of Transifex, you can import them into the platform. In this case, any existing translations will be overwritten with the ones from the uploaded file.
From the project dashboard, click on the project you want to add the translations to.
Click on ‘Resources’
Click on the source file you would like to add translations for
Click on the target translation language
When the popup appears, click on ‘Upload File’ or ‘Upload XLIFF file’.

Use Upload File when the translation file is of the same format as the source file. If your translation file is downloaded earlier from Transifex as an XLIFF and you want to upload it again, use Upload XLIFF File.
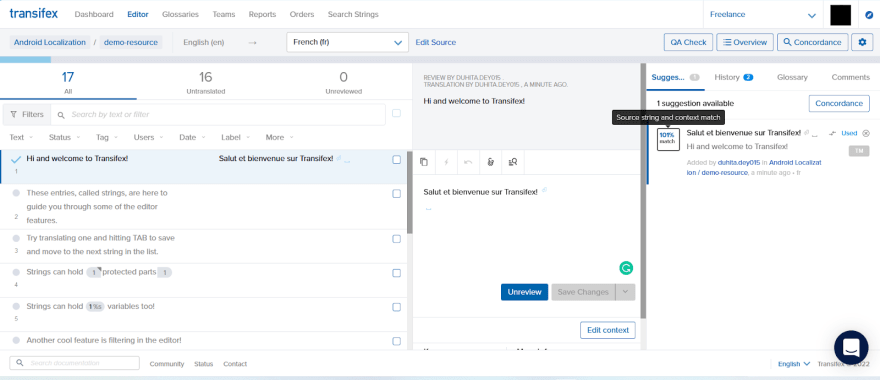
Use The Editor
Translators can use Transifex's inbuilt editor to work on content without having to worry about handling files. It can be accessed from any web browser, and multiple people can translate the same document simultaneously.
After you have uploaded your source file, select it and click on ‘Translate’. On the next page, you can view the source strings on the left and an editor for translation.
The strings can be edited manually or via machine translation (Google Translate, Microsoft Translator, Amazon Translate, DeepL Translate, or KantanMT). Machine translation is not generally recommended but can be helpful in certain cases, for example, if you are dealing with a lot of non-customer-facing content.
Use the editor to enter the translations for the specific strings and click on "Save Translation." Once done, review it to make any additional changes and save it.
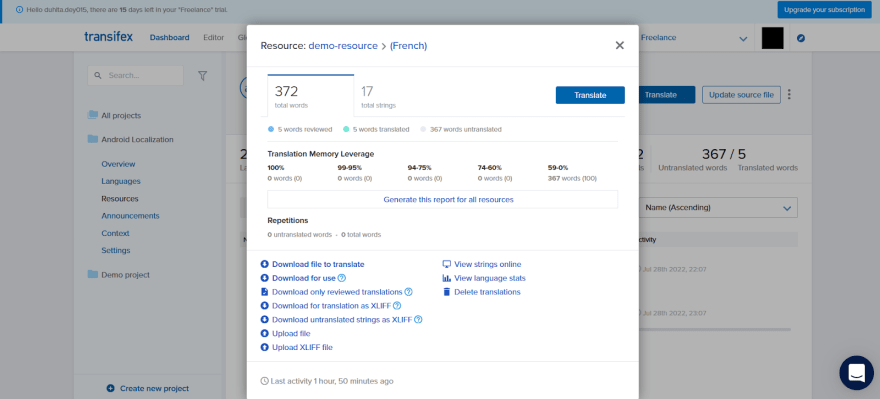
Download the Translated File
After the translations are done, it’s time to download the file.
From the project navigation menu, choose the project you are working on.
Select ‘Resources’ link and click on the resource that has been translated.
Select the target language for translation.
In the popup, click on ‘Download for use". It gives you only translated strings in the file. In case you want only reviewed strings, hit 'Download only reviewed translations'. .Use 'Downloaded file to translate’ if you want to get untranslated source strings show a blank translation field. To translate outside Transifex, select ‘Download for translation as XLIFF’.
While this is a great approach for developers looking to handle the entire situation manually, complexity may rise when new strings are added or translations have to be updated. Also, having multiple developers handle translations manually doesn’t seem to be the best way to manage large-scale data.
If you are someone who doesn’t like the idea of manual processes, you can easily implement Android localization in your app by integrating Transifex Native.
Android Localization: The Fileless Solution
If you don't want to bother with the whole process of the file-based method, Android Localization with Transifex Native only requires you to install the provided SDK to your app and you are ready to push or pull content for localization directly with Transifex, with no need for files.
With Native SDK, localization is done parallelly when any new code is released to your application.
Use these steps to install the Transifex SDK in your application and get started with your Android localization:
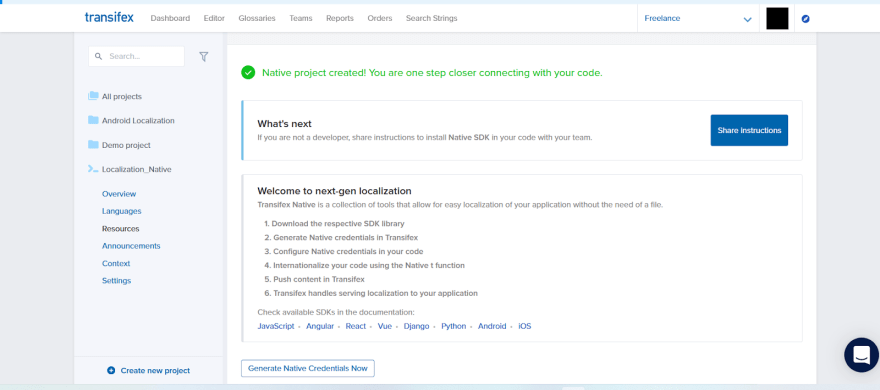
Create Transifex Native Project
To get started, you will need to head to Transifex create an account, if you don't have one already, and create a native project. Then select ‘Create a new project’ and choose the type as Transifex Native.
On the next page, you will find the dashboard where you are asked to share certain instructions with your developer team. You will also find ‘Generate Native Credentials Now’ at the bottom of the screen.
Generating Native Credentials
The Native credentials—TOKEN and SECRET are used in all the data exchanges between the Transifex Native and your application.
API TOKEN – It reads (GET) content from Transifex Native into your app.
API SECRET – It sends (POST) content from your application to Transifex Native for localization.
Generate the credentials and keep a copy for all future cases. Once created, you can manage them from the resources link.
Setup Android SDK
The Android Native SDK requires 18 (Android 4.3) or higher and uses appcompat 1.2.0.
Include the SDK as a package dependency, implementation **'com.transifex.txnative:txsdk:0.x.y'** and replace ‘x’ and ‘y’ with the latest version numbers
Configure the SDK in your Application class and replace the with the one provided in your Transifex Native project.
You will need to replace in your code with the languages you want your app to display.
Here’s a configuration example:

Internationalize Your Code
On top of the existing string resource-related methods, like getString() and getText(), the SDK offers Transifex Native's OTA translation capabilities.
To use the SDK in multiple areas of your code, refer to this documentation here.
Push Source Content To The Content Delivery Service
Use the CLI tool for exporting the strings from your app to Transifex for localization.
To run the CLI tool, replace /path/to/ with the folder you added the tool in, as seen below.
![]()
Replace app_module_name with the name of your module that refers to the strings.xml file containing your source content.
Use the push command of the command-line tool to provide the transifex_token and transifex_secret that you created in your project.
![]()
Pull The Localized Content
You can export the translated content to your code with the pull command from the command-line tool.
Replace the with your app module’s name, with your Native Project token, and with the target languages for translations.
![]()
If there are no cached translations found, by default, the Android Native SDK uses the existing strings.xml file and translations already cached in the app.
Use the command fetchTranslations() to get the latest translations for all locales in your app. These will be available the next time your app runs.
Note: Native performs CDS cache invalidation automatically.
Conclusion
Whether you choose the file-based format or Transifex Native to work with, following these steps will let you easily perform translations for your Android app.
While the file-based format is a more manual approach for your localization where teams are in charge of all exports and imports of content to and from your project code, Transifex Native provides a simpler way to integrate the platform with your application.
The simple UI and dashboard ensure your teammates are collaborating perfectly at all steps even if they are non-developers.
So invite your team or even crowdsource your translations if you are an open-source project looking to engage with your community.

Top comments (0)