Running Node.js in Docker for local development
You don’t need to know Docker to benefit from running local dev Node.js buildchains & apps inside of Docker containers. You get easy onboarding, and less hassle.
Andrew Welch / nystudio107
Devops folks who use Docker often have no desire to use JavaScript, and JavaScript developers often have no desire to do devops.
However, Node.js + Docker really is a match made in heaven.
You don’t have to learn Docker in depth to reap the benefits from using it.
Whether you’re just using Node.js as a way to run a buildchain to generate frontend assets that uses Grunt / Gulp / Mix / webpack / NPM scripts, or you’re developing full blown Node.js apps, you can benefit from running Node.js in Docker.
In this article, we’ll show you how you can utilize Docker to run your Node.js buildchains & apps & in local dev without needing to know a whole lot about how Docker works.
We’ll be running Node.js on-demand in Docker containers that run in local dev only when you’re or building assets with your buildchain or developing your application.
All you’ll need to have installed is Docker itself.
If you’re the TL;DR type, you can check out the example project we used eleventy-blog-base feature/docker branch, and look at the master..feature/docker diff.
Why in the world would I use Docker?
I think this tweet from Adam Wathan is a perfect example of why you would want to use Docker:
Adam’s certainly not alone, this type of “dependency hell” is something that most developers have descended down into at some point or another.

And having one global install for your entire development environment only gets worse from here:
- Updating a dependency like the Node.js version for one app may break other apps
- You end up using the oldest possible version of everything to keep the teetering development environment running
- Trying new technologies is costly, because your whole development environment is at risk
- Updating operating system versions often means putting aside a day (or more) to rebuild your development environment
- Getting a new computer similarly means putting aside a day (or more) to rebuild your development environment
Instead of having one monolithic local development environment, using Docker adds a layer of containerization that gives each app you are working on exactly what it needs to run.
Is it quicker to just start installing stuff via Homebrew on your computer? Sure.
But people often confuse getting started quickly with speed. What matters more is the speed (and sanity) with which you finish.
So let’s give Docker a whirl.
Docker setup overview
We’re not going to teach you the ins and outs of Docker here; if you want that, check out the An Annotated Docker Config for Frontend Web Development article.
I also highly recommend the Docker Mastery course (if it’s not on sale now, don’t worry, it will be at some point).
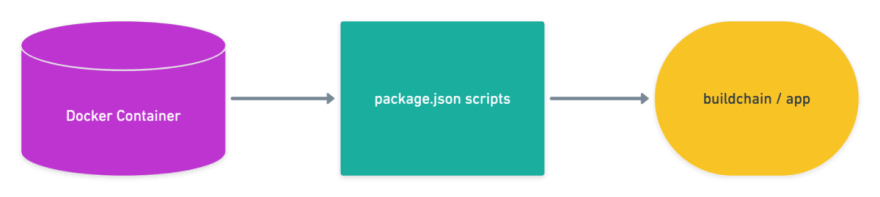
Instead, we’re just going to put Docker to work for us. Here’s an overview of how this is going to work:

We’re using make with a Makefile to provide a nice easy way to type our terminal commands (yes, Virginia, dependency managing build systems have been around since 1976).
Then we’re also using a Dockerfile that contains the information needed to build & run our Docker container.
We then leverage NPM scripts in the scripts section of our package.json to run our buildchain / application:
So we’ll type something like:
make npm build
And it will spin up our Node.js Docker container, and run the build script that’s in the scripts section of our package.json.
Since we can put whatever we want in the scripts section of our package.json, we can run whatever we want.
So let’s have a look at how this all works in detail.
Docker setup detail
So as to have a real-world example, what we’re going to do is create a Docker container that builds a website using the popular 11ty static site generator.
So what we’ll do is make a clone of the eleventy-base-blog repo:
git clone https://github.com/11ty/eleventy-base-blog
Then we’ll make just one change to the package.json that comes from the repository, adding an install npm script:
{
  "name": "eleventy-base-blog",
  "version": "5.0.2",
  "description": "A starter repository for a blog web site using the Eleventy static site generator.",
  "scripts": {
    "install": "npm install",
    "build": "eleventy",
    "watch": "eleventy --watch",
    "serve": "eleventy --serve",
    "start": "eleventy --serve",
    "debug": "DEBUG=* eleventy"
  },
MAKEFILE
Next we’ll create a Makefile in the project directory that looks like this:
TAG?=12-alpine

docker:
    docker build \
        . \
        -t nystudio107/node:${TAG} \
        --build-arg TAG=${TAG} \
        --no-cache
npm:
    docker container run \
        --name 11ty \
        --rm \
        -t \
        -p 8080:8080 \
        -p 3001:3001 \
        -v `pwd`:/app \
        nystudio107/node:${TAG} \
        $(filter-out $@,$(MAKECMDGOALS))
%:
    @:
# ref: https://stackoverflow.com/questions/6273608/how-to-pass-argument-to-makefile-from-command-line
The way make works is that if you type make, it looks for a Makefile in the current directory for the recipe to make. In our case, we’re just using it as a convenient way to create aliases that are local to a specific project.
So we can use make as a shortcut to run much more complicated commands that aren’t fun to type:
- make docker — this will build our Node.js Docker image for us. You need to build a Docker image from a Dockerfile before you can run it as a container
- make npm xxx — once built, this will run our Docker container, and execute the NPM script named xxx as listed in the package.json. For instance, make npm build will run the build script
The TAG?=12-alpine line provides a default Node.js tag to use when building the image, with the number part of it being the Node.js version (“alpine” is just a very slimmed down Linux distro).
If we wanted, say, Node.js 14, we could just change that to be TAG?=14-alpine and do a make docker or we could pass it in via the command line for a quick temporary change: make docker TAG=14.alpine
While it’s not important that you learn the syntax of make, let’s have a look at the two commands we have in our Makefile.
The </kbd> you see in the Makefile is just a way to allow you to continue a shell command on the next line, for readability reasons.
-
docker: # the command alias, so we run it via make docker
- docker build </kbd> # Build a Docker container from a Dockerfile
- . </kbd> # …in the current directory
- -t nystudio107/node:${TAG} </kbd> # tag the image with nystudio107/node:12-alpine (or whatever ${TAG} is)
- --build-arg TAG=${TAG} </kbd> # pass in our ${TAG} variable as an argument to the Dockerfile
- --no-cache # Do not use cache when building the image
-
npm: # the command alias, so we run it via make npm xxx, where xxx is the npm script to run
- docker container run </kbd> # Run a Docker container from an image
- --name 11ty </kbd> # name the container instance “11ty”
- --rm </kbd> # remove the container when it exits
- -t </kbd> # provide a terminal, so we can have pretty colored text
- -p 8080:8080 </kbd> # map port 8080 from inside of the container to port 8080 to serve our hot reloaded files from http://localhost:8080
- -p 3001:3001 </kbd> # map port 3001 from inside of the container to port 3001 to serve the BrowserSync UI from http://localhost:3001
- -v
pwd:/app </kbd> # mount a volume from the current working directory to /app inside of the Docker container - nystudio107/node:${TAG} </kbd> # use the Docker image tagged with nystudio107/node:12-alpine (or whatever ${TAG} is)
- $(filter-out $@,$(MAKECMDGOALS)) # a fancy way to pass any additional arguments from the command line down to Docker
We do the port mapping to allow 11ty’s hot reloading to work during development.
DOCKERFILE
Now we’ll create a Dockerfile in the project root directory:
ARG TAG=12-alpine
FROM node:$TAG

WORKDIR /app

CMD ["build"]

ENTRYPOINT ["npm", "run"]
Our Dockerfile is pretty small, but let’s break down what it’s doing:
ARG TAG=12-alpine — Set the build argument TAG to default to 12-alpine. If a --build-arg is provided, it’ll override this so you can specify other Node.js version
FROM node:$TAG — Designate which base image our container will be built from
WORKDIR /app — Set the directory where the commands in the Dockerfile are run to /app
CMD ["build"] — Set the default command to build
ENTRYPOINT ["npm", "run"] — When the container is spun up, it’ll execute npm run xxx where xxx is an argument passed in via the command line, or it’ll fall back on the default build command
Taking Docker for a spin
So let’s take Docker for a spin on this project. First we’ll make sure we’re in the project root directory, and build our Docker container with make docker:
❯ make docker
docker build \
        . \
        -t nystudio107/node:12-alpine \
        --build-arg TAG=12-alpine \
        --no-cache
Sending build context to Docker daemon 438.8kB
Step 1/5 : ARG TAG=12-alpine
Step 2/5 : FROM node:$TAG
 ---> 18f4bc975732
Step 3/5 : WORKDIR /app
 ---> Running in 6f5191fe0128
Removing intermediate container 6f5191fe0128
 ---> 29e9346463f9
Step 4/5 : CMD ["build"]
 ---> Running in 38fb3db1e3a3
Removing intermediate container 38fb3db1e3a3
 ---> 22806cd1f11e
Step 5/5 : ENTRYPOINT ["npm", "run"]
 ---> Running in cea25ee21477
Removing intermediate container cea25ee21477
 ---> 29758f87c56c
Successfully built 29758f87c56c
Successfully tagged nystudio107/node:12-alpine
Next let’s execute the install script we added to our package.json via make npm install. This runs an npm install, which we only need to do once to get our node_module dependencies installed:
❯ make npm install
docker container run \
        --name 11ty \
        --rm \
        -t \
        -p 8080:8080 \
        -p 3001:3001 \
        -v `pwd`:/app \
        nystudio107/node:12-alpine \
        install

> eleventy-base-blog@5.0.2 install /app
> npm install

npm WARN deprecated core-js@2.6.11: core-js@<3 is no longer maintained and not recommended for usage due to the number of issues. Please, upgrade your dependencies to the actual version of core-js@3.

> core-js@2.6.11 postinstall /app/node_modules/core-js
> node -e "try{require('./postinstall')}catch(e){}"

> ejs@2.7.4 postinstall /app/node_modules/ejs
> node ./postinstall.js

Thank you for installing EJS: built with the Jake JavaScript build tool (https://jakejs.com/)

npm WARN lifecycle eleventy-base-blog@5.0.2~install: cannot run in wd eleventy-base-blog@5.0.2 npm install (wd=/app)
npm notice created a lockfile as package-lock.json. You should commit this file.
npm WARN optional SKIPPING OPTIONAL DEPENDENCY: fsevents@~2.1.2 (node_modules/chokidar/node_modules/fsevents):
npm WARN notsup SKIPPING OPTIONAL DEPENDENCY: Unsupported platform for fsevents@2.1.3: wanted {"os":"darwin","arch":"any"} (current: {"os":"linux","arch":"x64"})

added 437 packages from 397 contributors and audited 439 packages in 30.004s

15 packages are looking for funding
  run `npm fund` for details

found 0 vulnerabilities
Finally, let’s fire up a hot reloading development server, and build our site via make npm serve. This is the only step you’ll normally need to do in order to work on your site:
❯ make npm serve
docker container run \
        --name 11ty \
        --rm \
        -t \
        -p 8080:8080 \
        -p 3001:3001 \
        -v `pwd`:/app \
        nystudio107/node:12-alpine \
        serve

> eleventy-base-blog@5.0.2 serve /app
> eleventy --serve

Writing _site/feed/feed.xml from ./feed/feed.njk.
Writing _site/sitemap.xml from ./sitemap.xml.njk.
Writing _site/feed/.htaccess from ./feed/htaccess.njk.
Writing _site/feed/feed.json from ./feed/json.njk.
Writing _site/posts/fourthpost/index.html from ./posts/fourthpost.md.
Writing _site/posts/thirdpost/index.html from ./posts/thirdpost.md.
Writing _site/posts/firstpost/index.html from ./posts/firstpost.md.
Writing _site/404.html from ./404.md.
Writing _site/posts/index.html from ./archive.njk.
Writing _site/posts/secondpost/index.html from ./posts/secondpost.md.
Writing _site/page-list/index.html from ./page-list.njk.
Writing _site/tags/second-tag/index.html from ./tags.njk.
Writing _site/index.html from ./index.njk.
Writing _site/tags/index.html from ./tags-list.njk.
Writing _site/about/index.html from ./about/index.md.
Writing _site/tags/another-tag/index.html from ./tags.njk.
Writing _site/tags/number-2/index.html from ./tags.njk.
Copied 3 files / Wrote 17 files in 0.74 seconds (43.5ms each, v0.11.0)
Watching…
[Browsersync] Access URLs:
 -----------------------------------
       Local: http://localhost:8080
    External: http://172.17.0.2:8080
 -----------------------------------
          UI: http://localhost:3001
 UI External: http://localhost:3001
 -----------------------------------
[Browsersync] Serving files from: _site
We can just point our web browser at http://localhost:8080 and we’ll see our website up and running:

If we make any changes, they’ll automatically be hot reloaded in the browser, so away we go!
Realize that with the Makefile and Dockerfile in place, we can hand our project off to someone else and onboarding becomes bliss:
- We won’t need to care what version of Node.js they have installed
- They don’t even have to have Node.js installed at all, in fact
Additionally, we can come back to the project at any time and:
- The project is guaranteed to work, since the devops needed to run it is “shrink wrapped” around it
- We can easily switch Node.js versions without affecting anything else
No more nvm. No more n. No more hassles switching Node.js versions.
Containerization as a way forward
Next time you have the opportunity to start fresh with a new computer or a new operating system, consider taking it.
Don’t install Homebrew.
Don’t install Node.js.
Don’t install dozens of packages.
Instead, take the containerization challenge and just install Docker, and run everything you need from containers
I think you may be pleasantly surprised at how it’ll make your life easier.
Further Reading
If you want to be notified about new articles, follow nystudio107 on Twitter.
Copyright ©2020 nystudio107. Designed by nystudio107

Top comments (1)
Really interesting article. I can't believe it received so little love.