Writing a smart contract can be a daunting task for beginners, but with the right tools and guidance, it can be made simple. In this tutorial, we will walk through how to write a basic smart contract, deploy it on the Celo testnet, and create a decentralized application (dApp) to interact with the contract.
Prerequisites:
Basic programming concepts and JavaScript proficiency
Node.js installed on your computer
Command line experience
Celo wallet set up to obtain testnet tokens
Familiarity with Vue.js and TypeScript
Step 1: Initialize and Install Hardhat Project
The first step is to initialize and install a Hardhat project, which is a development environment for building and testing smart contracts on Ethereum and other EVM-compatible blockchains. To do this, you can follow the official Hardhat documentation to install it on your machine.
Step 2: Write the Smart Contract Once you have set up your Hardhat project, you can start writing your smart contract. For this tutorial, we will create a basic contract called "HelloWorld.sol" that has two public variables: text and name. The user can set the text they want and also set their name on the contract.
To create the contract, you can create a new file called "HelloWorld.sol" in the contracts folder of your Hardhat project and add the following code:
pragma solidity ^0.8.0;

contract HelloWorld {
  string public text;
  string public name;

  function setText(string memory _text) public {
    text = _text;
  }

  function setName(string memory _name) public {
    name = _name;
  }
}
This contract has two public variables, text and name, and two public functions, setText and setName, which allow the user to set the values of the variables.
Step 3: Deploy the Contract on the Celo Testnet
After writing the smart contract, the next step is to deploy it on the Celo testnet. To do this, you can follow the official Celo documentation to set up your Celo account and connect it to your Hardhat project:
hardhatconfig.ts
mport { HardhatUserConfig } from "hardhat/config";
import "@nomicfoundation/hardhat-toolbox";
import * as dotenv from 'dotenv'
dotenv.config();

const PRIVATE_KEY = process.env.PRIVATE_KEY

const config: HardhatUserConfig = {
  solidity: "0.8.17",
  networks:{
    alfajores: {
      url: `https://alfajores-forno.celo-testnet.org`,
      accounts: [PRIVATE_KEY]
    },
  }
};

export default config;
Once you have connected your Celo account to your Hardhat project, you can deploy your contract to the Alfojores Celo network by running the following command in your terminal:
npx hardhat run --network alfajores scripts/deploy.js
This command will deploy your contract to the Alfojores Celo network and give you the address of the deployed contract(make sure to copy and save the contract address).
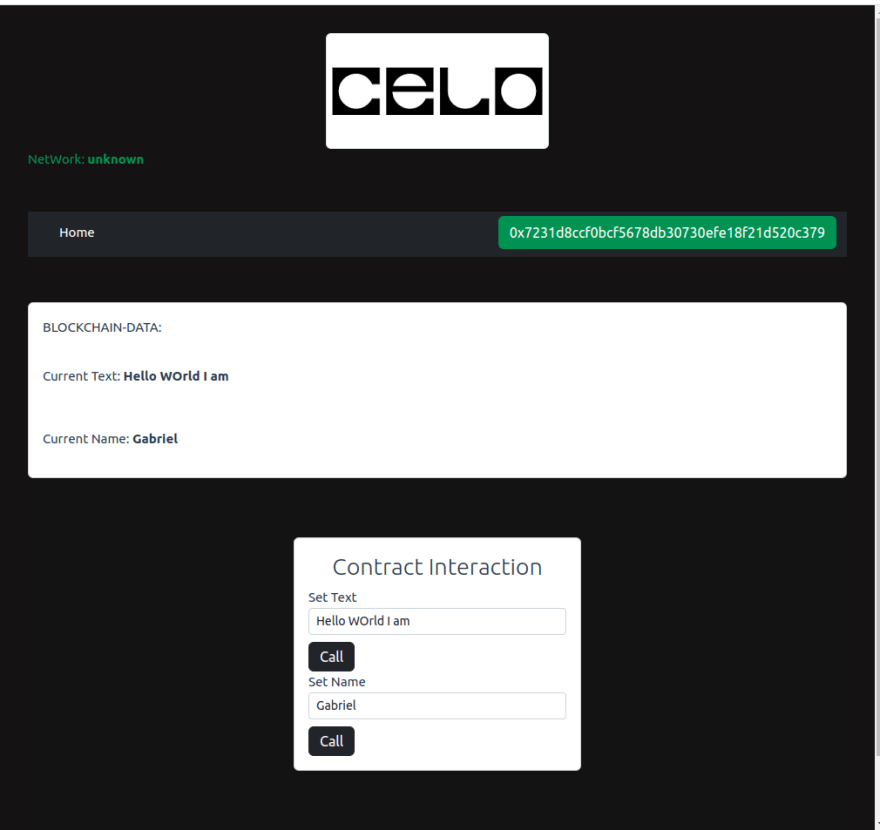
**Step 4: **Create the dApp for Contract Interaction
The final step is to create a dApp for interacting with the deployed smart contract. For this tutorial, we will create a simple dApp using Vue 3 and TypeScript.
To create the dApp, you can follow the official Vue documentation to set up a new Vue project with TypeScript.
Use this command to Quick start a Vue 3 Appliction
npm create vue@latest
//select Typescript--useRouter--piniaStore--Eslint--Preetier
npm install bootstrap ethers
After Initiating you Vue application, navigate to src/main.ts to add bootstrap
import 'bootstrap/dist/css/bootstrap.min.css'
*Step 5: * Navigate to src/views/HomeView.vue replace the code below:
<script setup lang="ts">
import { onMounted, reactive, ref, watchEffect } from 'vue'
import { ethers } from 'ethers'
import * as HelloWorldABI from '../contract/HelloWorld.json'

const { ethereum } = window
const contractAddress = '0xF112ba99A3586Ac4b5dA4148c0a03ADD2C6BFA0a'

const setAddress = reactive({
  address: ''
})
const setTexts = reactive({
  setText: '',
  setName: ''
})

const getTexts = reactive({
  getText: '',
  getName: ''
})

const networName = reactive({
  network: ''
})

let connected = ref(false)
onMounted(() => {
  if (!ethereum) {
    connected.value = false
    alert('Make sure you have MetaMask Connected!')
    return
  }
  watchEffect(() => {
    getCurrentText()
    getCurrentName()
  })
})

//connect your Metamask wallet on connect button click
const connectWallet = async () => {
  try {
    // Check if MetaMask is installed
    if (!ethereum) {
      alert('Make sure you have MetaMask Connected!')
      return
    }

    // Get user Metamask Ethereum wallet address
    const accounts = await ethereum.request({
      method: 'eth_requestAccounts'
    })
    setAddress.address = accounts[0]
    const provider = new ethers.providers.Web3Provider(ethereum)
    const network = await provider.getNetwork()
    networName.network = network.name

    console.log(accounts[0])
    connected.value = true
  } catch (error) {
    console.log(error)
  }
}
const getCurrentText = async () => {
  try {
    // Check if User already connected a wallet
    if (ethereum) {
      const provider = new ethers.providers.Web3Provider(ethereum)
      const signer = provider.getSigner()

      // Create a contract object
      const contractInstance = new ethers.Contract(contractAddress, HelloWorldABI.abi, signer)

      let text = await contractInstance.getText()
      getTexts.getText = text
    }
  } catch (error) {
    console.log(error)
  }
}
const getCurrentName = async () => {
  try {
    // Check if User already connected a wallet
    if (ethereum) {
      const provider = new ethers.providers.Web3Provider(ethereum)
      const signer = provider.getSigner()
      // Create a contract object
      const contractInstance = new ethers.Contract(contractAddress, HelloWorldABI.abi, signer)
      let text = await contractInstance.getName()
      getTexts.getName = text
    }
  } catch (error) {
    console.log(error)
  }
}
const setText = async () => {
  try {
    // Check if User already connected a wallet
    if (ethereum) {
      const provider = new ethers.providers.Web3Provider(ethereum)
      const signer = provider.getSigner()

      // Create a contract object
      const contractInstance = new ethers.Contract(contractAddress, HelloWorldABI.abi, signer)

      const setText = await contractInstance.setText(setTexts.setText)
      // Wait for the transaction to be mined
      await setText.wait()
      watchEffect(() => {
        getCurrentText()
        getCurrentName()
      })
      // Display a success message to the user
      alert('Txn successful!')
    }
  } catch (error) {
    console.log(error)
  }
}

const setName = async () => {
  try {
    // Check if User already connected a wallet
    if (ethereum) {
      const provider = new ethers.providers.Web3Provider(ethereum)
      const signer = provider.getSigner()

      // Create a contract object
      const contractInstance = new ethers.Contract(contractAddress, HelloWorldABI.abi, signer)

      const setName = await contractInstance.setName(setTexts.setName)
      // Wait for the transaction to be mined
      await setName.wait()
      // Display a success message to the user
      alert('Txn successful!')
      watchEffect(() => {
        getCurrentText()
        getCurrentName()
      })
    }
  } catch (error) {
    console.log(error)
  }
}
</script>

<template>
  <main>
    <div class="text-center">
      <img class="text-center img-thumbnail" src="../assets/celo.png" alt="" />
    </div>
    <div class="text-success textcenter">
      NetWork: <strong>{{ networName.network }}</strong>
    </div>
    <nav class="navbar navbar-expand-lg navbar-dark bg-dark mt-5 pt-1 mb-1">
      <div class="container-fluid">
        <a class="navbar-brand" href="#"></a>
        <button
          class="navbar-toggler"
          type="button"
          data-bs-toggle="collapse"
          data-bs-target="#navbarSupportedContent"
          aria-controls="navbarSupportedContent"
          aria-expanded="false"
          aria-label="Toggle navigation"
        >
          <span class="navbar-toggler-icon"></span>
        </button>
        <div class="collapse navbar-collapse" id="navbarSupportedContent">
          <ul class="navbar-nav me-auto mb-2 mb-lg-0">
            <li class="nav-item">
              <a class="nav-link active" aria-current="page" href="#">Home</a>
            </li>
          </ul>

          <button v-if="!connected" @click="connectWallet" class="btn btn-outline-success">
            Connect Wallet
          </button>
          <button v-else class="btn btn-success">{{ setAddress.address }}</button>
        </div>
      </div>
    </nav>
  </main>

  <div class="py-5">
    <div class="card">
      <label class="card-body" for="">BLOCKCHAIN-DATA: </label>
      <p class="card-body">
        Current Text: <strong> {{ getTexts.getText }}</strong>
      </p>
      <p class="card-body">
        Current Name: <strong> {{ getTexts.getName }}</strong>
      </p>
    </div>

    <div class="py-5 global-container">
      <div class="card login-form">
        <div class="card-body">
          <h3 class="card-title text-center">Contract Interaction</h3>
          <div class="card-text">
            <form>
              <div class="form-group">
                <label for="exampleInputEmail1">Set Text</label>
                <input
                  v-model="setTexts.setText"
                  type="text"
                  class="form-control form-control-sm"
                />
                <button @click.prevent="setText" class="btn btn-dark py-1 mt-2">Call</button>
              </div>
              <div class="form-group">
                <label for="exampleInputEmail1">Set Name</label>
                <input
                  v-model="setTexts.setName"
                  type="text"
                  class="form-control form-control-sm"
                />
                <button @click.prevent="setName" class="btn btn-dark py-1 mt-2">Call</button>
              </div>
            </form>
          </div>
        </div>
      </div>
    </div>
  </div>
</template>
<style>
.global-container {
  height: 100%;
  display: flex;
  align-items: center;
  justify-content: center;
  background-color: #141313;
}

.form {
  padding-top: 10px;
  font-size: 14px;
  margin-top: 30px;
}

.card-title {
  font-weight: 300;
}

.login-form {
  width: 330px;
  margin: 20px;
}

.sign-up {
  text-align: center;
  padding: 20px 0 0;
}

.alert {
  margin-bottom: -30px;
  font-size: 13px;
  margin-top: 20px;
}
</style>
Edit the styling to the best of your Taste(src/assets/main.ts).
*Note: *
Change the smartContract address in src/views/HomeView.vue with the contract address you got from deploying the HelloWorld contract.
Copy the contract ABI(helloWorld.json) from the contract folder in step 1. then create a folder in your vue application(src/) named contract then paste the json file so you can import it to HomeView.vue for contract interaction.
*Summary of the functions: *
OnMounted() : To initiate a function call when the page reloads.
connectWallet(): To connect a user, using MetaMask.
getCurrentText(): To get the updated text from the contract we deployed earlier.
getCurrentName(): To get the name from the contract earlier deployed.
setText(): To send the transaction to the blockchain(celo Alfajores network) containing the text gotten from the form as an argument.
setName(): To send the transaction to the blockchain(celo Alfajores network) containig the name gotten from the form as an argument.
View the live project here

Top comments (0)