Previously, we used .NET Core to build a command line tool to add users to a FusionAuth user identity management system. In this tutorial, we’ll build out a web application with a protected page. We’ll use Razor Pages and have both login and logout happen against FusionAuth, using the Authorization Code grant.
Configuring FusionAuth
You should already have FusionAuth up and running. If you don’t, head over to the previous post “Creating a user in FusionAuth with a .NET Core CLI Client” for instructions on downloading and installing FusionAuth. You’ll also need to create the application. After that, if you want to skip building the CLI client, you can just create a user in the admin user interface.
We are going to make a few changes to the FusionAuth configuration to allow integration with the ASP.Net Core web application.
First, we’re going to create a new signing key. There’s a list of supported algorithms that work with the open source identity project we’re using, but currently symmetric algorithms are not supported–I love the honesty of the library maintainer: “Don’t use symmetric keys is the easy answer.” Using the default HMAC key resulted in a SecurityTokenSignatureKeyNotFoundException and there was no easy way to change the SignatureProvider. Luckily, FusionAuth supports different key types, so let’s generate an asymmetric key to use to sign our JSON Web Tokens (JWTs).
To generate the key, go to “Settings” then to “Key Master”. In the upper right hand corner, click on the dropdown next to “Import Public Key” and choose “Generate RSA”. Use a descriptive name like “For dotnetcore” and leave the rest of defaults and click “Submit”.

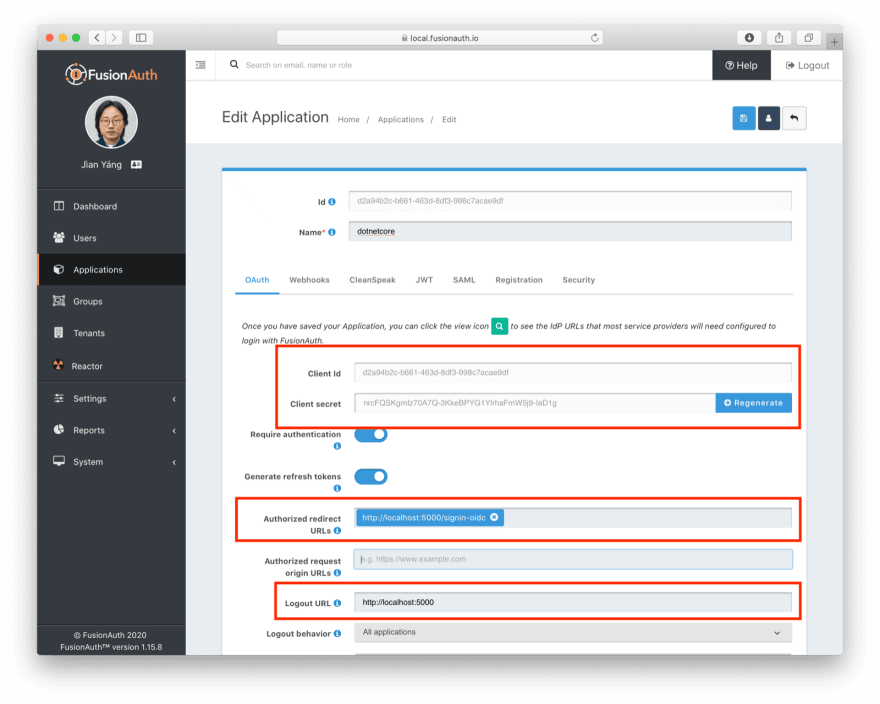
Next, we’ll be modifying the previously created “dotnetcore”’ application settings. Edit that application, then go to the OAuth tab. Make the following changes:
- Add an Authorized Redirect URL of
http://localhost:5000/signin-oidc. - Add a Logout URL of
http://localhost:5000.
The web application we are going to build is going to be on port 5000, and signin-oidc is an endpoint provided by the authentication library. We’re setting things up so that the Authorization Code grant will work. Write down the Client ID and Client Secret, as we’ll need that information later. When you are done configuring this section, the OAuth tab of your application should look like this:
Next, go to the JWT tab. We need to enable JSON Web Token signing and tell FusionAuth to use the previously generated RSA keypair. Update the “Access token signing key” and “Id token signing key” to point to that keypair. When you are done, the JWT tab should look like this:

Click the blue “Save” icon to save all the settings you just configured. We’re done with FusionAuth. (Unless you need to add a user, in which case, go to the “Users” section and add one. Make sure to add them to the “dotnetcore” application by creating the appropriate user registration.)
Set up a basic ASP.NET Razor Pages application
Now let’s start building our ASP.NET Core web application. We’ll use Razor Pages and ASP.NET Core 3.1. This application will display common information to all users. There will also be a secured area only available to an authenticated user. Good thing we have already added one! As usual, we have the full source code available if you want to download it and take a look.
First, let’s create a new web application using the dotnet CLI and go to that directory:
dotnet new webapp -o SampleApp
cd SampleApp
To see the results, we publish this application and run it. There are multiple ways of deploying an application, but I chose publishing to ensure my deployment process was repeatable. In this tutorial, I’ll be building a standalone Windows 64-bit executable, but with the same codebase you can also build a macOS or Linux program. Here’s the command to publish a standalone executable I could deploy behind a proxy like nginx:
dotnet publish -r win-x64
Then I start up the executable:
bin/Debug/netcoreapp3.1/win-x64/publish/SampleApp.exe
I can hit control-C to exit out of this application. I also like to open up a separate terminal so that I can edit source files (only applicable if you aren’t using Visual Studio or another editor). I also like to combine the publish and start up commands into one line (I run this is in a bash shell):
dotnet publish -r win-x64 && bin/Debug/netcoreapp3.1/win-x64/publish/SampleApp.exe
If I visit http://localhost:5000 I’m redirected to an https address and get a warning from my browser. While that might make sense in production, unless we terminated TLS before traffic gets to this application, we don’t need this behavior in development. To avoid this, simply remove app.UseHttpsRedirection(); from Startup.cs, which is the main configuration file for our web application.
We’ll also want to add a page to be secured, which we’ll aptly call “Secure”. Add Secure.cshtml and Secure.cshtml.cs to the SampleApp/Pages directory. Give them the following content:
Secure.html should look like his:
@page
@model SecureModel
@{
    ViewData["Title"] = "I'm full of secure data";
}
<h1>@ViewData["Title"]</h1>

<p>TBD</p>
Secure.html.cs should contain this code:
using System;
using System.Collections.Generic;
using System.Linq;
using System.Threading.Tasks;
using Microsoft.AspNetCore.Mvc;
using Microsoft.AspNetCore.Mvc.RazorPages;
using Microsoft.Extensions.Logging;

namespace SampleApp.Pages
{
    public class SecureModel : PageModel
    {
        private readonly ILogger<SecureModel> _logger;

        public SecureModel(ILogger<SecureModel> logger)
        {
            _logger = logger;
        }

        public void OnGet()
        {
        }
    }
}
Don’t forget to add a navigation element to Pages/Shared/_Layout.cshtml after “Privacy”:
...
<li class="nav-item">
<a class="nav-link text-dark" asp-area="" asp-page="/Secure">Secure</a>
</li>
...
Hit control-C to exit the application. Then republish it and start it up again. Visit http://localhost:5000 and view your new page: click on “Secure”.
If you are looking at the GitHub repository, you can see the application at this point by looking at the setup-application branch.
We’ve added a page, but it sure isn’t secure … yet. Let’s do that next.
Login
It’s always smart to leverage existing libraries as they are likely to be more secure and better handle edge cases. We’re going to add two new libraries to our application. Make sure you’re in the SampleApp directory and run these commands to add them.
dotnet add package Microsoft.AspNetCore.Authentication.OpenIdConnect
dotnet add package IdentityModel.AspNetCore -v 1.0.0-rc.4.1
You’ll note that unlike the command line tool, we aren’t using FusionAuth client packages. We’ll be protecting this page using standard OAuth and so there’s no need for any FusionAuth specific API calls. While I’ll be highlighting FusionAuth, you could run this code against any OAuth2 compliant server.
We specify version 1.0.0-rc.4.1 for the IdentityModel package because it hasn’t been released just yet. This package makes integrating with standards-based OAuth servers a snap, so we’ll overlook it being not quite released.
We need to protect our “Secure” page. We do this using the Authorize filter attribute on the backing class. From Secure.cshtml.cs:
// ...
namespace SampleApp.Pages
{
    [Authorize]
    public class SecureModel : PageModel
    {
// ...
We could also have added a RazorPagesOptions to our Startup.cs file, specifying which pages should be protected by an authorization call. This would be a good choice if we wanted everything centralized. Depending on the needs and size of your application, one of these choices might be better than the other.
// ...
services.AddRazorPages().AddRazorPagesOptions(options =>
                 {
                     options.Conventions.AuthorizePage("/Secure");
                 });
// ...
We’ll also display the claims contained in the JWT that FusionAuth creates upon authentication. Here Secure.cshtml iterates over the claims; update that file to include the text after and including Claims. A claim is essentially the information the authentication server has shared about a subject in the JWT.
@page
@using Microsoft.AspNetCore.Authentication
@model SecureModel
@{
    ViewData["Title"] = "I'm full of secure data";
}
<h1>@ViewData["Title"]</h1>

<h2>Claims</h2>

<dl>
    @foreach (var claim in User.Claims)
    {
        <dt>@claim.Type</dt>
        <dd>@claim.Value</dd>
    }
</dl>
We also need to set up some services to specify how this page is protected. Here’s the full Startup.cs code:
using System;
using System.Collections.Generic;
using System.Linq;
using System.Threading.Tasks;
using Microsoft.AspNetCore.Builder;
using Microsoft.AspNetCore.Hosting;
using Microsoft.AspNetCore.HttpsPolicy;
using Microsoft.Extensions.Configuration;
using Microsoft.Extensions.Hosting;
using Microsoft.AspNetCore.Authentication;
using Microsoft.Extensions.DependencyInjection;
using Microsoft.IdentityModel.Tokens;
using System.IdentityModel.Tokens.Jwt;
using Microsoft.IdentityModel.Logging;

namespace SampleApp
{
    public class Startup
    {
        public Startup(IConfiguration configuration)
        {
            Configuration = configuration;
        }

        public IConfiguration Configuration { get; }

        // This method gets called by the runtime. Use this method to add services to the container.
        public void ConfigureServices(IServiceCollection services)
        {
            JwtSecurityTokenHandler.DefaultMapInboundClaims = false;
            services.AddRazorPages();

            services.AddAuthentication(options =>
            {
                options.DefaultScheme = "cookie";
                options.DefaultChallengeScheme = "oidc";
            })
                .AddCookie("cookie", options =>
                {
                    options.Cookie.Name = "mycookie";

                    options.Events.OnSigningOut = async e =>
                    {
                        await e.HttpContext.RevokeUserRefreshTokenAsync();
                    };
                })
                .AddOpenIdConnect("oidc", options =>
                {
                    options.Authority = Configuration["SampleApp:Authority"];

                    options.ClientId = Configuration["SampleApp:ClientId"];
                    options.ClientSecret = Configuration["SampleApp:ClientSecret"];

                    options.ResponseType = "code";
                    options.RequireHttpsMetadata = false;
                });
        }

        // This method gets called by the runtime. Use this method to configure the HTTP request pipeline.
        public void Configure(IApplicationBuilder app, IWebHostEnvironment env)
        {
            if (env.IsDevelopment())
            {
                app.UseDeveloperExceptionPage();
            }
            else
            {
                app.UseExceptionHandler("/Error");
                // The default HSTS value is 30 days. You may want to change this for production scenarios, see https://aka.ms/aspnetcore-hsts.
                app.UseHsts();
            }

            app.UseStaticFiles();

            app.UseRouting();

            app.UseAuthentication();
            app.UseAuthorization();

            app.UseEndpoints(endpoints =>
            {
                endpoints.MapRazorPages();
            });
            IdentityModelEventSource.ShowPII = true;
        }
    }
}
Let’s go through some of the more interesting parts. First, we’re setting up our authentication including the scheme and challenge method. We’ll be using cookies to store our authentication information and “oidc” for our authentication provider, which is defined further below.
// ...
services.AddAuthentication(options =>
{
    options.DefaultScheme = "cookie";
    options.DefaultChallengeScheme = "oidc";
})
// ...
Here we configure the cookie, including setting the cookie name:
// ...
.AddCookie("cookie", options =>
{
    options.Cookie.Name = "mycookie";
// ...
Finally, we set up our previously referenced authentication provider, "oidc". You could have multiple providers. We create an OpenIdConnectOptions object to fully configure this provider. Setting ResponseType = "code" is what forces the use of the Authorization Code grant. PKCE is turned on by default. We pull configuration information like our client id from either appsettings.json or the environment. These are the values you saved off when you were configuring FusionAuth. (We’ll add them to appsettings.json a bit later.) We create an OpenIdConnectOptions object to configure our provider. Since we want to use the Authorization Code grant, we set ResponseType = "code". PKCE is turned on by default, so we’re ready for OAuth 2.1.
// ...
.AddOpenIdConnect("oidc", options =>
{
    options.Authority = Configuration["SampleApp:Authority"];

    options.ClientId = Configuration["SampleApp:ClientId"];
    options.ClientSecret = Configuration["SampleApp:ClientSecret"];

    options.ResponseType = "code";
    options.RequireHttpsMetadata = false;
});
// ...
We also need to turn on authentication for our application:
// ...
app.UseAuthentication();
// ...
Wait, I thought we were preventing users from accessing certain pages? Isn’t that authorization, not authentication? When we first set up the application, we didn’t have any authentication scheme configured. And, in this case, we’re actually prohibiting access to any anonymous user, so any authenticated user is authorized.
For debugging, add IdentityModelEventSource.ShowPII = true; to the very end of Configure method. This makes it easier to see errors in the OAuth flow. But for production code, please remove it.
// ...
IdentityModelEventSource.ShowPII = true;
// ...
As promised, here’s our appsettings.json file. We need to add our entire SampleApp object so that the code above can be configured correctly. Authority is just the location of the user identity server, in this case FusionAuth.
{
  "Logging": {
    "LogLevel": {
      "Default": "Information",
      "Microsoft": "Warning",
      "Microsoft.Hosting.Lifetime": "Information"
    }
  },
  "AllowedHosts": "*",
  "SampleApp" : {
      "Authority" : "http://localhost:9011",
      "ClientId" : "4420013f-bc5e-4d5a-9f94-f4b64ad5107c"
   }
}
Wait, where’s the client secret? This file is in git, but we should not put secrets under version control. Instead, the client secret is provided on the command line via an environment variable. This change means the correct way to publish and start the web application is now (where you replace H4... with the client secret value):
dotnet publish -r win-x64 && SampleApp__ClientSecret=H4... bin/Debug/netcoreapp3.1/win-x64/publish/SampleApp.exe
Once you’ve updated all these files, you can publish and start the application. You should be able to log in with a previously created user and see the claims. Go to http://localhost:5000 and click on the “Secure” page. You’ll be prompted to log in using FusionAuth’s default login page. You can theme the login screen of FusionAuth if you want to make the login page look like your company’s brand.

After you’ve signed in, you’ll end up at the “Secure” page and will see all claims encoded in the JWT.

You can see the source of the application at this stage of development by looking at the add-authentication branch.
Logout
Awesome, now you can log in with valid user credentials. However, right now there’s no way to log out. The JWT is stored in a session cookie. When we’re ready to leave, we want to log out of our ASP.NET Core session and of the FusionAuth session. So, we need to add a logout page, remove the session cookie, and redirect to the FusionAuth OAuth logout endpoint. FusionAuth will destroy its session and then redirect back to the configured Logout URL. We’ll add a Logout page to do all of this.
Here’s what the Logout.cshtml.cs class looks like:
namespace SampleApp.Pages
{
    public class LogoutModel : PageModel
    {
        private readonly ILogger<LogoutModel> _logger;
        private readonly IConfiguration _configuration;

        public LogoutModel(ILogger<LogoutModel> logger, IConfiguration configuration)
        {
            _logger = logger;
            _configuration = configuration;
        }

        public IActionResult OnGet()
        {
              SignOut("cookie", "oidc");
              var host = _configuration["SampleApp:Authority"];
              var cookieName = _configuration["SampleApp:CookieName"];

              var clientId = _configuration["SampleApp:ClientId"];
              var url = host + "/oauth2/logout?client_id="+clientId;
              Response.Cookies.Delete(cookieName);
              return Redirect(url);
        }
    }
}
OnGet is the important method. Here we sign out using a method of our authentication library, delete the JWT cookie and send the user to the FusionAuth OAuth logout endpoint. Don’t forget to add the Logout page to the navigation, but only if the user is signed in:
...
@if (User.Identity.IsAuthenticated)
{
    <li class="nav-item">
        <a class="nav-link text-dark" asp-area="" asp-page="/Logout">Logout</a>
    </li>
}
...
You also need to update the appsettings.json file with the cookie name setting. Since we’re now referencing the cookie in two places, pulling it out to the appsettings.json file will make for a more maintainable application.
{
  ...
  "SampleApp" : {
    "Authority" : "http://localhost:9011",
    "CookieName" : "mycookie",
    "ClientId" : "4420013f-bc5e-4d5a-9f94-f4b64ad5107c"
  },
  ...
}
Finally, we need to change the Startup.cs file to use the new cookie name.
// ...
.AddCookie("cookie", options =>
{
    options.Cookie.Name = Configuration["SampleApp:CookieName"];
})
// ...
Great! Now you can both sign in and sign out of your application.
(If you are interested, you can see the application’s current code by looking at the add-logout branch.
Next steps
If you want to explore more, you can add more pages to the application, limit a page to a certain user, or customize the FusionAuth login page theme.
You could also welcome users with their first name by retrieving user information via an API call, using the FusionAuth .NET Core client library.
For the next post in this .NET Core series, we’ll be associating a user with a role and creating a custom claim in the JWT, so stay tuned!

Top comments (0)