Once you have migrated an application to use a modern identity provider, how can you migrate your users?
Previously, we updated a legacy line of business PHP application to use OAuth and FusionAuth to authenticate users. At the end of that post, “The ATM” application worked well for new users. But how do you migrate existing users without impacting their ability to use the application to do their job?
This is part of a two part series. Here are all the posts:
- Securing your legacy PHP business application with OAuth
- How to migrate your legacy user data to a centralized auth system (this post)
Why migrate to a centralized user datastore
What are the benefits of having a centralized user datastore, rather than disparate, per application datastores? If you centralize user accounts, you have a one place for all your user data. This means:
- One application to go to add, remove and otherwise manage user access.
- A single auth system to secure and update.
- One place for all authentication and authorization logic.
- A single login interface for your users.
- One password for them to remember.
- A single identity provider to hook other applications into as your business grows.
- One view of your user across all of your applications.
As you add more and more applications, the value of having one place for user data grows. As you contemplate a migration of existing users to a new datastore, keep a few things in mind:
- Access: Usually, this is the highest priority concern. Any migration should minimally impact the user experience, including, but not limited to maintaining access to apps they currently use.
- Data: You want to map data from the previous system into the new system.
- Passwords: This is a subset of the data concern, but one that should be treated differently. Since passwords are typically hashed, not encrypted, you can’t import hashes directly unless you have access to the same hashing algorithm.
In general, there are two types of migrations:
- Big bang
- Migrate-on-authentication
I’ll cover the big bang option at a high level, and then cover a migrate-on-authentication scenario in depth.
Big bang migration to new auth system
If you choose a big bang, you are choosing to move all your users at once. You build a system to migrate them, test the heck out of it, and have minimal downtime, or possibly a degraded system where the user store can be read, but not updated, when you flip the system of record for all your users from the old to the new. You have that downtime because you don’t want anyone updating their user profile. Depending on your availability needs, you could also choose to do writes to both systems during that period.
With the big bang option, you also should create a rollback plan in case testing misses something, and things go sideways.
This is a good choice when you have a small user base, or aren’t in production yet. It also works when you need to decommission the legacy datastore as soon as possible, i.e. an upcoming license renewal. The big bang is operationally simpler too, because you are only running two systems for a small period of time; you keep the legacy system running only for so long as is required to verify the mass migration worked.
The risks of this type of migration are:
- You’ll miss something during testing. After all, you aren’t doing this regularly; by definition this is a one time event.
- You’ll encounter some unexpected error during the production rollout.
- If something goes sideways, many of your users will be impacted, since they were all being migrated.
A variant of this approach is to segment your users, and migrate them segment by segment. For example, it may be possible to move the users of each application to the new user datastore, one application at a time.
FusionAuth’s support for the big bang
If you want to use the big bang with FusionAuth, check out the Migrate Users tutorial. FusionAuth also includes support for custom password hashing logic, allowing you to import users without requiring them to modify their password.
Migrate-on-authentication
The other end of the spectrum from moving all your users at once is to move them one at a time. This is a phased approach. You maintain the existing user datastore, but each time one user authenticates, you move over their data.
Some of the benefits of this approach:
- There’s less risk because this is gradual, so only a subset of users are affected if there is an issue.
- It’s easier to dogfood. The change can be rolled out to a focused set of users first.
- There’s less throwaway code to be written; you don’t build a processing pipeline, only a way to expose the current data for one user.
- No system downtime is required.
- There is no need to find, understand or reimplement the password hashing algorithm, as you’ll re-hash each password when it is presented by the user.
- You won’t migrate users who haven’t used your application by the end of the migration period.
However, there are risks with the phased approach as well.
- The cutover will take longer. You must maintain both systems during this time, even as usage shifts.
- Customer service may have to access two systems to find someone, especially if contacted via email or phone.
- Rollback is more complex if there are issues, because there are two systems of record, one for users who have been migrated and one for users who have not.
FusionAuth’s support for migrate-on-authentication
You can do a phased migration using FusionAuth Connectors. Let’s walk through how to do so.
If you don’t have FusionAuth running, get it going in 5 minutes. Then get a license key and activate it. Please note that Connectors are a paid edition feature. You can learn more about paid editions and sign up for a free trial here. Finally, activate your license.
To use a Connector for a phased migration, you will:
- Build an HTTP JSON API endpoint in your existing application. This endpoint will receive the username and password, among other data, and return a JSON response. You should protect that API; you have a variety of options to do so.
- Configure the Connector policy to determine which tenants and users for which it should be executed.
- Let users authenticate against your application for a period of time; monitor how many users have migrated via the user search.
- Remove the Connector policy. Remove the API endpoint.
- Migrate the rest of your users (if needed) using the Import Users APIs.
- Update the application to remove the legacy datastore.
Let’s look at how this might work in the context of the application modified in a previous post: “The ATM” legacy line of business PHP application. This code is available in the master branch of that application’s GitHub repo, or online.
Build a login API in the legacy app
The first step to using a generic Connector for migration purposes is to build an API endpoint in your backend that can access the legacy user datastore. This code takes the username and password from FusionAuth and returns a JSON object. Here’s an example of what you might see coming from FusionAuth:
{
  "loginId": "richard@fusionauth.io",
  "password": "password",
  "applicationId": "10000000-0000-0002-0000-000000000001",
  "noJWT" : false,
  "ipAddress": "192.168.1.42"
}
The meanings of these keys are explained in detail in the Login API docs, but in general, your code should extract the loginId and the password fields and authenticate the user against the legacy datastore. You’ll also receive the application which the user was trying to access; you should validate that as well.
The user JSON object which you must return is documented in the User API docs, but the required fields are documented as well.
For the “The ATM” application, the PHP code for the endpoint is simple. There’s a config.php file containing, well, configuration, which looks like this:
<?php
// definitely update
$client_id = '1892611a-6b99-4457-913f-f39f7c614eb2';
$client_secret = '4X5_1OVkZi4ottPOrtdzwbe9lbuXRf2Vo9bZJenMkl0';
$tenant_id = '30663132-6464-6665-3032-326466613934';
$authorization_header_value = 'supersecretauthheader';

// update if you aren't running the app or FusionAuth in the default location
$redirect_uri = 'http://localhost:8000/oauth-callback.php';
$fa_url = 'http://localhost:9011';
config.php sets some variables which are used by the endpoint code. In the sample repository, this code is infusionauthconnector.php`. Let’s look at that:
`
<?php
require DIR. '/config.php';
require DIR. '/common.php';
require DIR. '/vendor/autoload.php';
use Ramsey\Uuid\Uuid;
$headers = getallheaders();
if (!$headers) {
error_log("Invalid authorization header.");
return;
}
// check auth header
$authorization_value = $headers['Authorization'];
if ($authorization_value !== $authorization_header_value) {
error_log("Invalid authorization header value found: ".$authorization_value);
return;
}
$input = file_get_contents('php://input');
$inputobj = json_decode($input);
if (!$inputobj) {
error_log("Invalid JSON");
return;
}
// for debugging the data passed to us
// error_log(var_export($input, TRUE));
if (!auth($inputobj->loginId, $inputobj->password)) {
http_response_code(404);
return;
}
// build the user object
// in the real world, we'd pull this data from the database.
$obj = [];
$user = [];
$user['id'] = Uuid::uuid4();
$user['email'] = $inputobj->loginId;
$user['active'] = true;
$user['verified'] = true;
$data = [];
$data['favoriteColor'] = 'blue';
$data['migratedFromTheAtmDatastore'] = true;
$user['data'] = $data;
$registrations = [];
$registration = [];
$registration['applicationId'] = $client_id;
array_push($registrations, $registration);
$user['registrations'] = $registrations;
$obj['user'] = $user;
echo json_encode($obj);
?>
`
This code does three main tasks. First, it checks some headers to ensure only authorized callers can access it. This endpoint essentially opens up your user data, so it’s a good idea to ensure no unauthorized access.
Then this code authenticates the user. It uses the same auth common code that was used way back before “The ATM” was converted to use OAuth (see the previous post for more details). This method reaches into the database, finds the user, and ensures their password is correct. At this point, you may want to consider updating the user record in the old datastore to mark the user as migrated. Doing so helps with data debugging, should it be needed.
Finally, the PHP code builds the $user object, which will, at the end of the method, be rendered as JSON. Again, normally much of this data would be pulled from the user datastore, but for purposes of this post, it is hard coded.
Let’s look at some more details around building the $user object.
//...

$user['id'] = Uuid::uuid4();

//...
This code generates a UUID. Each account in FusionAuth must have a UUID. If your legacy datastore has a value you can transform into a UUID, you can use that rather than generate one.
//...

$user['email'] = $inputobj->loginId;

$user['active'] = true;

$user['verified'] = true;

//...
This code is adding more attributes to the $user object. These can be hardcoded, fetched from an API, extracted from the value posted to FusionAuth, as is the email value, or retrieved from a datastore. It doesn’t matter as long as the attributes can be expressed in JSON.
//...

$data = [];

$data['favoriteColor'] = 'blue';

$data['migratedFromTheAtmDatastore'] = true;

$user['data'] = $data;

//...
You can populate the user’s FusionAuth data field with arbitrary data which can be represented as a key-value pair. Apparently a lot of people like the color blue. In this case, the code also is adding a boolean attribute. That will later be searched to learn about the progress of the migration.
`
//...
$registrations = [];
$registration = [];
$registration['applicationId'] = $client_id;
array_push($registrations, $registration);
$user['registrations'] = $registrations;
//...
`
You typically want to register this user to one or more applications defined in FusionAuth. In this case, the user is automatically registered for the application to which they are trying to authenticate, which is likely what you want. You could also have pulled the applicationId from the JSON received at authentication and stored in $inputobj. You could register this user to multiple different applications at migration time as well.
Finally, you’ll want to update your composer.json file to include the UUID library:
{

  "require": {

    "ramsey/uuid": "^4.1",

    "league/oauth2-client": "^2.5"

  }

}
Run composer install. Now you can start your application up by running:
php -S 0.0.0.0:8000
The Authentication URL API endpoint is up and ready to go. The next step is to configure FusionAuth to send authentication attempts to this Connector.
Configure the Connector
There are two parts to letting users authenticate against that shiny new API you just wrote.
The first is setting up the Connector and the second is updating the tenant configuration to use it. Below, you’ll do this with the FusionAuth administrative user interface, but you could use the Connector APIs and the Tenant APIs, if desired.
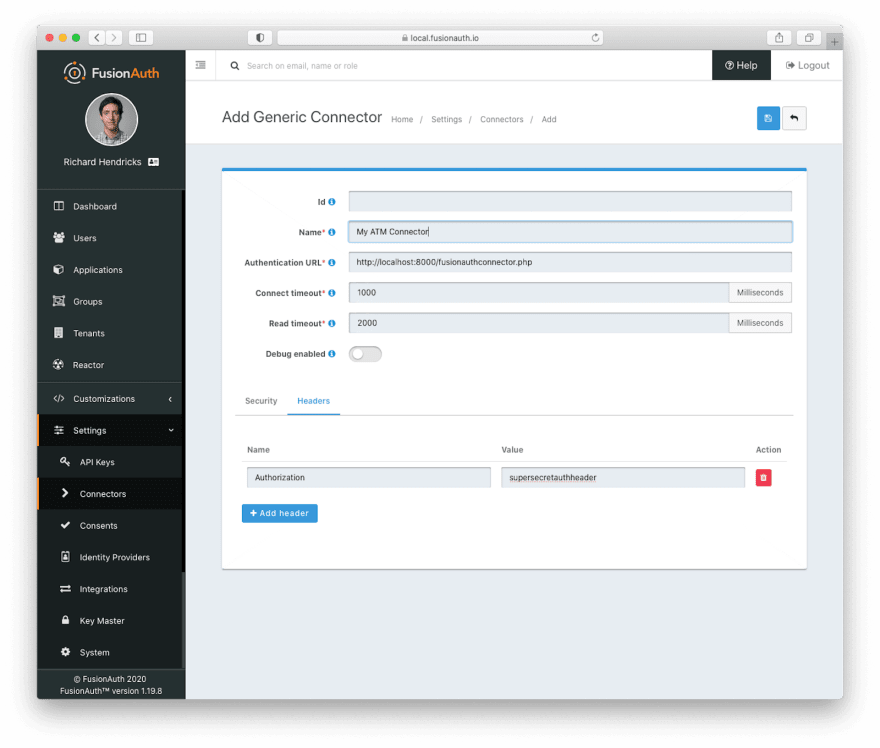
First, create the Connector by navigating to “Settings” and then “Connectors”, and create a new one. Give it a name, like “My ATM Connector”, and update the “Authentication URL” with the URL of the endpoint which you created above. For this post, update the headers tab with the authorization header value configured in config.php: supersecretauthheader. When configured, it looks like this:
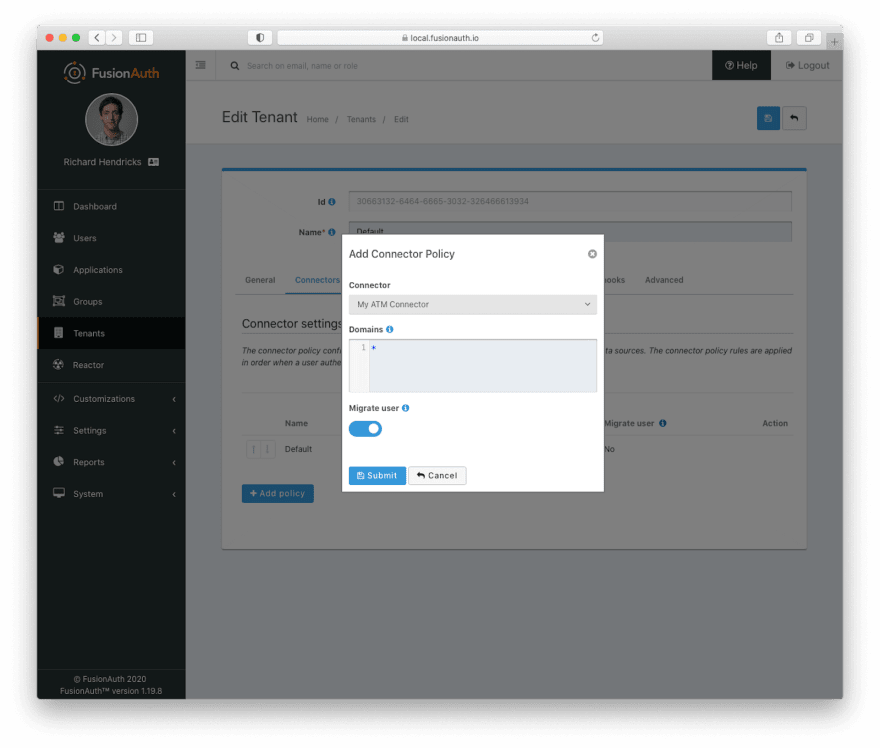
Now, set up the tenant to use this Connector. Navigate to “Tenants”, “Default”, and then the “Connectors” tab. FusionAuth supports multiple tenants, but for this post, let’s just keep everything in the “Default” tenant. Click the button to add a new policy.
Select the Connector created above and modify the domain if needed; that’s only required if a subset of users, with one or more email domains, are the only accounts which should be authenticated against this Connector.
Finally, check the “Migrate user” checkbox. This ensures that user data will be pulled over at initial authentication. After the first one, the authentication endpoint will not be called for this user again.
Make sure you save your tenant settings by clicking the blue “save” icon in the upper right corner, and you’re good to go.
Let your users sign in
The next step takes a while. Let the “The ATM” application run and let users sign in. You can, if you are following along with the code, open up an incognito browser and sign in with a few users. If you are using the example PHP application, your password is password.
During this time, users will be migrated over and registered with the application. Make sure that any users registering, should you allow that, are sent to register in FusionAuth rather than the legacy application.
How long should this run? Long enough to move over most active users. This time frame depends on how often your users sign in, and how many of them are active. If it’s an application most visit daily, users will migrate quickly. If it is an application accessed once a year, then a year may be needed to get most of your users into FusionAuth. You also want to think about how hard running both user datastores will be. If it’s difficult for your team, you may migrate fewer users with the phased approach.
During this time period, you can find the numbers of users in FusionAuth by searching for the users with a particular attribute. Comparing this count with the legacy datastore user numbers will give you an idea of the progress of the migration.
Here’s an example of a user search request which will show you the count of users with a user.data.migratedFromTheAtmDatastore value of true:
`
API_KEY=...
curl -H "Authorization: $API_KEY" 'http://localhost:9011/api/user/search?queryString=data.migratedFromTheAtmDatastore%3Atrue%0A'
`
This will return all the users who have migrated. The JSON returned will look something like this
{"total":629,"users":[...] }
If you have 800 users, well, congrats, your migration is well under way. If you have 10,000 users, you’ve got a bit longer to wait. If you look at users in the administrative user interface, you can see users in FusionAuth registered to your application:

You’ll also see the custom user data has been migrated over, too:

After this migration process has taken place for a while, or perhaps after you’ve reached a goal percentage of users migrated, you will need to decide about users in the old datastore. If the phased migration has lasted for six months or a year and there are still users who are only in the old datastore, it is likely that these users have abandoned your application; of course only you know your user’s visitation patterns, so that’s just a rule of thumb.
So what to do with these users? You can opt to leave these users out of your FusionAuth system, perhaps archiving or deleting them. Or you can choose to migrate these users using the one time cutover methods described above. This will of course be far lower risk because there are far fewer users to migrate.
Remove the Connector and the authentication endpoint
The final step to end the phased migration is removing the Connector and other migration code. You can delete the policy and then the Connector from FusionAuth anytime. Any user who has been migrated will authenticate against FusionAuth. Any user who has not will see an error message should they attempt to sign in, as their account won’t be found.
You can also remove the fusionauthconnector.php file from your application, as it won’t be needed in the future.
There are other cleanup steps, such as the final migration of users who haven’t signed in, if that’s the route you are taking, or dropping the users table from the “The ATM” application. But those are beyond the scope of this post.
Feel free to take a gander at the GitHub repo with the generic Connector example code we walked through above.
Conclusion
There are many ways to migrate your user data. For some situations a big bang approach with a single cutover date makes sense. For others, a phased migration, where users are migrated whenever they authenticate, will make for a smoother experience.

Top comments (0)