
Welcome to another dev.to post, all of you. In this article, I will show you how to make a simple load-balancer from the servler I set up with express using haProxy.
We will have two folders:
- app: A simple backend server to build with express
- haproxy: haProxy folder that will act as a load-balancer
Step 1: Creating Backend Server with Express
Let's create a simple backend server using Express. For this, we create a folder called app and enter it.
First, we create our package structure by saying yarn init. Then we add the express package as required for the server: yarn add express.
Now we create a file called index.js and add the following codes:
const app = require('express')();
const appid = process.env.APPID || 4000;
app.get('/', (req, res) => res.send(`APP ID: ${appid}`));
app.listen(appid, () => console.log(`listening on ${appid}`));
To make this nodeJS project a docker image, we add the Dockerfile:
FROM node:12
WORKDIR /home/node/app
COPY / /home/node/app
RUN npm install
CMD npm run app
To create our Docker image, we run the command:
docker image -t example-app .
Step 2: Installing the HaProxy Structure
What is HaProxy?
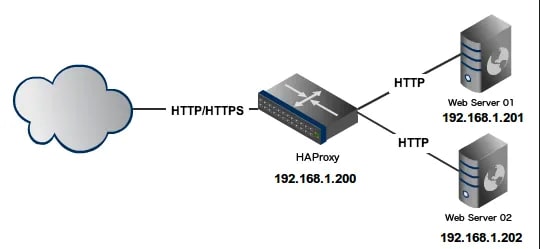
HAProxy (High Availability Proxy) is a load-balancer task manager. It offers free and secure services such as load balancing, high availability and proxy for many services.
We create the haproxy folder for laod-balancer and add a file called haproxy.cfg to it:
frontend http
    bind *:80
    mode http
    timeout connect 10s
    timeout client 10s
    timeout server 10s
    retries 3
    use_backend all
backend all
    mode http
    server s1 nodeapp1:4001
    server s2 nodeapp2:4002
    server s3 nodeapp3:4003
    server s4 nodeapp4:4004
The meanings of the keywords here:
- bind: The port value we are running
- mode: Entered as HTTP or HTTPs (if SSL is available).
- timeout: Timeout value. If the first attempt fails, it can be tried again. For this, you need to set the number of retries.
- retries: The value of how many times to repeat when times out.
- use_backend: Information of the backend servers to be used.
In the haproxy folder, we add the Dockerfile file to turn this structure into a docker image.
FROM haproxy:1.7
COPY haproxy.cfg /usr/local/etc/haproxy/haproxy.cfg
Step 3: Run Time 🚀
To run all these structures (images), we create the docker-compose.yml file on the outside.
version: '3'
services:
  haproxy:
    build: ./haproxy
    container_name: haproxy
    ports:
      - '80:80'
  nodeapp1:
    image: example-app
    environment:
      - APPID=4001
  nodeapp2:
    image: example-app
    environment:
      - APPID=4002
  nodeapp3:
    image: example-app
    environment:
      - APPID=4003
  nodeapp4:
    image: example-app
    environment:
      - APPID=4004
When we create the whole structure, our folder structure should be like this:
> app/
>   node_modules/
>   Dockerfile
>   index.js
>   package.json
>   yarn.lock
>
> haproxy/
>   Dockerfile
>   haproxy.cfg
>
> docker-compose.yml
And we came to run our images:
docker-compose up --build
After running this command, we go to http://localhost. Here we can see that the APP_ID value changes every time we refresh the page. We have successfully completed a simple load-balancer service.
Extra 🥳
For a more complex structure you can change the content of haproxy like this:
global
defaults http
    timeout client 50s
    timeout connect 50s
    timeout queue 60s
    timeout http-keep-alive 2m
frontend MyFrontent1
    bind :80
    mode http
    use_backend MyBackends1 # or -> default_backend MyBackends
frontend MyFrontend2
    bind :4000
    mode http
    use_backend MyBackends2
backend MyBackends1
    mode http
    server server1 nodeapp1:4001
    server server2 nodeapp2:4002
backend MyBackends2
    mode http
    server server3 nodeapp3:4003
    server server4 nodeapp4:4004
Since we have added another frontend, we need to add it to docker-compose.
.
.
.
haproxy:
  build: ./haproxy
  container_name: haproxy
  ports:
    - '80:80'
    - '4000:4000' # 4000 inputtan 4000 outputa aktarıyoruz
.
.
.
Here we created two frontends and two servers connected to each frontend. When you go to http://localhost and refresh the page, you can see that you switch between portals 4001 and 4002, and when you go to port http://localhost/4000, you can see that you switch between ports 4003 and 4004.
Conclusion
I tried to explain as descriptively as possible, I hope it was a useful article. Don't forget to like to support 🤟


Top comments (0)