![Cover image for How to Test WebRTC Stream Quality? Use StreamTest Extension [Free]](https://media2.dev.to/dynamic/image/width=1000,height=420,fit=cover,gravity=auto,format=auto/https%3A%2F%2Fdev-to-uploads.s3.amazonaws.com%2Fuploads%2Farticles%2Fmkfof636ncm0t15h1eyp.png)
As someone specializing in video chat and video streaming services, our QAs (quality assurance angels) used to deal with the problem of how to test a live stream quality with a load of tools and apps, all different for each metrics. But now there’s this all-in-one solution — StreamTest.
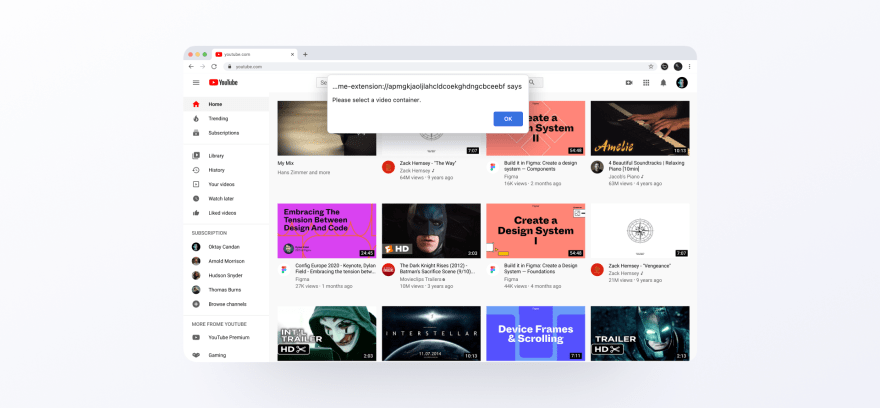
It’s a Google Chrome Extension, a testing tool for WebRTC video chats like Google Meet, iMind, Whereby, and ProVideoMeeting. Not sure you’re on a WebRTC stream? Enable StreamTest and if you’re trying to test a non-WebRTC stream, the extension will respond with an error.
It’ll give you a live status on 7 essential parameters with an insight on the connection and stream behavior.
Quick note for non-tech folks:
If you have no technical background and all of these indicators are just letters, figures, and colors to you or don’t want to analyze them yourself, just screenshot (Windows: Win + Shift + S; MacOS: Command + Shift + 3) the status you got immediately, download the report as a .csv file, and show both to your tech specialist.
We are already working on making the plugin accessible for you, so you could test your live streams easily, guys. So follow us on LinkedIn to stay turned.
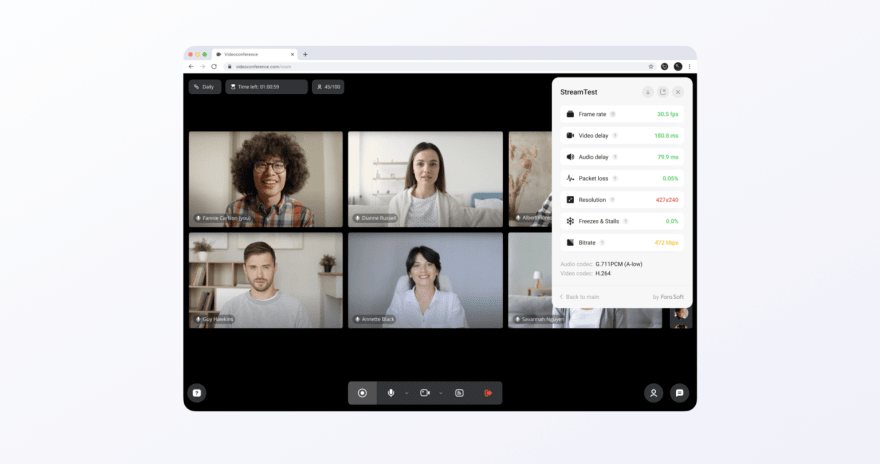
– Frame rate or just FPS. The higher the better. To calculate it the plugin measures the time between two frames and calculates the average for the last X frames.
– Video and Audio delay. Delay is never welcome, so the lower the better. Basically it’s a sum for jitterBufferDelay and average round trip time. Totals are relevant for the last 3*X seconds, where X is the time set in setInterval.
– Packet loss. The lower the better. It shows if any packets were lost on the way to the server, as a percentage. Calculated as (packetsLost stat / packetsSent stat) * 100%.
– Resolution. The higher the better. It mostly depends on the participant’s camera and the device you’re using to chat.
– Freezes and stalls. The lower this indicator is the better. It shows how much % of your call was wasted due to lags. Consider something as freeze if the comparison (!wasDocumentJustHidden && dt > Math.max(dtTimestampsQueue.getAverage() * 3, dtTimestampsQueue.getAverage() + 0.150)) is true. In simple terms freeze happens if the time of the current frame is greater than the average time of frame existence multiplied by 3. And at the same time is greater than the average time of frame existence for at least 150ms.
– Bitrate. This indicator is responsible for how smooth the picture is, the higher the indicator the smoother the picture.
– Video and Audio codec — for a developer to know how the data is compressed.
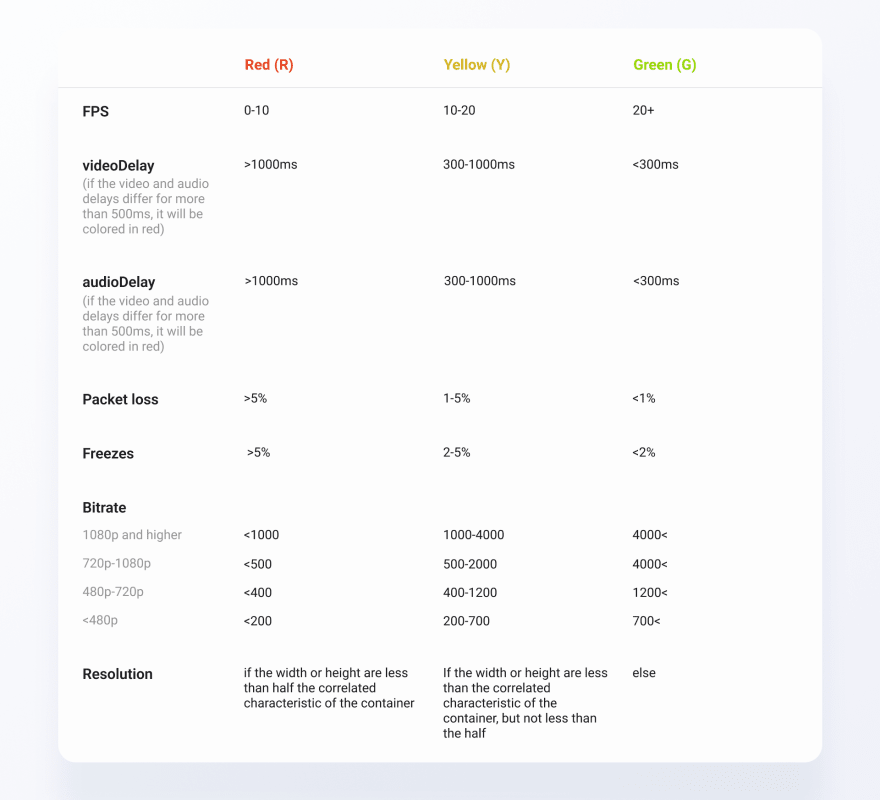
In the status you’ll also notice that the indicator measures are colored in Red, Yellow, or Green. Here’s what the colors mean:
Besides the data we described previously, there’re also SDP offer, answer, iceConnectionState, iceGatheringState, and WebRTC Stats info in the downloadable .csv report. It will give the bigger picture of the connection and the stream behavior.
StreamTest starts collecting data once you enable it. To do it, click your right mouse button on the other participant’s stream and tap “Test stream” in the context menu. It will stop collecting the data once you close the extension / start testing another stream / go to the extension main screen.
To test live streams, download this WebRTC tester for your Chrome from the official store here. For free.

Top comments (0)