
If you're a beginner developer, you might think that these two terms mean the same thing – but they're different.
So lets have quick aside before we start: Git and Github are not the same thing. Git is a free and open-source, version control system designed for working on the Linux operating system; GitHub is a company that makes tools which integrate with git in other terms github uses Git underneath, and lets you manage your Git repositories or folders easily on its platform. You do not need GitHub to use git, but you cannot use GitHub without using git. There are many other alternatives to GitHub, such as GitLab, BitBucket.
Now that we know the difference, lets get right into.
In order to follow along with me, you'll need:
- A command line interface.
- A text editor.
- A GitHub account.
- How to install Git
In order to use Git, you have to install it on your computer. To do this, you can download the latest version on the official website. You can download for your operating system from the options given.
Follow the necessary installer guide until installation is complete. Open the command prompt and type git version to verify that Git was successfully installed.
- Create a GitHub account
The next thing you'll need to do is to create an account, you can do this here
Now with your terminal opened, configure your username and email address. Git will use this information to identify who made specific changes to files.
To set your username, type and execute these commands:
git config --global user.name "YOUR_USERNAME"
git config --global user.email "YOUR_EMAIL"
Just make sure to replace "YOUR_USERNAME" and "YOUR_EMAIL" with your personal data.
- Set up the project
At your terminal move to where you want to place the project on your local machine using the cd (change directory) command. For example, i've created a folder named git-github and changed to it:
Quick note: the commands of the next two sections may change according your operation system and the terminal you're using, i recomend to take a look at the documentation of the terminal.

Now to initialize a git repository in the root of the folder, run the git init command:

- Add a new file to your local repository
Add a new file to the project,by running a touch command. touch tasks.txt this command will create and save a blank file named tasks.txt.
After creating the new file, you can use the git status command to see which files git knows exist.
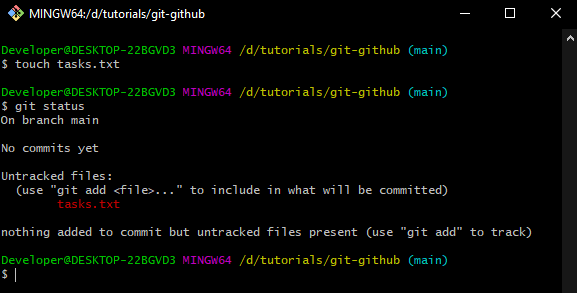
Git is basically saying:
we noticed you created a new file called tasks.txt, but unless you use the
git addcommand we can't do anything with it."
Now lets add into the staging area so git can track our file.

If you notice i have used the 3 following commands:
echo "git-github beginner friendly" >> tasks.txt to write inside my file.
git add tasks.txt that actually put the file in the staging area.
git status shows the files we have and their current state. And now, we can see that we have a different information, "git is now tracking tasks.txt".
- Commit files in Git
The next state for a file after the staged state is the committed state. To commit our file, we use the git commit -m "message of commit" command.
The message at the end of the commit should be something related to what changes you made - maybe it's a new feature, maybe it's a bug fix. A clear explanation of your changes can be extremely helpful for future programmers who are trying to figure out why some changes was made looking at your code years later.
The command git commit records the modification of all files. The second part -m "first commit" is the commit message. -m is shorthand for message.
After executing this command, you should get something similar to this:

Now our file is in the committed state.
- Lets create a Github repository

When you press Create repository github will make your new repository. And then you're gonna be redirected to a page that tells you how to create a new repository from scratch or if you want to push a repository you have created locally.

since we've already created a new repo locally, we will use commands in the "…or push an existing repository from the command line" section. These are the commands:
git remote add origin https://github.com/fcorreia18/git-github.git

git branch -M main

git push -u origin main

- The first command creates a connection between your local repo and the remote repo on Github.
- The second command changes your main branch's and name it to "main". acording your git version The default branch might be created as "master", but "main" is the standard name for repositories now.
- The last command pushes your local repository to GitHub.
Git Branches
Git recommend us to work with branches: because it allows you to create a copy of a file you would like to work on without messing up the original copy. You can either merge these changes later to the original copy or just let the branch remain independent.for example, if you want to work on a project feature, create a feature branch using git checkout or git branch. Make changes the changes in your files(the actual feature) and when you have done, merge the branch with the base or just create a pull request inside your github repository.
Here's an example:

git checkout -b feature In our case, we have created and switched to a new branch called feature.

echo to write inside the file
cat to view the changes we made
git add tasks.txt to stage our changes
git status to check the status of our file, we can see that git notice that we've changed something.
Now we just need to commit it:

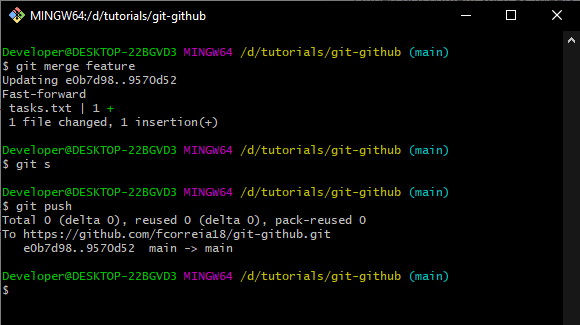
Now that we commit our changes we need to send it to the remote repository, but the remote repo doesn't have a feature branch. To create a new branch and push changes, we can use git push origin feature:feature or git push -u origin feature. The output of the command shows that a new branch have been created and both local and remote feature branches are synced.

Looking at the output you can observe that we have successfully pushed the local branch to GitHub with a modified version of our tasks.txt file.
Git also says to create a pull request inside of our github repository, but in order to learn how pull requests work we gonna do this manually by merging the main branch with the feature.
Merging Branches
Before we merge the branchs i just want to show you the current stage of our files in the main branch

Did you notice that the changes we made did not afect the file inside of the main branch? this is one of the greatest features of git it allows us to have multi stages of our files in different branchs and even at the same branch we can checkout different versions of the file just giving you a spoiler😁🤭
Now we can merge the changes we made in the feature branch into the main branch by running git merge feature. At this point, you will see all the changes made in the feature branch reflected on the main branch. You should also have an output similar to this:
Basic Commands
Before we finish i just want to give some basic commands that you probably gonna use often. The basic commands include initializing the Git repository, saving changes,review files, checking logs, pushing the changes to the remote repository, merging, etc.
git config use to set user specific configurations such as email, username, and file format.
git init create a Git repository in a local directory.
git clone : copy the entire repository from a remote server to remote directory. You can also use it to copy local repositories.
git add : add a single file and folder to the staging area. While git add . lets you add all files in the present folder.
git commit –m “message”: -m stand for message followed by the actual message, will create a snapshot of changes and save it in the repository.
git status shows the list of changed files or files that have yet to be staged and committed.
git push -u <remote-name> <branch-name>: send local commits to remote branch of repository, the -u flag creates a tracking reference for the branch.
git checkout -b <branch-name>: creates a new branch and switches to a new branch, if you dont want to switch just use git branch <branch-name>.
git remote –v: view all remote repositories.
git remote add [-t ] : connects the local folder to the repository on GitHub.
git branch –d : delete the branch.
git pull pull the history commits to a local repository from a remote repository.
git merge <branch-name>: after resolving merge conflicts(if you have) the command blends selected branch into the current branch.
git log shows a detailed list of commits for the current branch(We didnt use it, why dont you try it by yourself as a homework?).
Those are some of the main commands that'll help get you started using Git and you'll use all the time. if you find hard to use it just stick at this article, feel free to take a look as many time you need. Just remember pratice makes improvement
The more you continue using Git and GitHub, the more comfortable you'll get using these commands. it will eventually get easier as you build small projects and host them on GitHub using Git.
CONGRATULATIONS
I'm glad you've done so far 💯, in this article, we have learned about Git and GitHub and why they are so important. The tutorial also introduces you to basic Git commands and provides hands-on experience on how to track changes in your files and code. If you are interested in learning more about Git, here are some resources:
Git Official Documentation
Introduction to Github
Git Playground
w3 schools Git Basics
Free Code Camp Introdution to Git
If you like this article consider to subscribe and follow me in my social mideas:
Happy coding!💻

Top comments (0)