
In this article, I will guide you on how you can host a full-stack project on an AWS EC2 hosting cloud server.
Assuming you know what a cloud server is, I will continue from the very beginning (How to create a server) to how to successfully host your website. If you are using digital ocean droplet, You may start from Step-3.
Project stack for this tutorial
Front-end: ReactJS
Back-end: NodeJS
Database: MySQL with Prisma
Step-1: Create an EC2 server in AWS
- Login to your AWS account. Search ec2 from services.
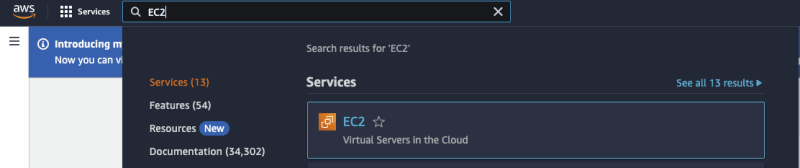
- Select EC2 from the list. Click on the Launch instance button
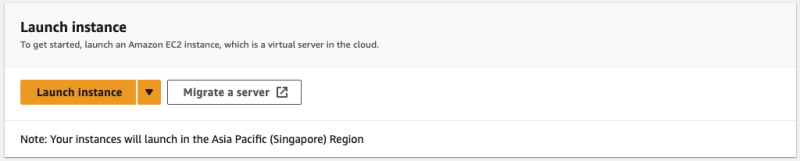
We will use a free tier instance for this blog.
Set a name for the instance and select ubuntu as your AMI. See the screenshot for ubuntu version.

- You can create a key pair and connect to your server via ssh (optional). We will connect to our server directly from aws console for this session. Hence, we will not be creating a key pair.

- Leave other settings as it is, and click on Launch instance button

We have successfully created a cloud server. We will use this server to host our project!
Step-2: Connect to the instance
- From your instances list, enter to the instance, click on connect, and connect using EC2 Instance Connect.

You will be redirected to another tab with a connected console to your instance.

Step-3: Set Up Your EC2 Instance
After connecting to your EC2 instance or digital ocean droplet, proceed with the setup:
- Update the instance for the latest packages
sudo apt update
Once it is updated, we will install all necessary things needed for the projects. This depends on the stack you are using. For the sample project, we need to install NodeJs, MySQL, Pm2, and Nginx. Pm2 & nginx will be needed for all kinds of projects.
- Install Node.js version 14:
curl -sL https://deb.nodesource.com/setup_14.x | sudo bash -

cat /etc/apt/sources.list.d/nodesource.list

sudo apt -y install nodejs
- Install the latest MySQL, alter root user password, & create database:
sudo apt install mysql-server

sudo service mysql status

sudo mysql

ALTER USER 'root'@'localhost' IDENTIFIED WITH mysql_native_password by 'your_mysql_new_password';

exit;

sudo mysql_secure_installation

sudo mysql -u root -p

create database sample_db_name;
after 'sudo mysql -u root -p' command, you will need to enter your updated password to connect to MySQL console.
- Set up PM2 (Process Manager for Node.js):
sudo npm install -g pm2

sudo pm2 startup systemd
- Install Nginx:
sudo apt-get install -y nginx

sudo ufw allow OpenSSH

sudo ufw allow 'Nginx Full'

sudo ufw --force enable
Step-4: Set Up Your Project
Next, set up your project on the EC2 instance.
- Navigate to your desired directory and create subdirectories for your project. I will move to root directory and create a folder for our project.
cd ../../

sudo mkdir app

cd app

sudo mkdir project_dir
- Clone your project from your Version control
sudo git clone https://your_project_repo_url

git config --global --add safe.directory /app/project_dir
- Navigate to your project directory
cd project_dir
- Install dependencies and run your server and client applications (Commands depend on your project setup). You need to do everything to run the project! Following is my setup for the blog.
cd server

sudo npm install

sudo npm run prisma-wohoo

sudo npm start

sudo pm2 start dist/index.js

cd ../client

sudo npm install
Create a build for your front-end
From the client or front-end directory, run
Sudo npm run build
This will create a fresh build for the front-end.We need to start our backend using pm2. Go to your backend directory and run pm2 start dist/index.js (depends on the your backend is set to start in production). You, then, will be able to see the running pm2 services list and there you can see the backend is actively running.
Step-4: Deploying and Configuring Nginx
Now, let's configure Nginx for our project and deploy it!
- Create deployment directories from root directory and copy build files.
cd ~

sudo mkdir app-deploy

cd app-deploy

sudo mkdir front-end

cd ../

sudo cp -r app/project_dir/your-project/project-frontend/build/ ~/app-deploy/front-end/
'sudo cp -r app/project_dir/your-project/project-frontend/build/' is your front-end's build folder path.
- Configure Nginx for your project
Navigate to Nginx's sites configuration directory:
cd /etc/nginx/sites-available/
Remove the default configuration files:
sudo rm -r default
Navigate to the sites-enabled directory and remove the default configuration symlink:
cd ../sites-enabled/

sudo rm -r default
Now let's create and configure the Nginx server block for our front-end:
cd ../sites-available/

sudo nano frontend
Paste the following configuration:
server {
        listen 80;
        listen [::]:80;

        root /home/app-deploy/front-end/build;
        index index.html index.htm index.nginx-debian.html;

        server_name your_domain www.your_domain;

        location / {
                try_files $uri $uri/ =404;
        }
        location /api {
         proxy_pass http://localhost:4000;
         proxy_http_version 1.1;
         proxy_set_header Upgrade $http_upgrade;
         proxy_set_header Connection 'upgrade';
         proxy_set_header Host $host;
         proxy_cache_bypass $http_upgrade;
         }
}
here, server_name will have the website domain that you want to use for your project, and proxy_pass http://localhost:4000; will basically pass any route with /api to backend (4000 is the port your project is running on). Now save the file (ctl x, y, enter)
Then, we need to set up nginx for backend:
type command : sudo nano api
and use the following cinfiguration,
server {
server_name ip your_backend_domain ww.your_backend_domain;
location / {
proxy_pass http://localhost:4000;
proxy_http_version 1.1;
proxy_set_header Upgrade $http_upgrade;
proxy_set_header Connection 'upgrade';
proxy_set_header Host $host;
proxy_cache_bypass $http_upgrade;
}
}
- save the file (ctl x, y, enter)
- cd ../sites-enabled/
- sudo ln -fs ../sites-available/frontend
- sudo ln -fs ../sites-available/api
- sudo nginx -t (checks if the nginx configs are correct)
And we are done setting our project! Restart the server using the following command
- systemctl restart nginx
Form your instance overview, you will find Public IPv4 address. Open that address with http, you will the project is running! If the dns settings are done in you dns management of the domains you used in the nginx configuration with your instance ip, you will be able to see the project is hosted on your domain as well.
This is for today guys! We will discuss how you can add ssl certificates for your domains using certbot. In the meantime, you can checkout the following tutorial on how to add ssl certificates for domains in your instance server.

Top comments (0)