

Zoom Automation
This program focuses on automating the zoom meetings which these days we all mostly have. We already know that there exists such program that does automate this process, but our implementation is a bit different and will work best for those people who have to join multiple meetings in a day and the meeting's credentials are different everytime.
Getting Started
These instructions will get you a copy of the project up and runnning on your local machine for using / testing or development purposes.
Prerequisites
Things you are going to need to get this program up and running on your machine.
(1) Python 3
(2) Zip extracting software, such as winrar or 7Zip.
(3) Telegram
(4) Network connection
Windows
Head to this link and click on the yellow button saying "Download Python 3.x.x", "x" here represents the version, it might be different based on when you decide to use this.
Go to the location on your PC where you downloaded the python setup, and then double-click it to begin it's installation, at the time of writting this documentation you can refer the steps and reference images below:-
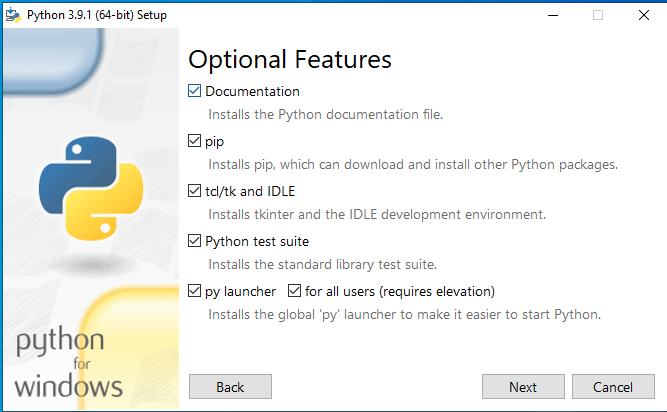
After double-clicking the python installation file, and granting it privileges, an installation window of Python will appear, on that window, on the bottom left corner will be a box and text stating "Add Python [version] to PATH", Please make sure, that you check that box, as it's very important.

After that, click on "Customize installation", and in there, make sure, all of the boxes are checked, and click "Back", and then "Install Now".
Now, click this link:https://github.com/evil5198/AutoZoom and then click "Code" and download it as ZIP. After the download is complete, extract it.


Now, open the folder and double-click the setup file and wait for it to finish installing dependenicies and close itself.

Now, follow the Telegram steps.
Setting up Telegram Bot
*Before following the steps mentioned below, create a telegram account, if you don't have one.
Open your telegram app, and on the top right corner, you will see a search icon, tap that and it will open a search bar. There search for "BotFather", the search result should yeild you a profile by name "BotFather" with a blue tick besides the name.

Tap on that profile and start the bot, after that, type "/newbot" and send it to the bot. The BotFather will ask you to name your bot, type the name which you want to assign to your bot next, the BotFather will ask you to assign a username to your bot, read the instructions from the BotFather and name appropriately. If you have followed all of the steps correctly, BotFather will reply and give you a API Token for your bot, copy it.
Also please don't try to copy the exact name, username or API token, these images are for reference only.
Make sure that the username which you assign to your bot is unique, if the username is already taken, BotFather will prompt to try again and use another username.

Assigning your Bot token inside code
Now open the folder you extracted few steps before, and in there locate a file named "bot", right click it and click "Edit with IDLE".

After doing the first step, the code file will be opened. There, within the first 10 lines of the code there will be a line having the following:-
token = ""

Inside the quotes paste the API Token of your bot which was provided by BotFather. After doing that, save the file (CTRL + S) and close the file.

That's it, you have successfully configured everything, now you can read the Usage.
Usage
Open up the folder which you extracted, and in there look for a file by name "control_gui", and double-click it. This will start the program and you will see a window like this:-
And in background another black window will be opnened (CMD), DO NOT CLOSE THAT WINDOW, you can minimize it instead.


Now open telegram and again press on the search icon and search your bot by it's username, once your bot has appeared on the search results, tap on it and start the bot.

*The following steps will only work if you have followed the step 1 and the results match.
Forward or send your bot the messages of zoom meeting's details.

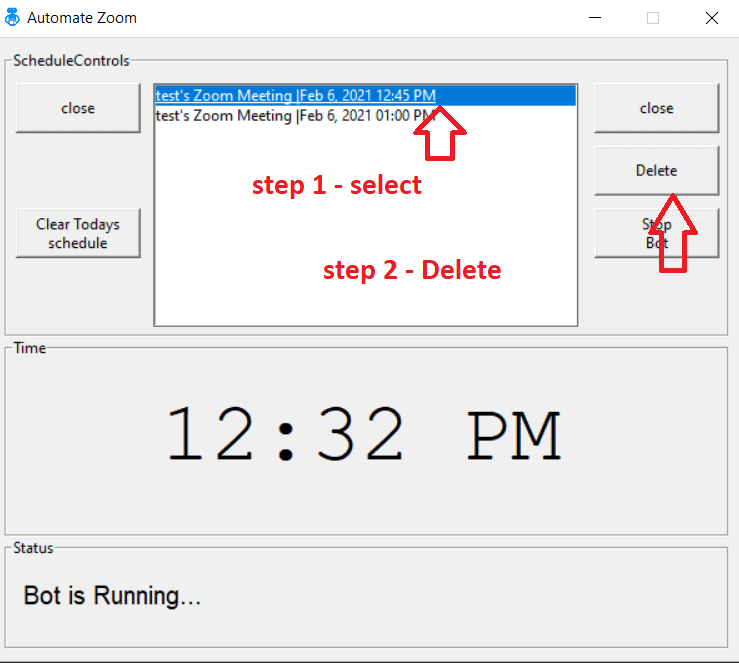
After doing the above step, in the "Bot Status" pane, you will see that the meeting has been added, if you have added multiple meetings at a time, or you just want to confirm that the meeting has been added, click the "Today's Schedule" Button.


If you want to clear entire schedule of the day, click "Clear Todays Schedule", this will remove all of the meetings of that day and they won't be automated. This only removes the meetings from the programs database and not the actual meeting itself. This button is usually used when all your meetings have been canceled and you don't want to join the meetings.
If you want to delete a particular meeting from the day's schedule, so that it won't be joined, click "Todays Schedule >> Delete Meetings
Select the meeting you want to remove >> and then click Delete"
DO NOT CLOSE the main app if you want your meetings to be automated, closing the app will do as it sugggests, close the entire program.
Keep it running till all of your meetings have been automatically joined, after that, you can can close all windows.
This program will run correctly only if your local machine's time and date is set correct and is accurate.


Top comments (0)