
Introduction
Hello, after a long break of blogging, I am dedicating myself to share my knowledge with the community via series of posts regarding different architecture designs that I have worked on throughout past year. These designs corresponds to my current learning journey and are open to feedbacks and discussions. Without further due, let's dig in.
Senario

Imagine you are in process of creating a product in form of web application, mobile application, or API endpoint. You have designed and prototyped your business logic in form of an executable package. While this application undergoes different levels of development maturity, you require a mean of presenting and demoing the proof of concept (POC) to your client/audiences with different technical skill levels. There are plenty approaches which can achieve this purpose. Some are mentioned below:
- Ship the application as a package to be installed and tested on other developer's laptops.
- Package and Deploy the application on an internal server, on-premises infrastructure or internal network for few techsavy audiences to test.
- Deploy your application and serve on a public/private cloud provider and create instructions for how the end-user would interact with your app.
As you can see, you have many choices to deploy and present your application. One of the most important lessons I have learnt is that there will never be a silver-bullet tool, design, or architecture which works for all problems. Each project comes with sets of requirements and constraints. An architect or a developer has to make considerations and trade-off which will affect the product's end-goal. Some of the factors you can consider while choosing the correct approach for your product demo are time, skillset, budget, product's maturity level, and enterprise infrastructure availability.
having said that, let us assume we decided to deploy our application to a cloud provider (such as Microsoft Azure). There are yet different abstraction levels we can choose to lower the entry-cost of using cloud services. The price of these abstractions are to lose control over certain parts of the infrastructure your application will run on. Some of the available options are as such:
- Deploy your application as a serverless architecture using Azure functions
- Containerize and deploy the application using one of the container delivery services on Azure like App Services, Container Instances, or Kubernetes Services.
- Deploy the application on a cloud hosted Virtual Machine
As mentioned before, there are situations which choosing one solution would be more beneficial than others. In this example, we would like to deploy our application with minimal architecture alteration and scalability in mind. We will try to containerize and deploy the application on Azure App Service.

Azure App Service
App Service is an Azure cloud offering which allows fast build, deploy, and scaling of Web, Mobile, and API applications. It supports .NET, .NET Core, Node.js, Java, Python, or PHP programs inside of containers. App Service provide a fully managed infrastructure which deals with maintenance, security patches, and scaling. With it's 99.95 percent service-level agreement (SLA)-backed uptime availability, App Service can be good candidate for some production grade applications. We will deploy our first App Service in the following section.

Requirements:
- docker
- az-cli
Steps:
- Generate a new resource group: We will use this logical container to easier manage, monitor, deploy, scale, grant access of resources to a specific group or identity.
- Create a new Azure Container Registry (ACR): This image registry hosts your docker images on Azure. For enterprise use-cases look into options such as Jfrog Artifactory.
- Create an Azure App Service Plan
- Create an Azure App Service
- Upload your docker image to ACR and configure the App Service to use the image
We will configure the components using Azure CLI for more interactive approach. For more advance use-cases we can look into Azure ARM templates or terraform for future blogs.
Login using az cli
# install azure-cli on mac-os
brew update && brew install azure-cli

# login
az login

# check the active subscription:
az account show --output table

# change the active subscription (if needed):
az account set --subscription <subscription_name>
Create new resource group
Note: Naming conventions should follow consistent rules throughout your developments. It is a good idea to research your organizational naming conventions and follow them. I will use the following convention in a Camel Case format:
-
[Compname, Teamname, Projectname, Envname, Resourcelocation (abbreviated), Resourcetype (abbreviated)] - example:
SpacexFlycontrolLandingtimeProdCcRg
# create a new resource group:
az group create --name DemoFlaskappDevCcRg --location canadacentral

# check the resource group list
az group list
Create Azure Container Registry (ACR)
# create ACR
az acr create --name demoflaskappacr --resource-group DemoFlaskappDevCcRg --sku Basic --admin-enabled true

# retrieve the registry's credentials
az acr credential show --resource-group DemoFlaskappDevCcRg --name demoflaskappacr
Note: Copy the "password" (not password2) and username in the step above as we will use this to login via docker.
Login and push the image into ACR
In this step you can use the boiler plate flask + docker project from github and follow the instructions:
# login to ACR
docker login demoflaskappacr.azurecr.io --username demoflaskappacr

# clone the sample flask docker project
git clone https://github.com/erfankashani/docker_flask_app.git
cd docker_flask_app

# build the image
docker build -t docker-flask-app .

# run the image
docker run -p 8888:5000 docker-flask-app
This local container exposes to port 8888 on the host. The successful application can be checked on http://localhost:8888/ URL on your local computer's browser.

Now let us push this built image to docker registry:
# change the image name and tag to latest
docker tag docker-flask-app demoflaskappacr.azurecr.io/docker-flask-app:latest

# push to registry
docker push demoflaskappacr.azurecr.io/docker-flask-app:latest

# check the ACR for the pushed image
az acr repository list -n demoflaskappacr
Create App service
In this step we will create the App Service Plan and then an App Service which can pull images from the registry
# create app service plan:
az appservice plan create --name DemoFlaskappDevAsp --resource-group DemoFlaskappDevCcRg --is-linux

# create the app service (webapp)
az webapp create --resource-group DemoFlaskappDevCcRg --plan DemoFlaskappDevAsp --name DemoFlaskappDevAs --deployment-container-image-name demoflaskappacr.azurecr.io/docker-flask-app:latest

# expose the container's port 5000
az webapp config appsettings set --resource-group DemoFlaskappDevCcRg --name DemoFlaskappDevAs --settings WEBSITES_PORT=5000

# enable the system assigned managed identity (principle-id):
az webapp identity assign --resource-group DemoFlaskappDevCcRg --name DemoFlaskappDevAs --query principalId --output tsv

# retrieve az account subscription-id (subscription-id)
az account show --query id --output tsv


# grant the pulling access from ACR to the webapp managed identity (use principle-id and subscription-id from above)
az role assignment create --assignee <principle-id> --scope /subscriptions/<subscription-id>/resourceGroups/DemoFlaskappDevCcRg/providers/Microsoft.ContainerRegistry/registries/demoflaskappacr --role "AcrPull"

# configure the app to use the managed identity (use subscription-id from above)
az resource update --ids /subscriptions/<subscription-id>/resourceGroups/DemoFlaskappDevCcRg/providers/Microsoft.Web/sites/DemoFlaskappDevAs/config/web --set properties.acrUseManagedIdentityCreds=True

# configure the web app to use the correct docker registry:
az webapp config container set --name DemoFlaskappDevAs --resource-group DemoFlaskappDevCcRg --docker-custom-image-name demoflaskappacr.azurecr.io/docker-flask-app:latest --docker-registry-server-url https://demoflaskappacr.azurecr.io
Grab the URL from azure portal:

use the URL to access the app (please note that the first time load might take longer):
We have a deployed working version of this App Service. There are few more considerations which we make before demoing this application.
Networking
The applications hosted on Azure App Service are by default accessible through public internet and can only reachout to public endpoints. There are series of networking features which can help you define guidelines on the app's ingress (inbound traffic) and egress (outbound traffic). It is important to note that some of these capabilities are dependant on your mode of deployment (aka. single-tenant vs. multi-tenant plans). The following features are available on our multi-tenant service hosted App Service:
Ingress:
- App-assigned address: Enables IP-based SSL checks and dedicated unshared inbound addresses for your app
- Access restriction: Can limit the app access to specific well-defined addresses. This is a good idea for early demo phases when you would want to ensure your application can be viewed only by specific people.
- Service endpoints and private endpoints: Expose a private endpoint and manage the access from resources within a VNet. There are more advanced techniques such as integrating your application with firewalls and load-balancer services like Azure Front Door. These applications are more useful for production and we can discuss them in future blogs based on interest levels.
Egress:
- Hybrid connections: Access to private networks that are not connected to Azure.
- Gateway-required Vnet-integrations: Access to resources in other VNets in different region via VNet peering.
- VNet Integrations: This integration with Virtual Network opens the door to options such as configuring private subnets, exposing static IPs via NAT gateway, defining Network Security Groups (NSGs) for outbound traffic, integrating your app with a secure hub-and-spoke model to communicate with on-premises resources etc.
User Authentication

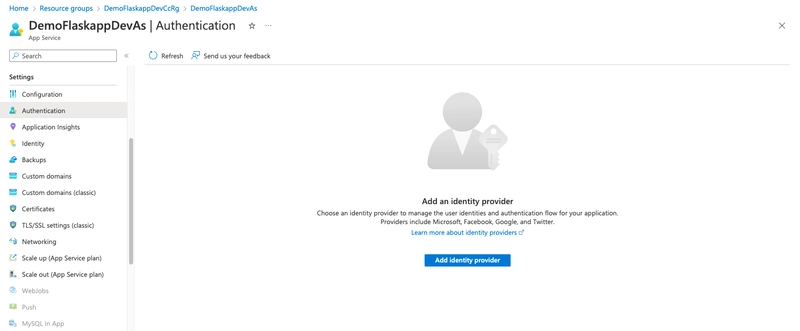
In this section we will enable user authentication using Microsoft AD Identity provider. Navigate to your App Service resource inside azure portal. Then click on authentication and "Add Identity Provider":
Select "Microsoft" as identity provider:
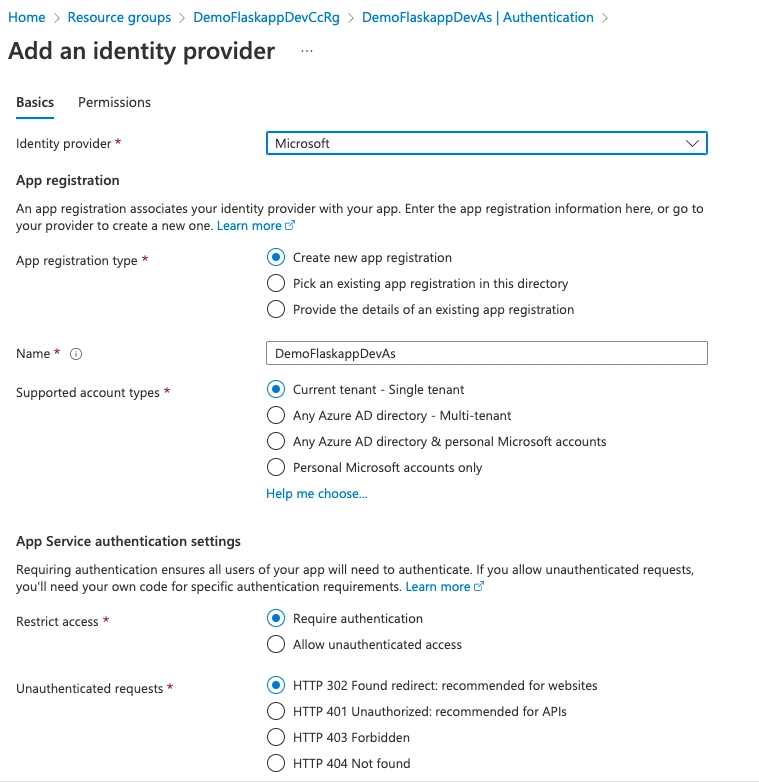
Your authenticator will require an app registration or service principal name (SPN) to communicate with the Identity provider. You have the preferred options of creating a new app registration from the same page or use an existing app registration followed by this link. In this example we:
- allow application access to same tenant users only.
- restrict app access to authenticated requests.
- return 302 Error code on unauthenticated requests.
- enable token storage.
Then press "add" which brings the following result:

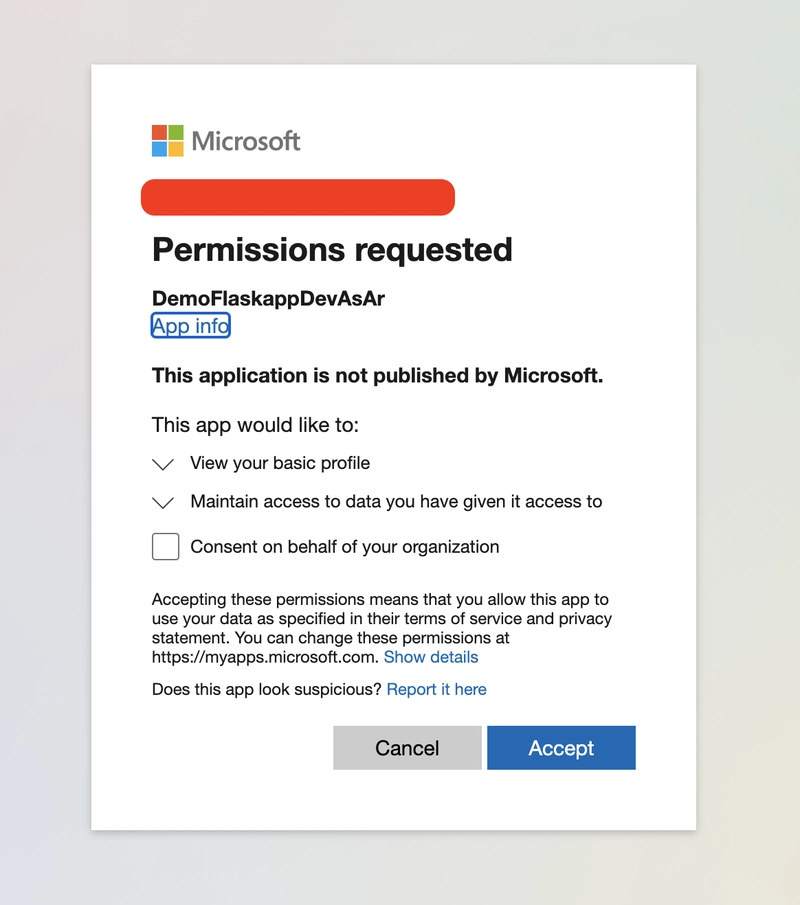
To try this feature, attempt to access the URL again. This will require a Microsoft account login and the following pop up would show up:
Basic Scaling
there are two means of scaling your application to support higher number of requests:
Scaling-up: Means adding more resources like CPU, memory, and disk space to your existing app. You can achieve this by altering the App service Plan tier which your App Service is using.
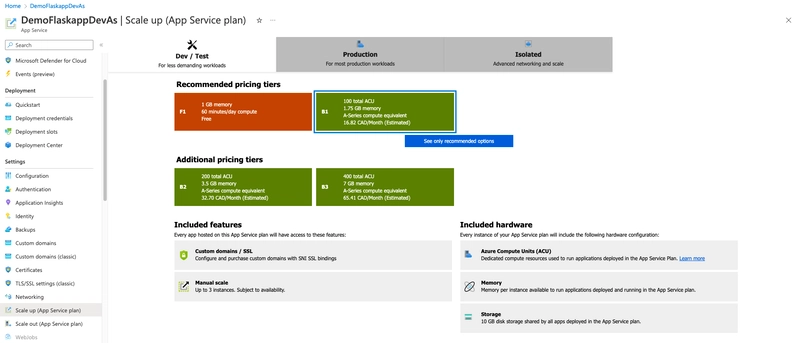
Scaling-out: Create more instances of the VMs that run your application. You can scale out to as many as 30 instances, depending on your pricing tier. There are also autoscaling options to scale up and down your instances based on rules and schedules.

Thank you for following this blog to the end. In the next blog we will look into other aspects of this solution such as:
- Secret management
- Deployment options
- Monitoring
- Disaster Recovery
Resources:
- https://azure.microsoft.com/en-us/products/app-service/
- https://learn.microsoft.com/en-us/azure/app-service/networking-features
- https://learn.microsoft.com/en-us/azure/app-service/manage-scale-up
- https://learn.microsoft.com/en-us/azure/architecture/reference-architectures/app-service-web-app/basic-web-app?tabs=cli

Top comments (0)