Recently I set out to see if I could get gulp to do all my front end “things” for me automatically. I had previously been using the VSCode task runner to transpile my scss or less files. But occasionally I’d run into issues on sites where another developer (or even myself at a previous time) had forgotten we were using a pre-processor and edited the main CSS file instead. And then we just end up with a mess between the pre-processor files and the transpiled files not being in sync. So why not minify? It’s good for site performance and if a developer opens the CSS file they will notice right away that it’s minimized and go look for the less/scss. And heck if I’m doing that why not add in an autoprefixer? And it’s always nice to have a sourcemap file to make it easier when you’re inspecting in the browser.
Install all the things
First things first. VSCode has a little bit on how a person might want to automate some processes and the first step is installing gulp.
Once you have gulp installed you’ll want to install the following other pacakges:
gulp-less
gulp-sass
gulp-clean-css
gulp-sourcemaps
gulp-autoprefixer
Create a Gulp Task
Now it’s time to create your tasks. You’ll want to create a file called ‘gulpfile.js’.
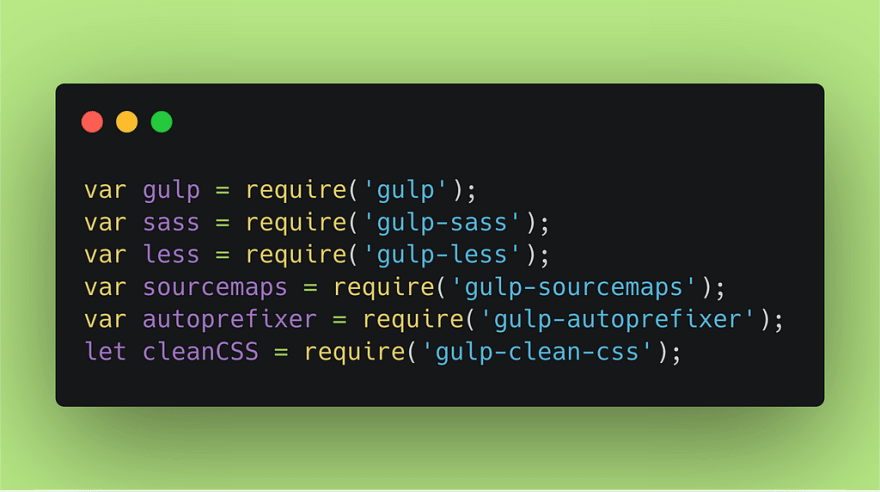
Require all the things
First in your gulpfile.js you will need to require all these nifty packages that you just installed:
Where do the things go?
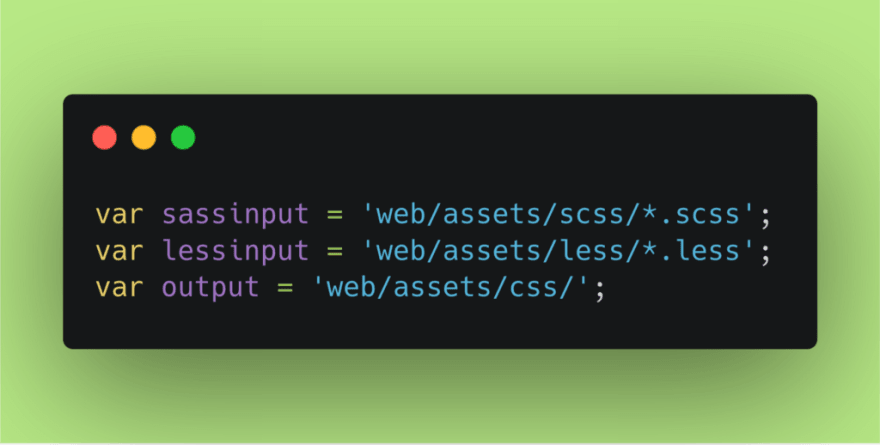
Follow that up with a couple variables which will hold your source and output locations for your front end files:
Optional Options
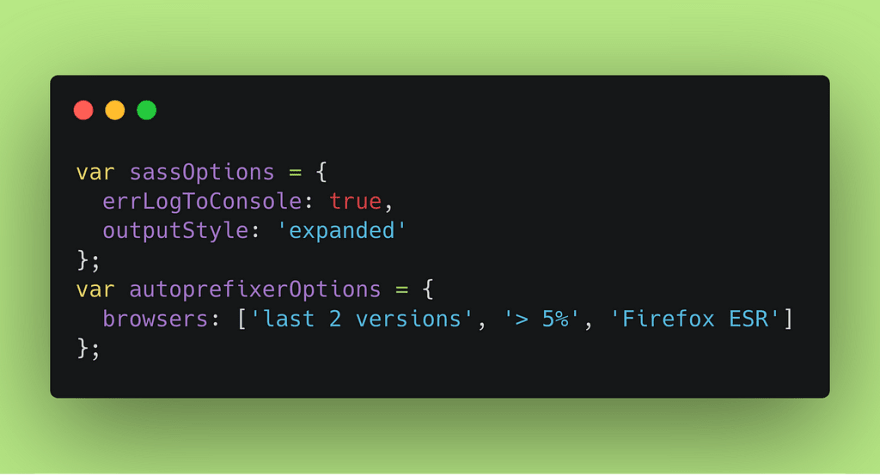
Optionally you might want to define some options:
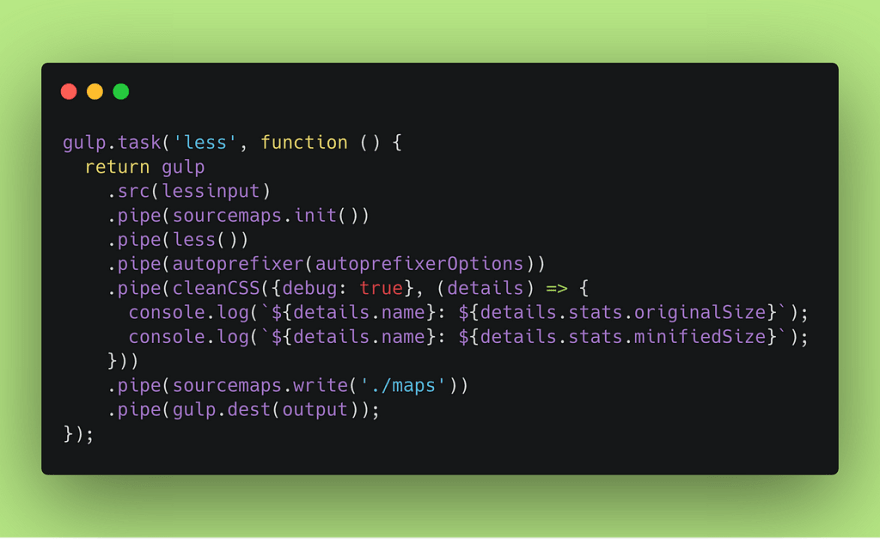
Sass Task
Now we need to set up a task to deal with sass files:
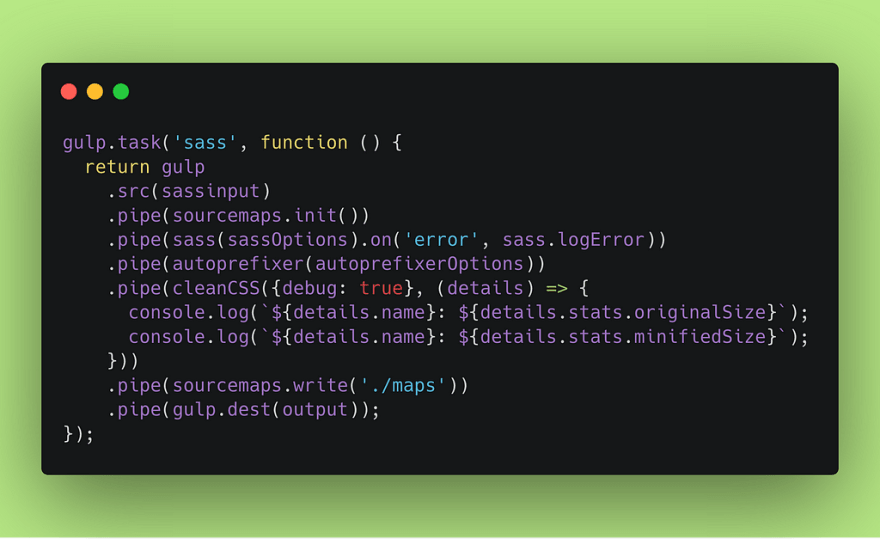
Let’s go line by line and see what’s going on here (this will be similar to the Less task further down the article).
- First, we initial the gulp task and give it a name of ‘sass’.
- After the return statement comes the real work:
- We use our ‘sassinput’ variable to define where we want the gulp task to get the source files from, in other words, where are you storing your .scss files?
- Next we initiate the sourcemaps package
- Followed by calling the sass package and utilizing any of the options we might have set up and logging any errors
- The autoprefixer and it’s options come after we transpile the sass, this will simply add some browser prefixes to your final CSS to help with backward compatibility.
- And now we are going to minify the resulting CSS, this example shows the debug options and prints out the starting and ending size of the CSS in the console for your reference.
- Next we write our sourcemap file and in this case we’re saving that in an additional directory called ‘maps’ located in the CSS directory
- And finally we write all these changes to our defined output location.
After all that you should end up with a nice minified, prefixed CSS file as well as a sourcemap file.
More for Less
Maybe you use less instead of sass, or you want to have both set up just in case:
The Less tasks varies only in the input variable ‘lessinput’ the less package (line 5), and the name of the task (line 1).
Watch the Things
Now that you have these tasks set up you can do a couple of different things.
- You can use VSCode to run these tasks with the built in task runner (check out the VSCode documentation for that)
- You can use gulp to automatically watch for changes to your source directory.
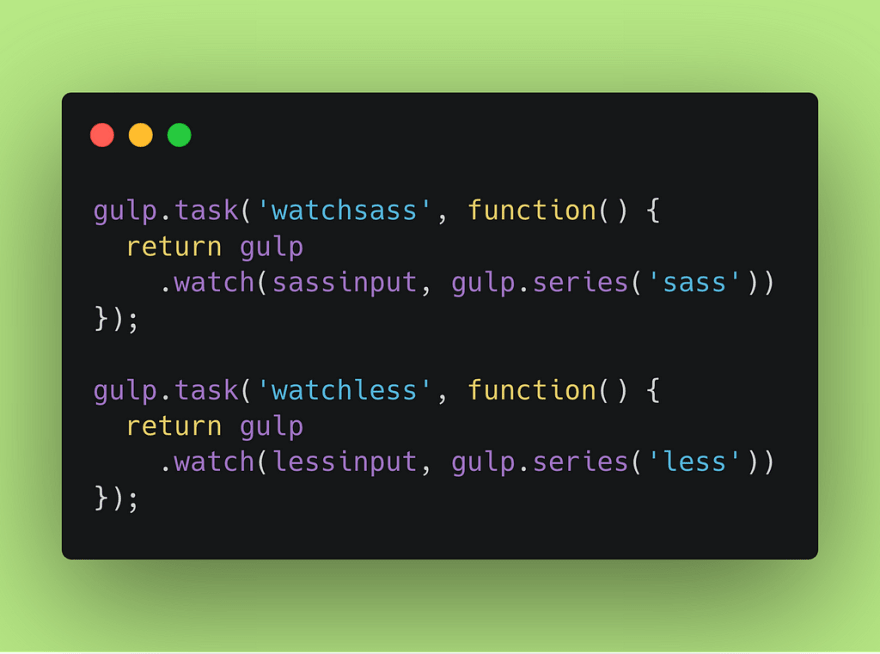
The first watch tasks watches for changes in the ‘sassinput’ directory and runs the ‘sass’ tasks if it sees your files change. And the second does the same for the ‘lessinput’.
Let’s get running!
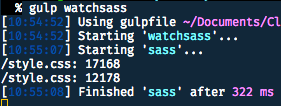
To run this watch task:
- Save this new ‘gulpfile.js’ to the root directory of your local web project
- In a terminal, or even more handily, in the terminal tab of VSCode, type ‘gulp watchsass’ or ‘gulp watchless’ (depending on what you are working on at the time).
- The tasks will watch your directory for changes and run all the fancy code you just wrote to transpile and minify your CSS every time you make a change and save it.
- And if you want to stop the task, a simple Ctrl-C will take care of that.
Code all the things!
Now that you have everything set up, go forth and code all the things, save your file and rest easy knowing gulp is handling all the nit picky stuff for you.
What automated tasks have you added to your gulpfile, I’d love to hear?

Top comments (1)
Great guide. I can add few extra options from PostCSS community:
browsersoption was deprecated in Autoprefixer. It is better to create.browserslistrcconfig (main reason is that this common config will be used by multiple tools). Here is more docs: github.com/browserslist/browserslistgulp-autoprefixeris not an official way to use Autoprefixer and could create some bugs. We recommend to usegulp-postcsswithautoprefixer()plugin. More details: github.com/postcss/autoprefixer#gulp