
In this post, you’ll learn to integrate PayPal payment in Ionic 5 apps and PWA, so you can accept payment both on mobile and desktop devices.
PayPal is one of the most widely used and easiest payment gateway to integrate in your website or app. Plus it is spread all over the globe, and supports a wide variety of payment options. PayPal can take care of almost all your payment requirements, so you don’t have to go all

What is Ionic ?
You probably already know about Ionic, but I’m putting it here just for the sake of beginners. Ionic is a hybrid mobile app development SDK. It provides tools and services for developing hybrid mobile apps using Web technologies like CSS, HTML5, and Sass. Apps can be built with these Web technologies and then distributed through native app stores to be installed on devices by leveraging Cordova or Capacitor environment.
So, in other words — If you create Native apps in Android, you code in Java. If you create Native apps in iOS, you code in Obj-C or Swift. Both of these are powerful but complex languages. With Ionic you can write a single piece of code for your app that can run on both iOS and Android and web (as PWA), that too with the simplicity of HTML, CSS, and JS.
It is important to note the contribution of Cordova/Capacitor in this. Ionic is only a UI wrapper made up of HTML, CSS and JS. So, by default, Ionic cannot run as an app in an iOS or Android device. Cordova/Capacitor is the build environment that containerizes (sort of) this Ionic web app and converts it into a device installable app, along with providing this app access to native APIs like Camera etc.
Ionic and Payment Gateways
Ionic can create a wide variety of apps, and hence a wide variety of payment gateways can be implemented in Ionic apps. The popular ones are PayPal, Stripe, Braintree, in-app purchase etc. For more details on payment gateways, you can read my blog on Payment Gateway Solutions in Ionic.
Also, there are different types of Ionic Apps you can build for same functionality. Most popular ones are :
- Front-end: Angular | Build environment : Cordova ✅
- Front-end: Angular | Build environment : Capacitor
- Front-end: React | Build environment : Capacitor
- Front-end: React/Angular | as PWA ✅
As you see, PayPal can be integrated in websites as well as mobile apps. In this blog we’ll learn how to integrate PayPal payment gateway in Ionic 5 apps and Ionic 5 PWA.

Structure of post
In this post we will learn how to implement Paypal payments for an Ionic 5 PWA and mobile app. We can break down the post in these steps:
Step 1— Create a PayPal developer account and configure it for integration
Step 2— Creating a basic Ionic 5 Angular app
PWA integration
Step 3 —Configure PayPal web integration
Step 4 — Run the PWA on ionic serve to test web payments
App integration
Step 5 — Integrate Ionic Native plugin for PayPal
Step 6 — Build the app on android to test app payments.
Step 7 — Going Live
Step 1 — Create PayPal developer account and configure it for integration
To configure PayPal payments in your Ionic app or PWA, you need to create a business PayPal account. But for testing purposes, you have to use the Sandbox test accounts. Sandbox testing will look exactly like live payments, but it won’t deduct any money from your account or Credit Card.
To obtain your Sandbox credentials follow the steps below:
- Go to Sandbox - Accounts and create a sandbox business and personal test accounts.
- Go to My Apps & Credentials and generate a REST API app, and link it to your sandbox test business account (by default you have a business and personal sandbox account in developer dashboard).When your app’s PayPal SDK is running in Sandbox mode, you cannot make payments with an “actual” PayPal account, you need a Sandbox account. So, the personal sandbox account “pays” and business sandbox account “receives” the money.

Also note down your Client ID from the app details. This is mostly what you need to integrate PayPal in your app / PWA and test payments.

Country specific gotchas
- Being a payment gateway, PayPal has to respect different countries rules. E.g. In India, PayPal users can only pay and receive payments done from India in INR. So if you are testing from India, and your Sandbox accounts are created with India as country, you’ll have to make payments in INR. Similar restrictions may exist for other countries.
- Sandbox payment credit cards are also currency sensitive. If you are facing issue making payments with the default sandbox credit card, generate a new one using Credit Card Generator from the left menu. Make sure you keep the country same as the sandbox account. Add this card with the
Add new cardoption when you are making a sandbox payment

Step 2— Create a basic Ionic Angular app
First you need to make sure you have the latest Ionic CLI. This will ensure you are using everything latest. Ensure latest Ionic CLI installation using
$ npm install -g ionic@latest
(My node version at the time of writing the blog is 12.14.0)
Creating a basic Ionic-Angular app. Start a basic blank starter using
$ ionic start PayPalIonic sidemenu --type=angular --cordova
The --type=angular told the CLI to create an Angular app, not a React app !!
Run the app in browser using
$ ionic serve
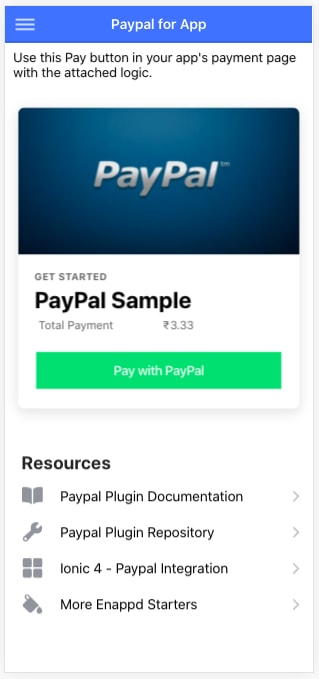
You won’t see much in the homepage created in the starter. I have modified the homepage a little to test our PayPal functionality — basically you can do away with just a button for PayPal payments.
My homepage looks like this

Overall PayPal-web.page.html code looks like this
Step 3 — Configure PayPal web integration
We can’t use the PayPal Cordova plugin in an Ionic Progressive Web App (PWA). But we can use the PayPal front-end Javascript SDK in such case.
Warning : In websites or PWA, it is recommended to use payment gateway functions in back-end, because front-end implementation can reveal your client-ID, secret etc
Add PayPal Javascript SDK to index.html
For website/PWA front-end implementation, PayPal provides Payment Buttons (the yellow button in the above image). These are pre-configured PayPal buttons + functions, attached to a JS file we import in our PWA’s index.html as :
<script src="https://www.paypal.com/sdk/js?client-id=YOUR_CLIENT_ID&currency=USD"></script>
Replace YOUR_CLIENT_ID in above script call with your own client ID, and change the currency as per your sandbox/live account currency. Client ID is what attaches the Payment with your PayPal REST API app, so do not get it wrong.
SDK Parameters
PayPal JavaScript SDK uses default values for parameters you don’t pass in the imported script. You might want to override these default values depending on your functionality. A few common parameters you might override:
-
currency- The PayPal JavaScript SDK defaults toUSD -
intent- The PayPal JavaScript SDK defaults tocapture, which results in the capturing the funds immediately. If you want to authorize funds immediately but capture the funds later, you have to explicitly passauthorizeas the intent for the transaction
Now, PayPal official documentation tells you to code the remaining part of the logic in index.html itself. But the default implementation is good for two reasons
- Ionic app takes time to compile and load in the webview environment, so the render function cannot find the button container
- We need to pass variables like amount, currency etc to the functions. So it makes more sense to keep the functions inside the page.ts file of PWA
Render Payment Buttons
In the HTML template, we replace the ion-button with
<div id="paypal-button-container"></div>
This id is used to identify the button, and attached correct render and payment functions to the button.
Payment Functions
createOrder — This function is called when the buyer clicks the PayPal button. This button
- Calls PayPal using
actions.order.create()to set up the details of a one-time transaction, including the amount, line item details, and more - Launches the PayPal Checkout window so the buyer can log in and approve the transaction on paypal.com
onApprove — This function is called after the buyer approves the transaction on paypal.com. This function:
- Calls PayPal using
actions.order.capture()to capture the funds from the transaction. - Shows a message to the buyer to let them know the transaction is successful.
onApprove function carries out the success or error part after a transaction. Here, you can call your server with a REST API and save a successful payment in your database.
Here’s the full code of PayPal-web.page.ts
You can also try different styles of payment buttons at PayPal Payment Button demo page
Step 4 — Test payments in PWA
Run the PWA on browser using ionic serve
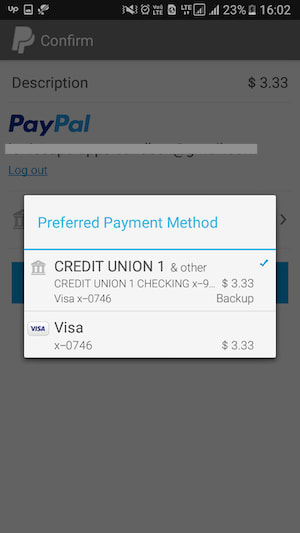
When you click on the Payment Button, PayPal script automatically pops-up a modal with required functionality. Remember, this PayPal popup is attached to your PayPal REST API app, based on the Client ID you provided.

Login with your Sandbox account, and you’ll see payment options just like a normal PayPal transaction. Add a new credit card as I mentioned in Step 1, if you are getting an error saying Your bank was not able to verify your card . This is generally a mismatch in currency of the app, sandbox account or the credit card.
Remember, you cannot login with a non-sandbox PayPal account for testing

Select the appropriate method, and your payment is done.
Sometimes, there will be an additional verification step involved, imitating a 3D secure password for real transaction. As you can see, being a Sandbox transaction, the password is mentioned as the Personal message.

Once the payment is done, the response object will look like this

You can easily use the response to determine if the payment was successful.
Step 5 — Integrate Ionic Native plugin for PayPal
To implement PayPal payment in Ionic Mobile apps, install PayPal Cordova plugin first
$ ionic cordova plugin add com.paypal.cordova.mobilesdk
$ npm install @ionic-native/paypal
Import PayPal in app.module
Import and include PayPal in the list of providers in your app.module.ts file.
import { PayPal } from '@ionic-native/paypal/ngx';

Import PayPal in your page
Create a separate folder for PayPal app implementation.
$ ionic generate page paypal-mobile
Import PayPal in your paypal-mobile.page.ts same as app.module.ts
import { PayPal, PayPalPayment, PayPalConfiguration } from '@ionic-native/paypal/ngx';
....
export class PaypalPage {constructor(private payPal: PayPal) { }
Modify the page’s UI a little to match the phone payment functionality
Here’s the paypal-mobile.page.html code, in case you need
PayPal payment function
Invoke the payment function to initiate a payment. As mentioned earlier, You will require your client_id from your PayPal account. (How to get my credentials from PayPal account). This function will be attached to Pay with PayPal button we saw earlier in the app screenshot.
Here’s the complete code for PayPal mobile app implementation
In the payWithPaypal() function, you start by initializing the PayPal object with the PayPal environment (Sandbox or Production) to prepare the device for processing payments. Βy calling the prepareToRender() method you pass the environment we set earlier. Finally, you render the PayPal UI to collect the payment from the user by calling the renderSinglePaymentUI() method.
Notice thePayPalEnvironmentSandboxparameter. This is used for Sandbox environment. For production environment, it will change toPayPalEnvironmentProduction. Of course, do not forget to replaceYOUR_SANDBOX_CLIENT_IDwith your Sandbox Client ID .
Also notice, for the sake of a sample, we have taken PaymentAmount andcurrency as static in the logic, but these can be easily dynamic as per your app’s requirement.

Once payment is done, PayPal SDK will return a response. A sample sandbox response is shown in the gist above. One can use this response to show appropriate Toast or Alert to app users.
Step 6 — Build the app on android to test app payments
To build the app on android, run the following commands one after another
$ ionic cordova platform add android
$ ionic cordova run android
The final command will run the app on either default emulator, or an android device attached to your system. Once you click the Pay with PayPal button, you will see the PayPal payment screens

You can choose to
- Pay with PayPal — using your PayPal account, OR
- Pay with Card — This will use your’s device’s camera to help read your credit card (to avoid typing your card number, expiry date etc)
1. Pay with PayPal
You will need to login to your Sandbox Account to make a payment (because, remember, you are in a sandbox environment)

Once you are logged in, you’ll see the checkout options
Select one option, and pay for the dummy amount.
2. Pay with Card
In this case, your apps’ camera will open up to scan your card.

Once it is done scanning, it will confirm the card number, expiry date and ask for your CVV details etc. Lastly, it’ll show you a confirmation screen, and you proceed to pay the amount.

In both payment cases, you should receive a successful payment response like the following

This completes the Mobile app part of PayPal payment.
Going Live
After testing on app and PWA, when you want to go live, you will need to perform following steps
- Copy the
productionclient-ID from your PayPal account and use it in your app

- In app implementation, change the
PayPalEnvironmentSandboxtoPayPalEnvironmentProductioninprepareToRenderfunction - In web-implementation, change the script import with
<script src=”https://www.paypal.com/sdk/js?client-id=LIVE_CLIENT_ID"> </script>
You’re all set now to make and accept payment from your Ionic app and PWA. Go enjoy, homie !

Conclusion
In this post, we learnt how to integrate PayPal in an Ionic app, as well as in an Ionic progressive web app. Testing can be performed easily using Sandbox accounts, and we can go live by simply changing sandbox client-ID with live-ID.
Leave comments if you face any issues in the implementation. I’ll be happy to help.
Next Steps
If you liked this blog, you will also find the following Ionic blogs interesting and helpful. Feel free to ask any questions in the comment section
- Ionic Payment Gateways — Stripe | PayPal | Apple Pay | RazorPay
- Ionic Charts with — Google Charts | HighCharts | d3.js | Chart.js
- Ionic Social Logins — Facebook | Google | Twitter
- Ionic Authentications — Via Email | Anonymous
- Ionic Features — Geolocation | QR Code reader | Pedometer
- Media in Ionic — Audio | Video | Image Picker | Image Cropper
- Ionic Essentials — Native Storage | Translations | RTL
- Ionic messaging — Firebase Push | Reading SMS
- Ionic with Firebase — Basics | Hosting and DB | Cloud functions
Ionic React Full App with Capacitor
If you need a base to start your next Ionic 5 React Capacitor app, you can make your next awesome app using Ionic 5 React Full App in Capacitor
Ionic Capacitor Full App (Angular)
If you need a base to start your next Angular Capacitor app, you can make your next awesome app using Capacitor Full App

Ionic Full App (Angular and Cordova)
If you need a base to start your next Ionic 5 app, you can make your next awesome app using Ionic 5 Full App


Top comments (0)