
Carpooling is the sharing of car journeys so that more than one person travels in a car, and prevents the need for others to have to drive to a location themselves. Growing population lead to more vehicles on the road thus increasing traffic congestion and pollution.
Carpool is carpooling or ride-sharing app template built in Ionic 4. With this template, you can create apps like BlaBla Car, UberPool, Ola Share, etc. With this starter kit, you can build a full working cab booking and sharing application to provide services to the people at an extremely convenient way, You only have to integrate a back-end server to make it fully functional.

How can I use this template
This template is a ready-made front-end template for a carpooling and ride-sharing App. You can use the screens coded in this app, navigation between the screens and specific functions applied to buttons, etc. This saves your 100% cost and time in front-end UI development. You can simply add a back-end/server to this app template, and replace the demo data with data coming from your server. This way, you only spend time and money on back-end development. You can easily change the screens, styles, and logics to suit your requirements. To make it a live app like BlaBla Car, UberPool, ToGo, Uber Eats, and Ola Share, etc. you just need to add a back-end to the app, and load your data in the back-end.

This template is made in IONIC 4 language. With IONIC 4, you can
- Create iOS and an Android app with a single source code
- Cut your project cost and time in half
- Ensure exact same UI in iOS and Android, while following the standard UI norms
- Saves separate updates for each app in future
Features of this template
Screens

Landing
You will get this screen as the app loads successfully after the splash screen timeout. Here you are provided with two options on this screen one is log in and another one is signup. If a user already exists then he/she may opt for login or if he/she has no account on this application then the user will have to create an account by clicking on the signup button.
This page navigates you to the login page and signup page. Here this page only UI for demo purpose but you can make it a fully working application by integrating backend to it with the help of a good backend developer.
Login
This page can be accessed from the Landing page as the app loads. By clicking on the login button after the required entries in the input field it redirects you to the home page. The login page can be used to perform login action with username/email and password. Currently, the login is only for demo purposes. The login page also contains “Forgot Password” and “Signup” page navigations.
Signup
This page can be accessed as the app loads. By clicking on the signup button it redirects you to the Home page. The signup page can be used to register a user with a username/email and password. Currently, the signup is only for demo purposes. The signup page also contains “Login page “ page navigations.
Forgot Password
This page can be accessed from the “Login” page. Forgot Password page can be used to send a reset password URL or OTP to the user’s email or any other way you want to use. Currently, this page is only UI. The email sent to the user can be verified from their mail and the user may be asked to provide a new password.

Home
This is the first tab of the application. This page can be accessed after a successful login by a registered user for the application. Home page contains two segments “CURRENT ” and “HISTORY” at the top of the page after the header. The current segment has options to OFFER A RIDE and FIND A RIDE options for a user. The history segment has the details of all the rides taken in the past. By clicking on any one options in the current segment, it will navigate to the Offer a ride page or Find a ride page.
History
This is the first tab’s second segment of the application. This page can be accessed by clicking on the second segment “History” in the application. This page contains all the information about previous rides.
Offer Ride — Pick-up
This page can be accessed by clicking on offer a ride button on the home page. Here you can search for a pickup location of your choice or bu clicking on use current location to access your current location with the help of Ionic geolocation plugin.
This page navigates you to your pickup location’s view on the pickup map page.
Offer Ride > Pick-up > Map
This page can be accessed by clicking on any of the locations in pickup page. This page depicts the exact pick-up location on the map. This page navigates to the drop-off page.

Offer Ride — Drop-off
This page can be accessed by clicking on the arrow forward button on the pick-up-map page. Here you can select your drop location same as the pickup location. This page navigates to drop-off map view page.
Offer Ride — Drop-off — Map
This page can be accessed by clicking on any of the locations in drop-off page. This page depicts the exact drop location on the map. This page navigates to the add stopover page.
Add Stopover
This page can be accessed by clicking on the arrow forward button on the drop-off-map page. Here you can select your stopover in-between the journey. This page navigates to map view page of your complete ride.
Add Stopover — Complete journey on the map
This page can be accessed by clicking on the confirm button on the Add Stopover page. This page shows the map view of the journey.
This page navigates to the calendar page.

Calendar page
This page can be accessed by clicking on the Good for me button on the journey map view after the stopover selection. Here we can select the date of departure for your ride.
This page navigates you to the Select Time page.
Select time page
This page can be accessed by clicking on the arrow-forward button on the select date page. Here we can select the time of departure for the ride.
This page navigates to the comfort page.
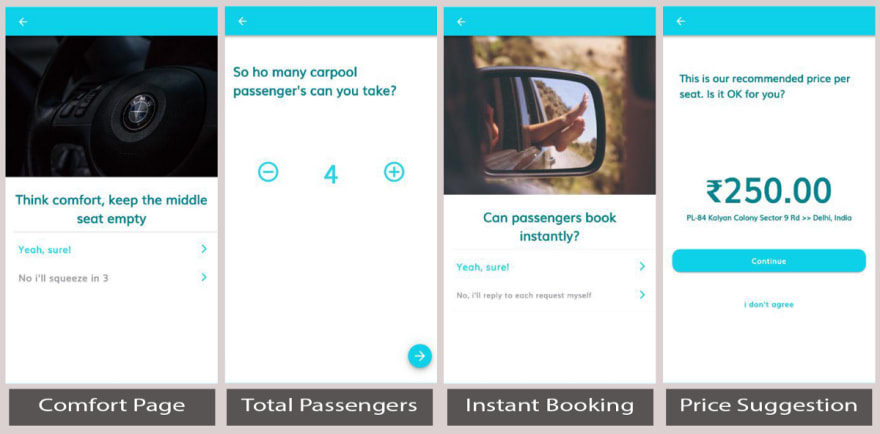
Comfort page
This page can be accessed after the pickup time selection. this page navigates you to the total no of carpool passenger’s page.
Total passengers
This page can be accessed after comfort page by clicking on any button on that page. Here you can select the total number of passengers that you can take with you for the ride.
This page navigates you to the permission page to verify either passenger booking instantly or not ?.
Permission to book by Passengers instantly
This page can be accessed after total passengers page by clicking on the arrow-forward button at the right end of the page.
This page navigates you to the recommended price per se seat page.
Recommended price per seat
This page can be accessed after the permission page.
This page navigates to the don’t agree or confirmation price page.

Price Edit
This page can be accessed after the recommended price page. This page navigates to the edit price page.
Price Amount Enter
This page can be accessed from the don’t agree page. Here you can edit the price of the journey. This page navigates you to the return trip page.
Return Trip Plan
This page can be accessed from the edit price page. This page navigates to the return journey plan Calender.
Return Trip Plan date selector
This page can be accessed from the return trip plan confirmation page. Here you can select the return date of the journey. This page navigates to the return time page.

Select return time
This page can be accessed by clicking on the arrow-forward button on the select return date page. Here we can select the return time of pick for the ride.
This page navigates to message for the passenger’s page.
Message for the passengers
This page can be accessed after the return time page. Here on this page, the user can add some messages or instructions about his/her ride. This page navigates to the ride confirmation page.
Offer Ride Confirmation
This page can be accessed after complete ride information. This page navigates to the Home page current segment.
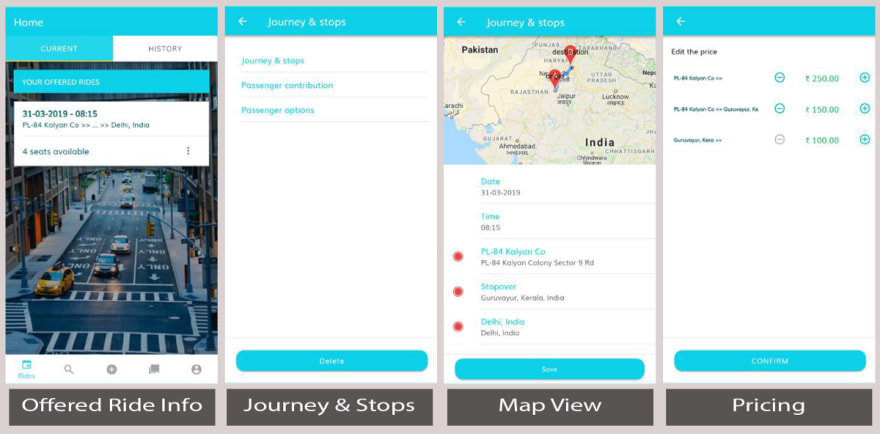
Home Page — Current segment — offered rides
This page can be accessed after filling and selecting all the details from the “OFFER A RIDE” to “RIDE CONFIRMATION”. This page contains the navigation to journey and stops page.
Home Page — Current segment — offered rides — Journey and Stops
This page can be accessed by clicking on the card in the home page.
This page navigates to:-
1. Journey & Stops
2. Passenger contribution
3. Passenger Options
4: Delete Offered Journey
Offered Rides — Journey and Stops — Journey & stops details
This page can be accessed from the Journey & Stops. this page contains the details of the offered journey.
Offered Rides — Journey and Stops — Passenger contribution
This page can be accessed from the Journey & Stops. This page contains the details of the price offered for the journey. Here you can edit the price and save that.

Offered Rides — Journey and Stops — Passenger options
This page can be accessed from the Journey & Stops. This page contains the details of the passengers offered for the journey. Here you can edit the number of passengers and message for the passengers and save that.
Offered Rides — Journey and Stops — Delete Offered Journey
This page can be accessed from the Journey & stops page by clicking on the delete button at the bottom of the page. This page navigates to the first tab’s first segment.
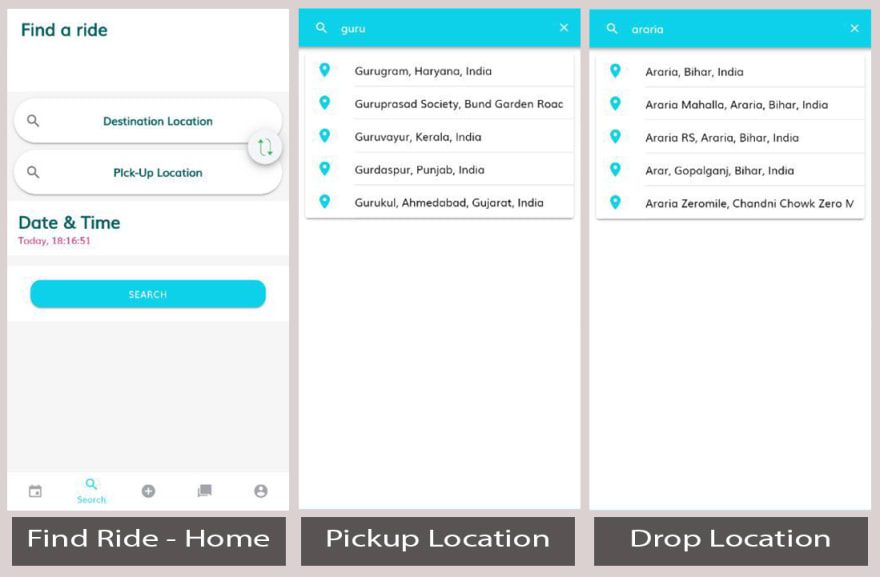
Find a ride
This is the second tab of the application. This page navigates to the: —
- Destination location
- Pickup Location
- Date and time selection
Find a ride — Pickup Location
This page can be accessed by clicking on the Pickup location in the second tab of the application. In this page, we can select the pickup location of our’s using google place prediction.
This page navigates back to find a ride page.
Find a ride — Destination Location
This page can be accessed by clicking on the Destination location in the second tab of the application. In this page, we can select the destination location of our’s with the help google place prediction.
This page navigates back to find a ride page.

Find a ride — Date and Time
These pages can be accessed by clicking on the Date and Time button on the Find a ride page to select the date and time for the ride. This page navigates back to find a ride page. In find ride page after selecting all the information this page navigates to the available rides page by clicking on the search.

Find a ride — Available rides
This page can be accessed by clicking on the search on the second tabs of the application after filling/selecting all the required details of the ride. By selecting any ride it navigates to the ride details page.
Find a ride — Available rides details
This page can be accessed by clicking on any card in the available rides page. The page contains detailed information about the available ride. This page navigates to the total riding passenger’s page.
Find a ride — Total passengers count
This page can be accessed by clicking on the “CONTINUE” at the bottom of the available ride details page.
This page navigates to the “Book” page.

Find a ride — Book ride page
This page can be accessed from the total passenger’s count by clicking on the arrow-forward button at the bottom right most of the page. This page navigates to the “Booking confirmation” page.
Find a ride — Booking confirmation
These pages can be accessed from the “Book ride” page. This page processes the progress for booking confirmation.
This page navigates to the ride booked confirmation page.
Find a ride — Ride Booked
This is the last page of the find a ride flow. This page navigates back to the find ride page after successful ride booking.
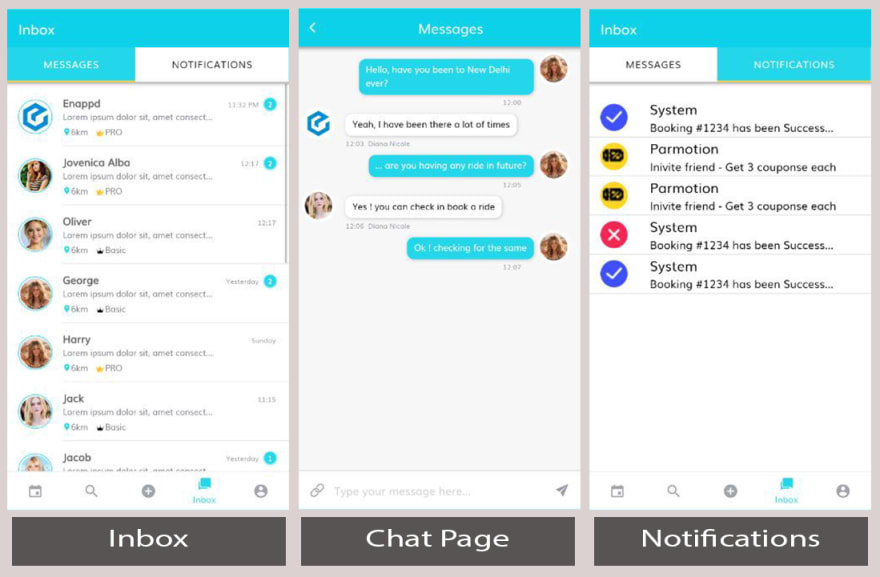
Inbox
This is the fourth tab of this application. This page contains the nesting of tabs and segments. This page has two segments at the top of the page below the header as “MESSAGES” and “NOTIFICATION”.This is the first segment of the inbox tabs.
This page navigates to the Chat page.
Inbox — Messages-Chat
This page can be accessed by clicking on any chat contact in the “MESSAGES” segment. Messages page contains the chat application for direct interaction to the carpool customer service. Here chat is only UI and for demo purpose.
Inbox — Notification
This is the second segment of the inbox tabs. This page contains the notification as list items in the vertical direction of the page. To enable and disable mobile notifications, you will first need a Push notifications system in your back-end. If you are using Firebase — implementing, enabling and disabling push notification is very easy compared to a custom back-end. Read more about Firebase- Ionic push notification here.
You will first need a Push notifications system in your back-end. If you are using Firebase — implementing, enabling and disabling push notification is very easy compared to a custom back-end. Read more about Firebase- Ionic push notification here.
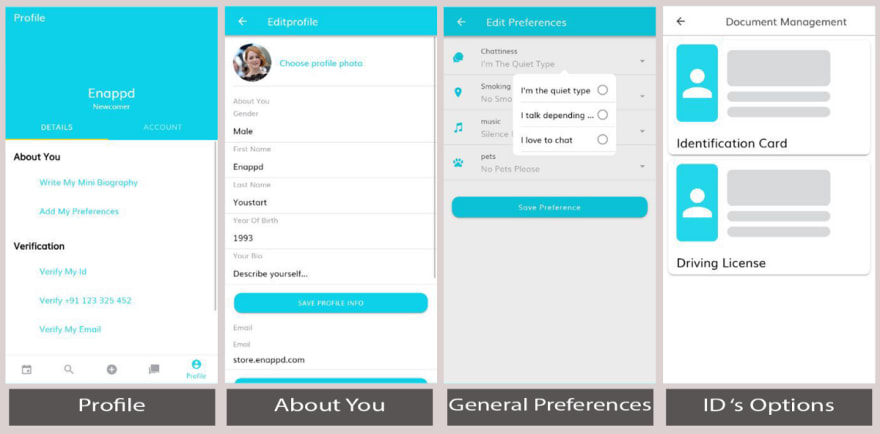
Profile
This is the fifth tab and the first segment of this application. This page contains the nesting of tabs and segments. This page has two segments at the top of the page below the header as “DETAILS” and “ACCOUNTS”. This is the first segment of the profile tabs. This segment has a list of actions in vertical direction. All the action executes as…
- Mini Biography
- Add my preferences
- Verify my id
- Verify mobile number
- verify email
- Add a car
Profile — Mini Biography
This page can be accessed from the “Profile” page. The options available can be chosen to edit user name, email address, update password, address, contact, Gender, DOB, Bio, and etc as per your requirement and update all those. Back button takes you back to the “Profile” page.
Profile — Add my preferences
This page can be accessed from the “Profile” page by clicking on the “Add my preferences”. Here you can edit your preferences and update that. The save preferences button will update your data in the database and navigate back to the profile tab. Here this is only UI for demo purpose.
Profile — Verify my ID
This page can be accessed from the “Profile” page by clicking on the Verify my id”. This page will navigate to update document details.
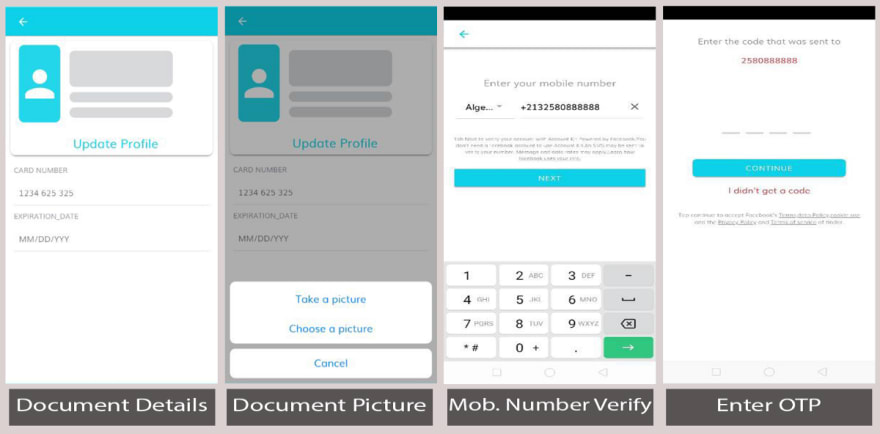
Profile — Update Document
This page can be accessed from the “Verify my id” page by clicking on the “Driving License”. This page will navigate to the camera. Here this is only UI and for demo purpose. You can make it in a fully functioning app by integrating back-end with the help of a back-end developer.
Profile — Verify mobile number
This page can be accessed from the “Profile” page first segment. Verify mobile numbers page can be used to authenticate a user to check a user is registered or not. After entering the registered mobile number it navigates the user to the OTP verification page which a user receives after entering his/her mobile number.
Profile — OTP Verification
This page can be accessed after entering the phone number in with phone number page. In this page, received OTP on user’s mobile gets verified for letting the user to access the home page. On clicking “CONTINUE” it navigates back to the apps profile tab.
This page here is only the UI but you can make it a fully working app by integrating a suitable backend by a developer.

Profile — Verify email
This page can be accessed by clicking on the verify email in the profile page.
Here you can control the emails you want to get either all of them, just the important stuff or the bare minimum. Here you have the options to enable and disable email notifications.
You will first need a Push notifications system in your back-end. If you are using Firebase — implementing, enabling and disabling push notification is very easy compared to a custom back-end. Read more about Firebase- Ionic push notification here.
Here this is only the UI for demo purpose.
Profile — Add a car
This page can be accessed by clicking on the Add a car in the profile page.
This page navigates to the add new vehicle page.
Profile — Add a car — Add new vehicle
This page can be accessed by clicking on the Add button at the very bottom in the Add a car page of the profile page. Here the items are listed in a list view in the vertical direction. Each item contains a dropdown menu to select the matching item from them.
By clicking on the “COMPLETE” button it will navigate back to the add car page.
Features
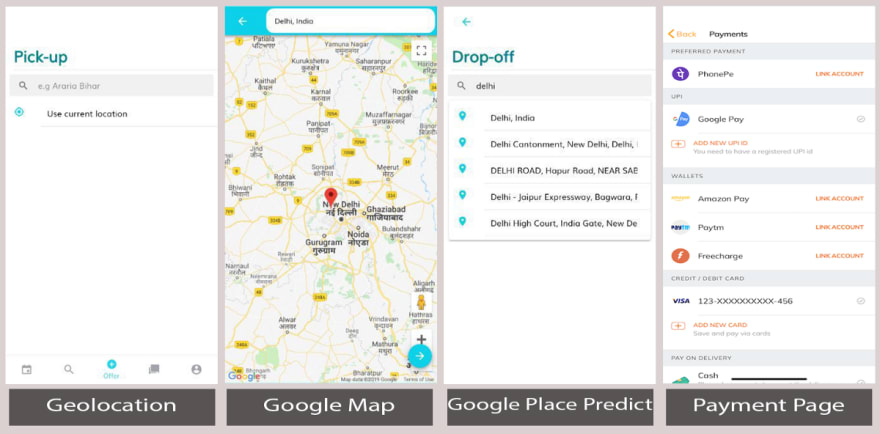
Geolocation
This can be accessed by clicking on the pickup page or drop-off page on the find ride page. This allows the app to get your current location by clicking on the current location button.
Google Map
Google map shows us the current location of the app by clicking on the current location or by filling the input field in the pickup or drop location. This shows us the exact point of our location on the map.
Google Place Prediction
As mentioned earlier in the geolocation, by filling the input text in the set pickup page or drop-off page, this will show you some predicted locations according to your filled entries in the text input field. By selecting any predicted location it will store that location and show that on Find a ride pages’ pickup and destination location individually.
Payments
You can have a payment page like above for the payments of the rides with the help of some developer. You can implement the payments by using any one or multiple of the following for your rides…
- Ionic PayPal
- Ionic Stripe
- Ionic in-app purchase
- Ionic Apple Pay and Android Pay
- Ionic Razorpay
- PhonePe
- GooglePay
- AmazonPay
Conclusion
In this article, we get to know in quick fashion about all the screens and features of Ionic 4 Carpooling App Starter from Enappd. Carpooling is one of the most booming and trending app based business opportunities. Keeping in mind the positive environmental benefits of this model, more people are getting inclined towards carpooling services, it is also pocket-friendly at the same time. This starter can be a very useful and time saving starting point for freelancers and so provide great value at a fraction of the price if one goes for the custom development from the scratch.
— — — — — — — — — — — — — — — — — — — — — — — — — — -
Buy “Ionic 4 Carpooling App Starter: Carpool” today!!
— — — — — — — — — — — — — — — — — — — — — — — — — — -


Top comments (0)