Integrating Ionic 5 Application with Kommunicate Bot

Integration of a Bot with the mobile application is one of the most interesting topics we have written on. Many of the developers need to integrate a Bot with the apps for proper handling of customers. Bots can help us reduce staff requirements.
You could integrate a customer support chatbot in your business to cater to simple queries of customers and pass on only the complex queries to customer support agents. Humans react to others based on their moods and emotions, so bots can’t completely replace humans. But can improve the overall efficiency of response.

In this tutorial, we will integrate the Kommunicate bot service with the Ionic 5 Angular application and we can facilitate the user with some prebuild or custom builds Bots using kommunicate.io . First, create an account on this service, and keep that credential with you as it will help you to integrate the Bot.
What is Kommunicate.io?
Kommunicate is the intelligent chat-based support, which provides you the bots or the custom chat windows where you can provide support to your customers. Kommunicate provides the complete solution, As it provides the dashboard which can help us to look at the stats of support we have provided.

The dashboard shows the Incoming / Open / Resolved Conversations, that have been done with the customers. This platform also works as a team management tool, it helps us to assign the conversations between the teammates (i.e. if you use customer support, not the bot service). Below is the Conversations Tab :-

The above is a Resolved Conversation that has been initially assigned to ChatBot and later handled by Human. We have the option that helps us to include both ChatBot and human support. Using this Platform we can list the users which are using the chat services or logged in to the applications. Below is the Users tab:-

The above Users tab helps us to manage the conversations of the User by assigning them to the teammates. And now the most interesting part of our blog is here, we will configure the prebuild Kompose Bots. Below is the Bot Integration Tab:-

We can configure the prebuild bot using Kompose. I f you want to integrate your own Bot — one can be built using IBM Watson or Amazon Lex or any other Bot service. For this tutorial, we will configure our prebuild Bot using Kompose. In the below steps, we will configure the Kompose Bot:-
Step 1:- Initialize your Kompose Bot and enter the basic details:-

In the first steps, we will give a name to our bot with an awesome avatar and we can choose a speaking language for our Bot. Once you save and proceed then you will be asked a question “Should bot hand off the conversation to a human team member when it is unable to recognize any user query”. For now, we will disable this feature:-

Our Basic setup is complete and we will proceed to the advanced setup of Bot like questioning and answering of Bot with Customers. Using Kompose we can set up the Bot in 4 parts:-
- Welcome Message:- This is the first part in which we provide the bot with the inviting/welcoming message. The great part is that we can suggest the reply option to the Customers. So that they don’t have to type.

2. Setting up questions and answers:- We can design our own questions and answers that our Bot can face by the customers. And you can also add buttons or texts so that users can reply easily by clicking buttons. You can design any number of questions and answers you want so that the bot can answer more and more questions.

3. Setting Response on Unknown User Input:- You can set a common response for all unmatched Customer Input. To that, you have to simply add up the response in the below tab:-

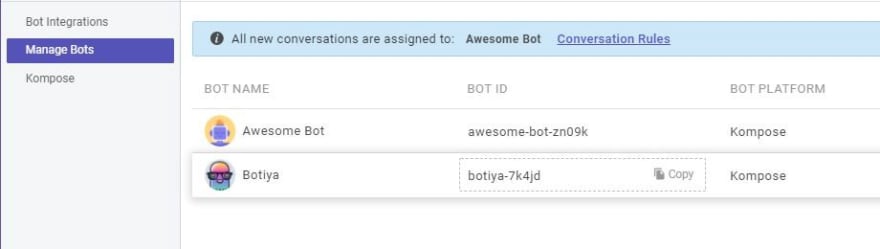
Now your awesome Bot is all ready to respond to all of the customer queries, if you want to configure more you can do that by adding more questions and features to it. Finally, you will get your Bot ID (that will be used in our application) in the Manage Bot Tab:-
Now we can start integrating our Bot with the Ionic 5 Angular application using some plugins and packages.
Integrating kommunicate Bot with Ionic Application
To integrate the Ionic 5 application with Kommunicate, we have to first install the packages and plugins that are required in this procedure. To install the packages run the below commands:-
$ ionic cordova plugin add kommunicate-cordova-plugin
$ npm install @ionic- **native** /kommunicate
And if you are using a capacitor you can this plugin by running the below command:-
$ npm **install** kommunicate-cordova- **plugin**
$ npx cap **sync**
$ npm **install** @ionic- **native** /kommunicate
Now once the packages and plugins are installed, now we have to grab our APP_ID from Kommunicate Dashboard. APP_ID is a unique application ID assigned to your Kommunicate account — remember, APP_ID is different from BOT_ID. You can have many BOT_IDs in 1 account. Finally, we start to Code our own ChatBot.

So first of all we will Import [Line 9] and Inject [Line 20] the Kommunicate Module in the app.module.ts file under the Providers:-
We will move to the Home page, where we will implement our main Logic.
There are two ways the bot can be integrated:- (First under the difference b/w these two methods)
The Different between above two methods :-
First method only have Chat Support (Human to Human interaction), Chat window is provided by the Kommunicate Plugin and Admin can interact with App users through Kommunicate Dashboard.
In Second, we included a Bot (Human to Bot interaction), where we created a Bot in Kommunicate Dashboard and trained it by some question and answers.
- The Custom Chat Window:- In this part, a normal chat window is generated by the Kommunicate Module using which the App Admin and Customer will interact (i.e. the Customer will write up through the Chat window, and App Provider/Owner will reply through Kommunicate dashboard).
This method is more of a Support Chat window only , where humans is interacting with humans. One side is handled by Admin (using Kommunicate Dashboard) and another side is handled by Application User. [There is no interaction with Bot]
Now First Import [Line 3] Kommunicate Module to the Home Page and then Inject [Line 20] it into the Page. At this place the APP_ID (i.e. we have copied from Dashboard).
In the above code, we have used the APP_ID [Line 15] and LoggedIn user data to start the custom conversation with the Owner. By calling the initateBot () function [Line 22] the Chat Window will launch up and you can interact with the App Provider/Owner.

Above the screen is the Chat Window screen with Custom chat, where customers can chat with the Humans executives. And executives can respond from the Kommunicate Dashboard like below:-

And keep in mind that, you must save the clientKey (response from conversationBuilder Function [Line 25 in home.page.ts])in the Database or in local storage so that the chat window can be initiated with the same user data. Here Client Key is unique for every user that logs in and chats with Admin. And that’s it for the custom chat window.
2. The ChatBot Window:- In this chat window we will interact with our own Awesome chatBot that we have created through Kompose. To integrate that we have made a few changes to the above Home PageCode.
The only change that has been done is in the Configuration [Line 18] (i.e. change in conversationObject ). In this, we have used the botId attribute that will help us to include our ChatBot in chat windows. You can change the botId to change the Bot used in the Application.

I have tested My Botiya Bot in place of Awesome Bot, You can test any of your bots by changing the BotIds. And If you want to take over / hand off your Bot and assign it to your teammate you can do it from the dashboard Conversations section.

There we can assign the Bot chat to a teammate by switching between the assign to tag. So that's it, this way you can easily integrate your ChatBot with your Ionic 5 application.
Conclusion
So In this tutorial, we have learned how we can integrate ChatBot with our Ionic 5 application. Now you can add this feature to your awesome application which will benefit you in many ways and your Customers will be happy with your services. If you want to explore more about other features, you can go to our Blogs.
Next Steps
If you liked this blog, you will also find the following Ionic blogs interesting and helpful. Feel free to ask any questions in the comment section
- Ionic Payment Gateways — Stripe | PayPal | Apple Pay | RazorPay
- Ionic Charts with — Google Charts| HighCharts | d3.js | Chart.js
- Ionic Social Logins — Facebook | Google | Twitter
- Ionic Authentications — Via Email | Anonymous
- Ionic Features — Geolocation | QR Code reader| Pedometer
- Media in Ionic — Audio | Video | Image Picker | Image Cropper
- Ionic Essentials — Native Storage | Translations | RTL
- Ionic messaging — Firebase Push | Reading SMS
- Ionic with Firebase — Basics | Hosting and DB | Cloud functions
Ionic React Full App with Capacitor
If you need a base to start your next Ionic 5 React Capacitor app, you can make your next awesome app using Ionic 5 React Full App in Capacitor

Ionic Capacitor Full App (Angular)
If you need a base to start your next Angular Capacitor app , you can make your next awesome app using Capacitor Full App
Ionic Full App (Angular and Cordova)
If you need a base to start your next Ionic 5 app, you can make your next awesome app using Ionic 5 Full App


Top comments (0)