
You might have seen the delivery guys taking your signature on the phone, or someone scribbling their handwriting on their phone. It looks pretty cool, and in this post, you’ll learn how to integrate a Signature pad functionality in Ionic 5 apps and PWA.
By signing on your phone you can do (among many) following things
- Sign on a document and email/share
- Scribble your signature and save as an image for later
- Get signature from a user on delivery / trip completion etc.

We’ll implement this functionality in an Ionic 5 Angular Cordova app. We will learn how to sign on the phone and then save the signature in phone’s gallery as a png.
What is Ionic ?
(Just for the sake of beginners)
Ionic is a hybrid mobile app development SDK. It provides tools and services for developing hybrid mobile apps using Web technologies like CSS, HTML5, and Sass. Apps can be built with these Web technologies and then distributed through native app stores to be installed on devices by leveraging Cordova or Capacitor environment.
So, in other words — If you create Native apps in Android, you code in Java. If you create Native apps in iOS, you code in Obj-C or Swift. Both of these are powerful but complex languages. With Ionic you can write a single piece of code for your app that can run on both iOS and Android and web (as PWA), that too with the simplicity of HTML, CSS, and JS.
Signature Pad functionality
Scribbling signature pad is not at all different from writing on an image, which we all do regularly in our Whatsapp, Facebook etc. image shares. Essentially, we create a Canvas in the app, and let the user draw on the Canvas.
Canvas is a very powerful tool in HTML/Javascript. You can draw/scribble on a designated area, resize it, change colors, put a picture in background and write on it etc. Canvas can even cater to PDF and other files, but we’ll stick to images for this post.
Due to Ionic being platform agnostic, there are different types of Ionic Apps you can build for same functionality. Most popular ones are :
- Front-end: Angular | Build environment : Cordova ✅
- Front-end: Angular | Build environment : Capacitor
- Front-end: React | Build environment : Capacitor
- Front-end: React/Angular | as PWA ✅
Canvas can be implemented in any of the above, but for our example I’m choosing Angular Cordova framework. Besides having dedicated plugins for a lot of integrations, Cordova also has a huge community backing.
We’ll implement the Signature functionality in both PWA and apps.
Structure of post
As always, I’ll go step-by-step in the post. If you are an experienced dev, you can just skip over the known stuff and jump to the section you need
Step 1 — Creating a basic Ionic 5 Angular app
Step 2— Install required plugins
Step 3— Implement Signature pad functionality on web
Step 4— Save the created signatures in Android gallery
Step 5— Test on Android
Let’s dive right in !

Step 1— Create a basic Ionic Angular app
First you need to make sure you have the latest Ionic CLI. This will ensure you are using everything latest. Ensure latest Ionic CLI installation using
$ npm install -g ionic@latest
(My node version at the time of writing the blog is 12.14.0)
Creating a basic Ionic-Angular app. Start a basic tabs starter using
$ ionic start ionicSign tabs --type=angular --cordova
The --type=angular told the CLI to create an Angular app, not a React app !!
Run the app in browser using
$ ionic serve
You won’t see much in the homepage created in the starter. I have modified the homepage a little to test our Signature functionality. To make wider space for signatures, I have kept the orientation landscape.
My homepage looks like this
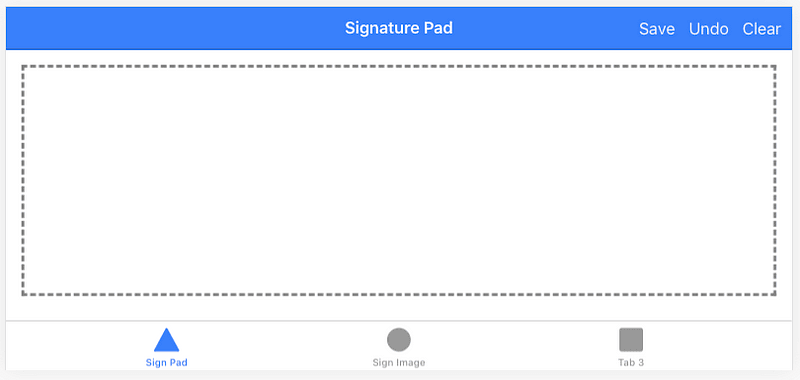
HTML code for tab1.page.html is given in Step 3
Step 2 — Install required plugins
Signature Pad npm package
We’ll use the Javascript signature_pad package for our functionality. Over the years, many angular and ionic plugins have used this package to create signature pad plugins, but at the time of this post none of them is actively maintained. So it is better to use the core package itself.
$ npm install --save signature_pad
Import the plugin in your tab1.page.ts
import SignaturePad from 'signature_pad';
In tab1.page.html , we’ll create a canvas element,
<canvas class="signature-pad-canvas" #canvas width="900" height="400" style="touch-action: none;"></canvas>
which can then be referenced in the JS file with
export class Tab1Page implements OnInit, AfterViewInit {
@ViewChild('canvas', { static: true }) signaturePadElement;
.....
The signature pad is rendered with
this.signaturePad = new SignaturePad(this.signaturePadElement.nativeElement);
Base64toGallery Plugin
Our Canvas signature pad will output the signature in png format, but in base64 encoding. To save this in phone’s gallery, we can either
- Save the base64 data as a blob using FileWrite (you can use it in PWA), OR
- Use base64toGallery Ionic Native Plugin, which does the above for us in an easier fashion
Install the plugin using
$ ionic cordova plugin add cordova-base64-to-gallery
$ npm install @ionic-native/base64-to-gallery
Import the plugin in app.module.ts
import { Base64ToGallery } from '@ionic-native/base64-to-gallery/ngx';
@NgModule({
 ...
 providers: [
  ...
  Base64ToGallery,
  ...
})
Import the plugin in tab1.page.ts
import { Base64ToGallery } from '@ionic-native/base64-to-gallery/ngx';
constructor(private base64ToGallery: Base64ToGallery){}
Android Permissions Plugin
To save images in Android gallery, you need permission to read/write external storage. Android Permissions plugin will help ask the user for permissions. Install the plugin using
$ ionic cordova plugin add cordova-plugin-android-permissions
$ npm install @ionic-native/android-permissions
Import the plugin in app.module.ts
import { AndroidPermissions } from '@ionic-native/android-permissions/ngx';
@NgModule({
 ...
 providers: [
  ...
  AndroidPermissions,
  ...
})
Import the plugin in tab1.page.ts
import { AndroidPermissions } from '@ionic-native/android-permissions/ngx';
constructor(private androidPermissions: AndroidPermissions){}
Step 3 — Implement Signature pad functionality
Following the above steps, you’ll have a canvas where you can scribble. Here’s the code for tab1.page.html and tab1.page.ts . We’ll go walk through the code step by step
tab1.page.html
tab1.page.ts
- First, we referenced the
canvaselement from the HTML assignaturePadElement, using@ViewChild -
init() — In this function, we are setting
widthandheightfor the signature pad area. This is called on page load, as well as on each window resize - In
ngAfterViewInit, we create the SignaturePad and set the pen color to a specific RGB value. At this point, you can start scribbling text or your signature on the screen - clear() — method clears the canvas of all content
- undo() — method clears out the very last stroke from the canvas
- In the save() method, we use
toDataURL()This method outputs the canvas content as an image in base64 encoded data. You can then go ahead and save this in gallery using base64ToGallery plugin’sbase64ToGallerymethod
Note :toDataURL()method outputs PNG format as default. You can giveimage/jpegas an argument to get JPEG data as well. However, thebase64ToGalleryplugin is explicitly coded only to handle PNG data. Hence, if you try to save JPEG data from the canvas, the data will not be saved.
Here’s how the signature pad works

So we have our own signature pad functionality built in Ionic 5 web app, with Undo and Clear functionalities.
The Save() method will not work on ionic serve as it is dependent on a Cordova plugin. Once you build the app in Android (Step 5) , when you try to save the signature in gallery, you’ll see an error
error in saving image
(Well ! that’s very informative !!)
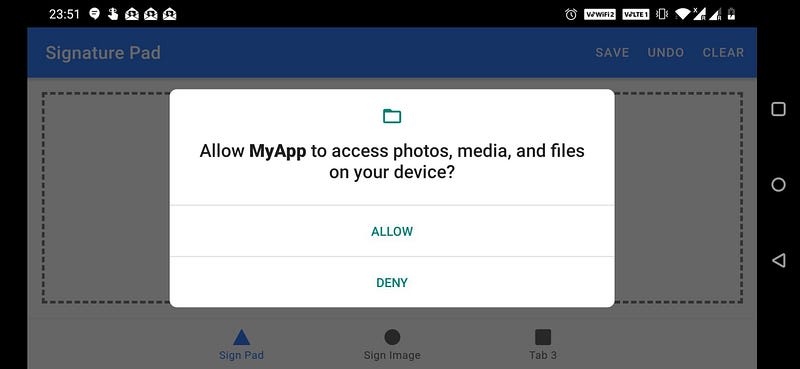
This happens because we don’t have enough permission to write to the device’s storage.
Step 4 — Save signatures in Android gallery
To get permission to write on device’s storage, we’ll use Android Permissions plugin. Install and import the plugin as shown in Step 2. After that, add/modify the following in your tab1.page.ts file
The save() function now first checks if the app has permission to save on device storage. If not, it calls requestPermissions function , where the app requests a permission using a user prompt.
Once the permission is granted, the image is saved in device’s gallery. 🎉
The Gotcha: If you’re keeping your signature pen color black, and saving image in gallery, make sure you gallery’s background color is not black. If it is, you won’t see anything but black in the image in gallery, because it is a PNG with transparency. Similar result for other color match.
Step 5 — Test in Android
If you haven’t already, build the app for a test run in Android using
$ ionic cordova platform add android
$ ionic cordova run android
This will build and run the app in your default emulator or a connected device.
Remember, you can test the ‘Save to gallery’ functionality only on a device.
Here’s how the app functions in an android device

Congrats ! you just learnt how to sign in an Ionic 5 app, and save it in the gallery as PNG.
Conclusion
This post describes how to implement a signature pad functionality in Ionic 5 apps and PWA. You can save these signatures as PNG and use those at a later time. You can also load any image in the canvas and mark/write over the image. This can work on PDF content as well, but that is for a later post.
Happy Coding !
Next Steps
If you liked this blog, you will also find the following blogs interesting and helpful. Feel free to ask any questions in the comment section
- Ionic Payment Gateways — Stripe | PayPal | Apple Pay | RazorPay
- Ionic Charts with — Google Charts | HighCharts | d3.js | Chart.js
- Ionic Social Logins — Facebook | Google | Twitter
- Ionic Authentications — Via Email | Anonymous
- Ionic Features — Geolocation | QR Code reader | Pedometer| Signature Pad
- Media in Ionic — Audio | Video | Image Picker | Image Cropper
- Ionic Essentials — Native Storage | Translations | RTL
- Ionic messaging — Firebase Push | Reading SMS
- Ionic with Firebase — Basics | Hosting and DB | Cloud functions
Ionic React Full App with Capacitor
If you need a base to start your next Ionic 5 React Capacitor app, you can make your next awesome app using Ionic 5 React Full App in Capacitor
Ionic Capacitor Full App (Angular)
If you need a base to start your next Angular Capacitor app, you can make your next awesome app using Capacitor Full App

Ionic Full App (Angular and Cordova)
If you need a base to start your next Ionic 5 app, you can make your next awesome app using Ionic 5 Full App


Top comments (0)