
In this post, you’ll learn how to implement the famous (and infamous) In-App Purchase functionality in iOS apps using Ionic 4.
Complete code of this post can be found in the Github repository ionic-4-in-app-purchase
I have another post explaining the In-app purchase implementation for Android apps.
Read the ** marked sections only if you haven’t gone through the Android post for In-app purchase, otherwise ignore these ** sections.
What is In-app purchase, again ? *
In-App Purchase is the functionality that lets you purchase items from within your mobile apps. These are different from other payment gateways in the sense that the payment is taken care of by Google Play store or Apple App store itself. These one-time purchases are money in the bank for app developers, while the app store also takes its share.
Types of In-app purchase
There are four types of products / purchases available using In-app purchase method
- Consumable — Consumable allow the user to buy a certain item once. Often used in game apps, one-time in-app purchases can give you added functionality like extra characters, extra life, new powers etc. This purchase can be done again and again, e.g. You can buy more and more lives for your game character.E.g. Buying a life in Candy Crush ?
- Non-Consumable — This type of product can be bought only once, and it never expires. This can be used for something like a premium membership in the app, or you can say “unlock” featureE.g. Getting a premium membership of an app for lifetime
- Non-renewable Subscriptions — Subscription is different from one time payment, it is supposed to run for a period of time and then it expires. Non-renewable Subscription expires after a set period of time and does not renew automatically. E.g. Premium membership of Netflix (Did they become auto-renewable ? I need to check my credit card bills)
- Auto-renewable Subscriptions — Auto-renewable Subscription expires after a set period of time and renews automatically. This is the most preferred choice for subscription based apps. But this option also faces the maximum scrutiny from app store reviews.E.g. Premium membership of Tinder
Why is In-app purchase so important ?
In-app purchases can give you major advantages in terms of sales. Following are few reason why In-app purchases are so important
- Creative Control — While most of the payment gateways require you to have the payment UI a certain way, In-app purchases allows you to be as creative as you want in terms of UI and UX. Because everything is integrated inside the app itself, the payment becomes a part of the app, rather than a third-party service.
- Freemium model — You allow the user to “try” the free version before investing even a few cents into the rest of your app and when they are convinced to upgrade no additional trip into the app store is required. This way your user engagement increases, and more users convert to paid ones.
- Less user interaction, better UX — In-app purchase only takes a single tap. Sending the user to the App/Play Store to buy other products requires at least 2 or more taps. Even more if you integrate payment gateways in the app
- Allows variety of options — As we discussed above, the four types of in-app purchase products can provide a wide variety of product and add-on experience for your users. Creating the same experience using a third-party payment gateway can be cumbersome for developers
- Reliable Google and Apple ecosystem — Since the in-app purchase is offered by Google and Apple themselves, it can be assumed to be of highest quality. Any app containing in-app purchase is reviewed very closely before being allowed to published. So users can rest assured that these apps are least risky in terms of payment issues etc.
- Regularly updated — Since the in-app purchase is an App/Play store feature itself, it can be safely assumed that these functionalities will be regularly updated by the platforms as iOS and Android versions change. While the same cannot be said about third-party services, which struggle to update when a new version of Android / iOS is released in market
What is Ionic 4?
You probably already know about Ionic, but I’m putting it here just for the sake of beginners. Ionic is a complete open-source SDK for hybrid mobile app development created by Max Lynch, Ben Sperry and Adam Bradley of Drifty Co. in 2013. Ionic provides tools and services for developing hybrid mobile apps using Web technologies like CSS, HTML5, and Sass. Apps can be built with these Web technologies and then distributed through native app stores to be installed on devices by leveraging Cordova.
So, in other words — If you create Native apps in Android, you code in Java. If you create Native apps in iOS, you code in Obj-C or Swift. Both of these are powerful but complex languages. With Cordova (and Ionic) you can write a single piece of code for your app that can run on both iOS and Android (and windows!), that too with the simplicity of HTML, CSS, and JS.
Structure of the post
I will go ahead in step-by-step fashion so you can follow easily
- Setup your app in iOS App Store
- Setup In-app purchase on App Store Connect
- Create a basic Ionic 4 app
- Setup the In-App purchase plugin
- Test the app on iOS device
- Detailed study on In-app purchase functions
- Keep in mind !
- Subscriptions and Receipt validations
Step 1 — Setup your app in App Store
You don’t need to do this step if you already have an iOS app and identifier registered.
First of all, you will need to become an iOS developer on App Store. This requires a membership, worth USD 99 , and it needs to be renewed every year (unlike Google Play’s one time payment).
Apple Developer Console takes care of certificates, identifiers etc. App Store Connect takes care of all the app side stuff.
Apple Developer Console Steps
Once you have your Apple developer account, login to https://developer.apple.com/account to access all your certificates and profiles.
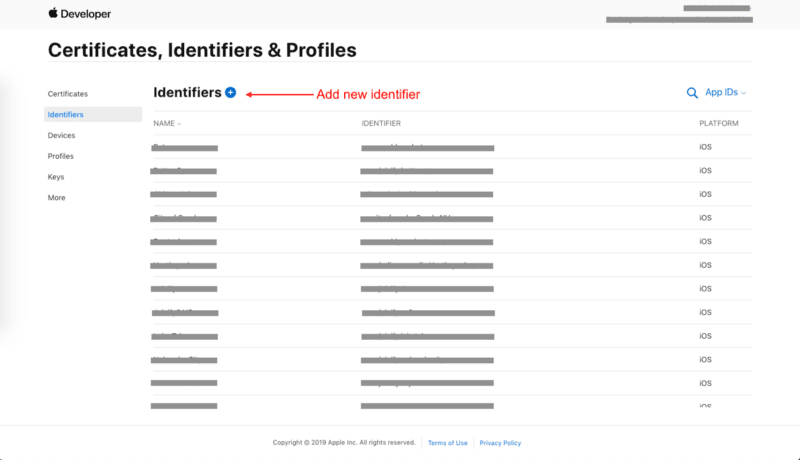
In the Developer console, create a new identifier for your app (if you don’t have one already). Identifier is the bundle ID of your app. This helps the App Store identify which app is connected to what in-app purchase products, essentially
<img class="graf-image" data-image-id="1VsX0JsiUtp5depN5Y2tNw.png" data-width="1364" data-height="491" alt="App store- Enter the bundle ID to create an identifier" src="https://cdn-images-1.medium.com/max/800/1*_VsX0JsiUtp5depN5Y2tNw.png">Also, you’ll see that In-app purchase features is pre-selected in the feature list.
Go ahead and register your identifier.
App Store connect Steps
Previously called, iTunes connect, this is the place where you will find all your apps uploaded, prepare app store listings, add in-app purchase products, beta test etc.
At this point, you have created an identifier in Apple developer console, but you’ll also need to create corresponding app in App Store Connect as well.
Log in to your App Store Connect account, go to My Apps. Add a new app for iOS from the + button

You’ll land on the app information page now. Next, we’ll create In-app purchase products.
Step 2 — Setup In-app purchase on App Store Connect
You can create in-app products in App Store Connect dashboard, even without uploading first build of the app (unlike Android, where you need to upload first APK to even add an in-app purchase product)
Go to Features tab → In-app purchases → Add new product using +
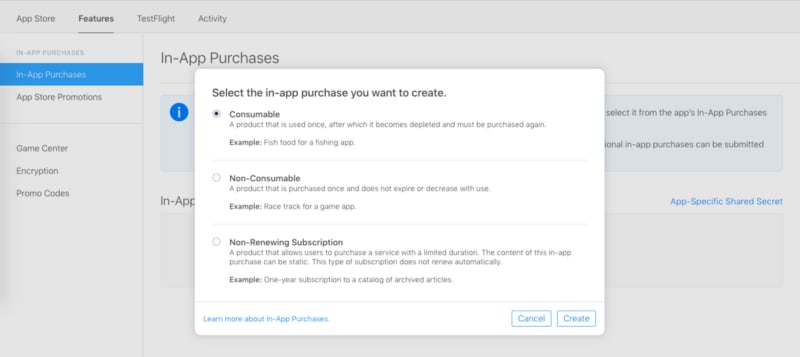
Let’s create a Consumable for now (which is the same as I did in Android blog).
- Create the product, then add name, description and a 1024x1024 JPG icon for the same
- Add Product ID, you’ll need this in your code
- Add a price for the product (minimum is $1)
- Add a screenshot and details at the bottom
- Make sure you check
Cleared for Sale
You’ll see a ready to submit on the top of the page. Don’t worry for now, we’ll handle that later.
You’ll see your product listed in the in-app purchases tab now.

Create iOS Sandbox Users
To test your In-App Purchase, you will need a “Sandbox” user account. Enter the “Manage users” section of AppStore Connect to create one (or more).
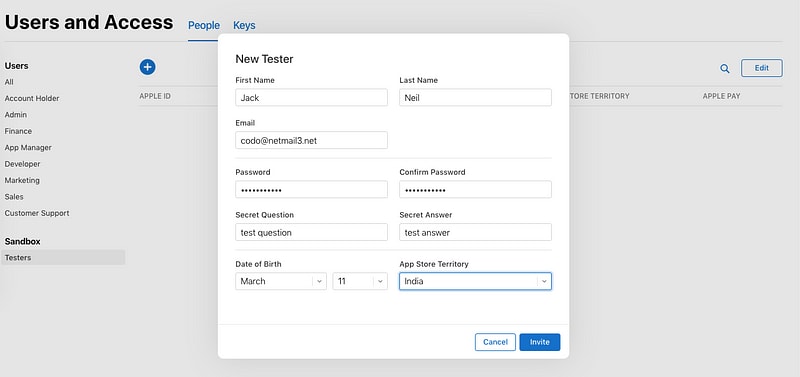
Note: that if you mistakenly use your test-user-account credentials to log in to a production environment on your test device (instead of in to your test environment), your account credentials become invalid and cannot be used as a test account again. If a test user have mysteriously stopped working, try creating a new Sandbox user.
Important : To be able to use iOS In-app purchase, you need to have all Tax and Banking information updated and approved in App Store Connect. Also, you’ll have to agree to all Apple agreements pending in Agreements, tax and banking section.

Step 3— Create a basic Ionic 4 app
I have covered this topic in detail in this blog.
In short, the steps you need to take here are
- Make sure you have node installed in the system (V10.15.3 at the time of this blog post)
- Install ionic cli using npm (my Ionic version is 4.7.4 currently)
- Create an Ionic app using
ionic start
You can create a blank starter for the sake of this tutorial. On running ionic start ionic-4-in-app-purchase blank , node modules will be installed. Once the installation is done, run your app on browser using
$ ionic serve
The app will launch on browser. You can go to Inspect → Device Mode to see the code in a mobile layout. You can create a basic layout for In-app purchase, or you can just use a simple button for all actions, doesn’t matter. All the real action will happen when we build the app for iOS on device. Here’s how my layout looks like (layout taken from Woocommerce Ionic Starter)
<img class="graf-image" data-image-id="1*IZmVqodx-ikRjddhUae1g.png" data-width="350" data-height="623" alt="Basic layout for in-app purchase sample app" src="https://cdn-images-1.medium.com/max/800/1*IZmVqodx_-ikRjddhUae1g.png">Step 4— Setup the In-App purchase plugin in app
To implement In-app purchase functionality, we’ll use the plugin cordova-plugin-purchase . This is also available as Ionic Native.
Install plugin
Install the plugin using
$ ionic cordova plugin add "https://github.com/j3k0/cordova-plugin-purchase.git#v9"
I am using the repository from Github directly, as this change is recently made and not available in npm
Once installed, include the module in your app.module.ts as well as in your page where you will implement in-app purchase
// app.module.ts
import { InAppPurchase2 } from '@ionic-native/in-app-purchase-2';...
  providers: [ InAppPurchase2 ]
...
and in your cart.page.ts
// cart.page.ts
import { InAppPurchase2 } from '@ionic-native/in-app-purchase-2';
...constructor(public platform: Platform, private store: InAppPurchase2) {...}
Implement plugin methods
In-app purchase works broadly in four steps
- Check if platform and store is ready
- Register your product with product ID (we’ll create product in Play Store in Section 5). Register multiple products if you have.
- Register handles for a particular product’s purchase. These handles are event listeners, which will listen if the purchase was successful, failed etc.
- Purchase — If above steps go fine, you can start the purchase flow, which will be handled by Google’s native in-app purchase UI. This will ask for authentication on your phone before purchase
Let’s me first print out the cart.page.ts file here, and then we’ll discuss the methods
Let’s go through the code step-by-step
-
Check for Platform ready — All store function will strictly run only inside Platform ready. If you don’t put your functions inside it, it can throw a
plugin not installederror - Register product — Registering a product basically validates the product with Play store if the product really exists, and if the type and ID of product is correct. Any purchase or refresh action should be performed only after registration
- Event handlers — There are several event handlers registered for different events of the purchase process. Let’s see the important ones
- loaded: Called when product data is loaded from the store
- updated: Called when any change occurred to a product
-
error: Called when an order failed. The
errparameter is an IAPError object - approved: Called when a product order is approved
- owned: Called when a non-consumable product or subscription is owned
- cancelled: Called when a product order is cancelled by the user
- refunded: Called when an order is refunded by the user
- registered: Called when product has just been registered
- valid: Called when the product details have been successfully loaded
- invalid: Called when the product cannot be loaded from the store
- initiated: Called when the purchase process has been initiated
- finished: Called when the purchase process has completed.
- expired: Called when validation find a subscription to be expired.
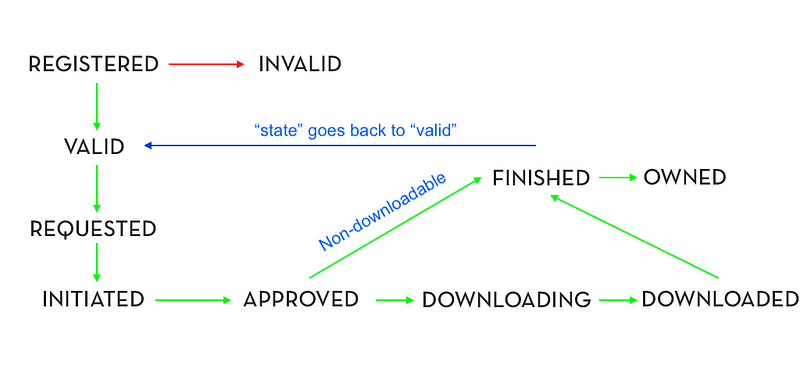
Each of these event can help you detect what the status of the purchase is. To understand the major events in the life-cycle, refer to the flow diagram below
4. Purchase product — The .order method starts the purchase process. This process will be successful only when the product is valid and successfully loaded on app start. On success, you’ll receive an object with product details.
Once the transaction is approved, the product still isn’t owned: the store needs confirmation that the purchase was delivered before closing the transaction.
To confirm delivery, you’ll use the product.finish() method.
5. Restore purchase — In an app where you use in-app products, you need to check every time if the user has the ownership (has purchased) of the product or not. E.g. you may remove ads in the app based on whether the user has purchased a premium membership.
This process is done by getting the details of the product after registering. If the user has purchased a particular product, the product will return owned: true in the details fetched by store.get('product_id') method. Accordingly you can take decision in the app.
Note: The product will return owned: true only for products other than CONSUMABLE . Consumable go back to valid state, and purchase can be verified by transaction details in product info
Step 6 — Test the app on iOS device
You cannot test the in-app purchase functionality on iOS simulator. A real device is required.
The major step, fingers crossed 🤞
Difference from Android
An iOS app DOES NOT NEED to be published to start testing in-app purchase. This is a major relief for iOS developers, as Android developers have to wait for their alpha/beta/internal testing version to be published before they could even start testing in-app purchase. But iOS will give you pain when you try to submit in-app purchases for production, but that’s for later.
Login as Sandbox User
In your device, log out if already have a login. Then login from your Sandbox user account. Remember that if you mistakenly use your test-user-account credentials to log in to a production environment on your test device (instead of in to your test environment), your account credentials become invalid and cannot be used as a test account again.
In case you made a “dummy” sandbox user, with a temp email like me, make sure you verify the user before testing in-app purchase.
Build the app
Build the app for iOS using
$ ionic cordova prepare ios
This will create the xcworkspace file for the iOS project. Open this file in Xcode, and
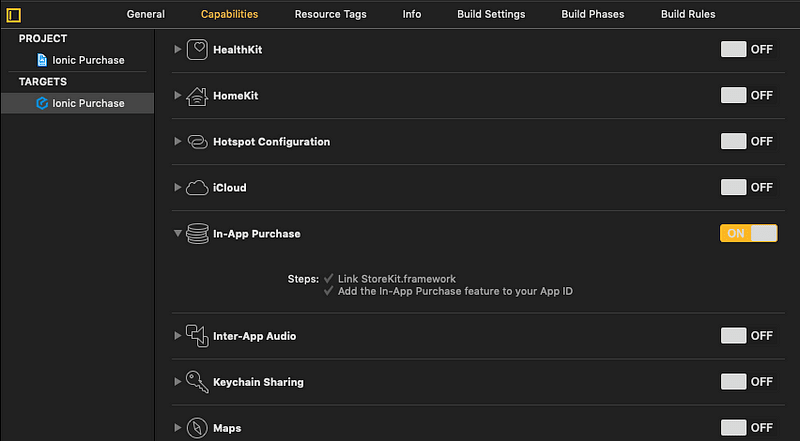
- Make sure your app bundle ID matches the one provided for In-app purchase app in App Store connect
- Make sure you have a valid certificate for development selected in Xcode
- Enable In-app purchase capability in app using Xcode
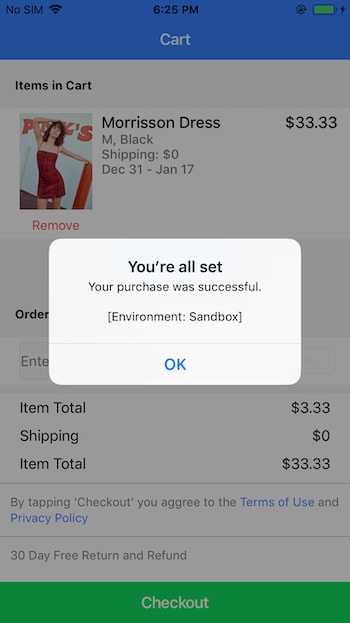
Test the app
Once you build the app in device, it’s straight away time for testing. Click the checkout button, and you’ll be asked for your account password (or finger print) to authorize the purchase. Once you do that, an alert will inform you of a successful purchase.

You don’t need to have a payment method added with your Apple account for this to work (another surprising relief from Apple ! ) 🍎 ✌️
Test Time Durations for Subscriptions
iOS makes it very easy to test subscriptions by providing a sample time duration for which the purchase stays valid. When testing auto-renewable in-app purchase subscriptions in the sandbox environment, the duration times will be compressed to allow for more streamlined testing. Additionally, a sandbox subscription will only auto-renew a maximum of 6 times. After the subscription has auto-renewed 6 times, it will no longer renew in the sandbox. The compressed duration times are as follows:
Actual duration      Sandbox duration
   1 week               3 minutes
   1 month              5 minutes
   2 months             10 minutes
   3 months             15 minutes
   6 months             30 minutes
   1 year               1 hour
Step 7— Detailed study of Store functions
We can now check how each method works in the flow.
- Register — When you register your product, and the product is successfully registered, you get a response like this from the plugin
[store.js] DEBUG: state: ionic_101 -> registered
Note : Even if you try to register a product not existing in App Store Connect , it will return the same message. But you will face error when trying to purchase such a product.
Just after register , you will receive only limited details of the product. Rest of the details will come when you refresh store
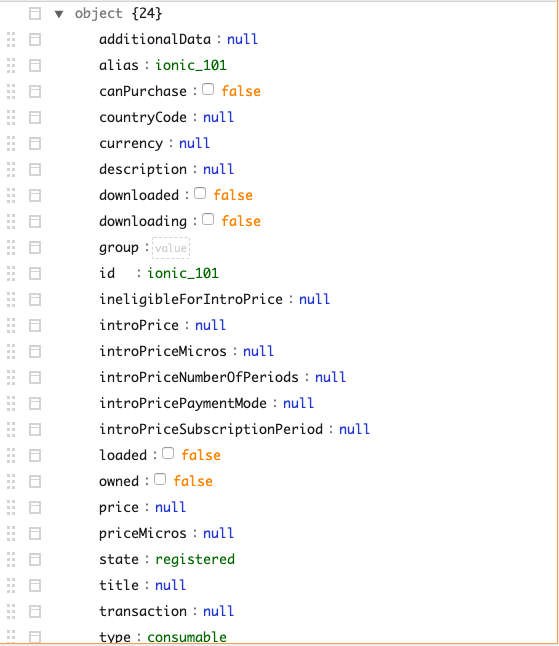
- Refresh — Refresh function refreshes the state of in-app products and fetches detailed information like following
{
  countryCode = IN;
  currency = INR;
  description = "This in-app purchase allows ad free app usage";
  id = "ionic_101";
  introPrice = "<null>";
  introPriceMicros = "<null>";
  introPriceNumberOfPeriods = "<null>";
  introPricePaymentMode = "<null>";
  introPriceSubscriptionPeriod = "<null>";
  price = "\U20b9\U00a079.00";
  priceMicros = 79000000;
  title = "Ad Free app";
}
> Refresh function fetches all the products from the store, and also reveals which registered product is valid and which is invalid, as shown in above console log.
> Refresh also fetches the previous purchase details that tells the app which products have been purchased.
> In the app, this detailed information of products can be fetched by product.get() method. This information can be used to know the exact status of the product’s purchase. Following is the extra response of product.get('ionic_101) method after Refresh (if you have purchased once) — it provides you with the transaction info, based on which you can take app decisions
"transaction":{
  "type":"ios-appstore",
  "id":"1000000565248780"
}
> Calling the product.get() method for ionic_102 will return a valid: false in details.
-
Handlers — Registering the handlers in the app after purchase of a product triggers the
approvedevent for me. In response, you get the same product info that we got fromproduct.get('ionic_101')method, where we get the transaction info of the product as well. This can help us figure out the status of the product’s purchase.Also, the product info containsowned: falsebecause CONSUMABLES return tovalidstate after purchase, while others go toownedstate - Purchase — Once a purchase is made successfully, you will get to know the success from the UI itself
But on the code level, there are few things happening →
- Immediately after purchase (in the
.then()oforder()), we receive the product data, but that is not the valid picture of the product status, so don’t use it for decision making. - After this,
updated()event is triggered, which provides following details of the product
Here, you can see the transaction object containing the transaction info. This confirm that the purchase is made. You can save this information in your database for future usage.
"transaction":{
  "type":"ios-appstore",
  "id":"1000000565248780"
}
- After this, the
approved()event is triggered, which is a signal that the purchase is successful. The data received in this trigger is as follows
> Notice, “state”: “valid” has now changed to “state”: “approved” . After transaction finishes, the state again goes back to valid . Once approved , you can consider the purchase to be complete, and save the transaction ID in your database
> Also, now there is a value in transactions array
Un-finished Purchases
If your app wasn’t able to deliver the content, product.finish() won't be called.
Don’t worry, the approved event will be re-triggered the next time you call store.refresh(), which can very well be the next time the application starts. Pending transactions are persistent.
Few important points
- When finished, a consumable product will get back to the
VALIDstate, while other will enter theOWNEDstate. So don’t put a condition onowned: trueforCONSUMABLE - Any error in the purchase process will bring a product back to the
VALIDstate. - During application startup, products may go instantly from
REGISTEREDtoAPPROVEDorOWNED, for example if they are purchased non-consumables or non-expired subscriptions. - Non-Renewing Subscriptions are iOS products only. Please see the iOS Non Renewing Subscriptions documentation for a detailed explanation.
Step 8 — Subscriptions and Receipt validations
All this trouble has been taken to test the in-app purchase consumables. Subscriptions work very similar way till purchase, but a server receipt validation is mandatory for Subscriptions.
When the receipt validator returns a store.PURCHASE_EXPIRED error code, the subscription will automatically loose its owned status.
Typically, you’ll enable and disable access to your content this way.
this.iap2.when("my_subcription").updated((product: IAPProduct) => {
  if (product.owned)
    // serve the app with subscription
  else
    // serve the app without subscription
});
For more details on Receipt validation, read the documentation provided by Ionic.
Conclusion
In this post we learnt how to implement the In-App purchase feature in iOS apps. We also tested the app in an iOS device and understood what all the events and methods mean.
It is a long a meticulous feature where a lot of things are required to be done correctly. But it’s a very stable feature, which once implemented correctly, will not cause you future troubles.
Complete code of this post can be found in the Github repository ionic-4-in-app-purchase
Next Steps
Now that you have learned the implementation of In-app purchase in Ionic 4, you can also try
- Ionic 4 Payment Gateways — Stripe | PayPal | Apple Pay | RazorPay
- Ionic 4 Charts with — Google Charts | HighCharts | d3.js | Chart.js
- Ionic 4 Social Logins — Facebook | Google | Twitter
- Ionic 4 Authentications — Via Email | Anonymous
- Ionic 4 Features — Geolocation | QR Code reader | Pedometer
- Media in Ionic 4 — Audio | Video | Image Picker | Image Cropper
- Ionic 4 Essentials — Native Storage | Translations | RTL
- Ionic 4 messaging — Firebase Push | Reading SMS
- Ionic 4 with Firebase — Basics | Hosting and DB | Cloud functions
If you need a base to start your next Ionic 4 app, you can make your next awesome app using Ionic 4 Full App

Top comments (0)